Earlier this year I went with the family to New York for some relaxation. Talking about relaxing and New York in the same sentence seems rather contradictory, but I’ve never been a guy who can lay on the beach and do nothing for more than a minute. Anyway, it got me away from my normal busy work and I got to see some Broadway musicals.
Of course, I arranged to have a whole morning by myself to visit the garment district and do some serious fabric shopping. No shopping trip should miss out on B&J Fabrics, and I made it my last stop. The two times I’ve been there I’ve always felt overwhelmed by the amount of nice fabrics I want to bring home.  While looking at the wall of rolls with samples, trying to find an interesting pattern, I saw this little piece of cloth that looked like a cityscape. It was a really small print, but I thought it could make an interesting pattern. Much to my surprise it was a complete border print. And when I saw it I knew I wanted it. Vibrant colours, interesting pattern.
Now I had a different problem. I know I need about 3 yards of 46″ wide fabric for a shirt. But that is if I cut it out with the pattern pieces oriented to the warp of the fabric. With this print, I would have to orient them to the weft, 90 degrees rotated. I had never done this and had no clue what this would mean for the amount of fabric I would need. I did know that I would never forgive myself if I left the fabric here, or if I didn’t get enough. Chest circumference is 40 inches, a little over a yard. That would be the front and back pieces. Two sleeves can be cut from a 45 inch wide fabric, so another yard or so. Then I need space to manoeuvre the pattern pieces around to align them the way I want. So let’s double that to four yards. I’m probably making a mistake here, so let’s add another yard. Before I could talk some sense into myself or look at the price, I told them I wanted 5 and a half yards of it. I think I suppressed the memory of what they said the total cost was, I honestly cannot recollect.
After months of gathering enough courage, I washed it and cleared the kitchen island to get a good look at how I could position the pattern pieces on the fabric.
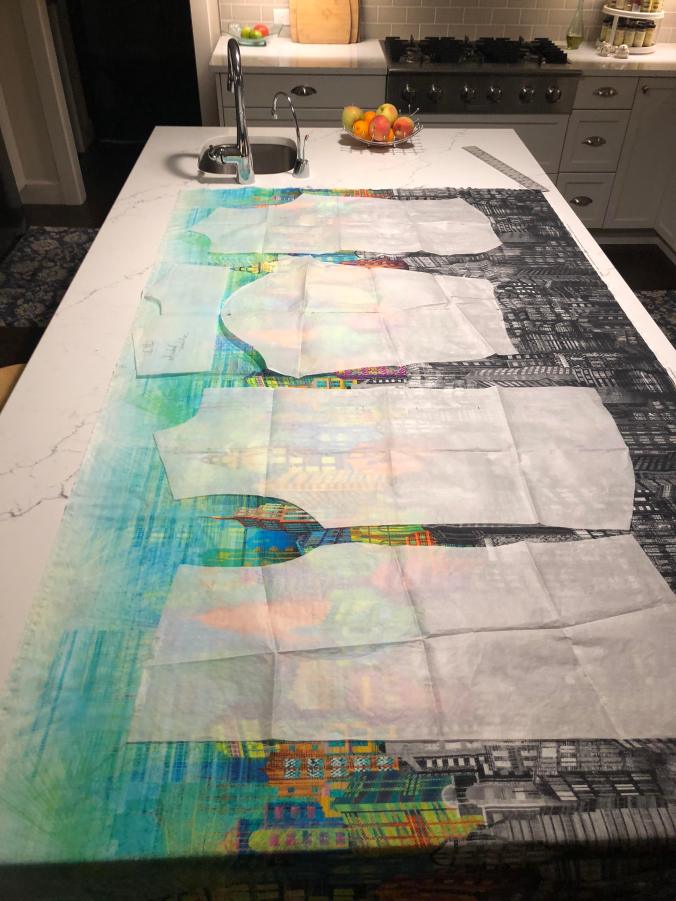
To make absolutely sure, I traced another front pattern piece. The cityscape pattern would have to flow from one side to the other, and figuring that out would be easier if I could just lay the pieces on the fabric. Now I had to decide which parts I wanted to make sure I would include on the front, what should be the middle of the shirt, and how high the black parts would have to be. I normally wear my shirts tucked into my pants, and I would want some of the monochrome parts to be visible. The sleeves would have to be adjusted to that decision, so that they would match horizontally.

Although you can see the back yoke piece situated on the fabric in the photo above, in the end the layout I chose didn’t allow me to use that part for it. The yoke had to match the back piece, and the colour difference between that part and the top of the back was enough to have me look for a different solution. None was readily available, and I opted to go for a different solution; make the yoke out of separate pieces. It is made out of three pieces, allowing the colours to blend as well as I could arrange them. The inside yoke is just a piece of white cotton.
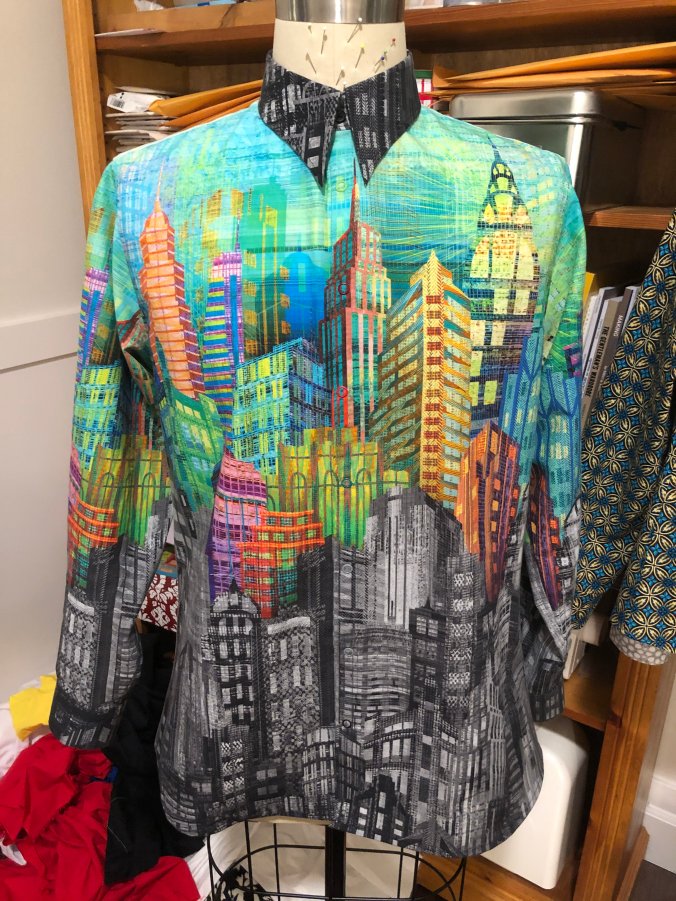
Then came the collar. I wanted the vertical orientation of the pattern to be reflected in the collar too, both in the front and in the back. That meant that the collar needed to be a three piece solution too. The dress form was a great tool to construct this. The seams were positioned as extensions of the shoulder seam, so they would be less noticeable.


I also changed the shape of the points a bit to make them more dramatic. Just before I started on the collar I read a blog post from Duane. In it, he referenced this video that has changed how I’m doing collars now. I’m still working on getting this technique as perfect as the guy in the video, but every one I made since has been a lot better than any I made before seeing that. It was a bit scary to try a new technique on something I was so invested in. Seeing how well the collar points came out took away all hesitation.
The rest of the shirt construction went smoothly. Just the standard adding sleeves, making flat-felled seams, add cuffs, and hem it.
And then; buttons. Oops. No buttons I had looked right. And I have a lot of different coloured shirt buttons. It occurred to me that no matter how long I would look, I would never be happy with a button on the front. I should have anticipated this. I should have created a hidden button placket. Too late now. I felt really down, having made such a stupid mistake. I felt like I couldn’t finish the shirt to my satisfaction.
Then I realised that there are other options. Ones I hadn’t tried yet; snaps! Some Google research led me to Snapsource, who had so many colours, there should be something I could use. The Color Sampler helped with finding the right ones. I was a bit worried about placing them and aligning the pattern. With buttons I just put the buttonhole in the right place, align the fabric and stick a needle and thread through the hole. Now the button will be exactly in the right spot. You can’t do that with a snap. Or so I thought. Turns out that since I used ring snaps, I can just push a pin through and then mark where the bottom part needs to go.


This worked really well on the test piece, and all the snaps on the shirt came together easily. Definitely something I need to remember next time I’m using snaps. I did use buttons for the collar and cuffs. Those being on a monochrome background made it easy to find appropriate ones.
And with that, the shirt had been completed. I’m tickled how well the project turned out. I’m not going to call it an art shirt, since I didn’t design the fabric, or did anything really special with the construction. Yet it will go to the special area of my closet, only to be taken out on special occasions.


Thanks for reading!

This shirt is absolutely gorgeous. I would never have thought of snaps, but they turned out to be the perfect solution.
LikeLiked by 1 person