Shirt and Tie

It seems like this has been a year of making facemasks and jeans. The former because we had to, and the latter because I didn’t seem to have that many. It just doesn’t feel right to dress the same as I would in the office, when I now just walk downstairs and sit in my sewing-room/home-office. So I really did need more jeans. And eventually I got tired of sewing masks and jeans, and needed to do something else.

Just as it happens I was browsing through Instagram and looked through older posts from @adamarnoldstudio. And I was somehow struck by this photo.

I thought it was silly clever. A sweater that pretends to be a caricature shirt.

And then I realized I could do something with that idea.

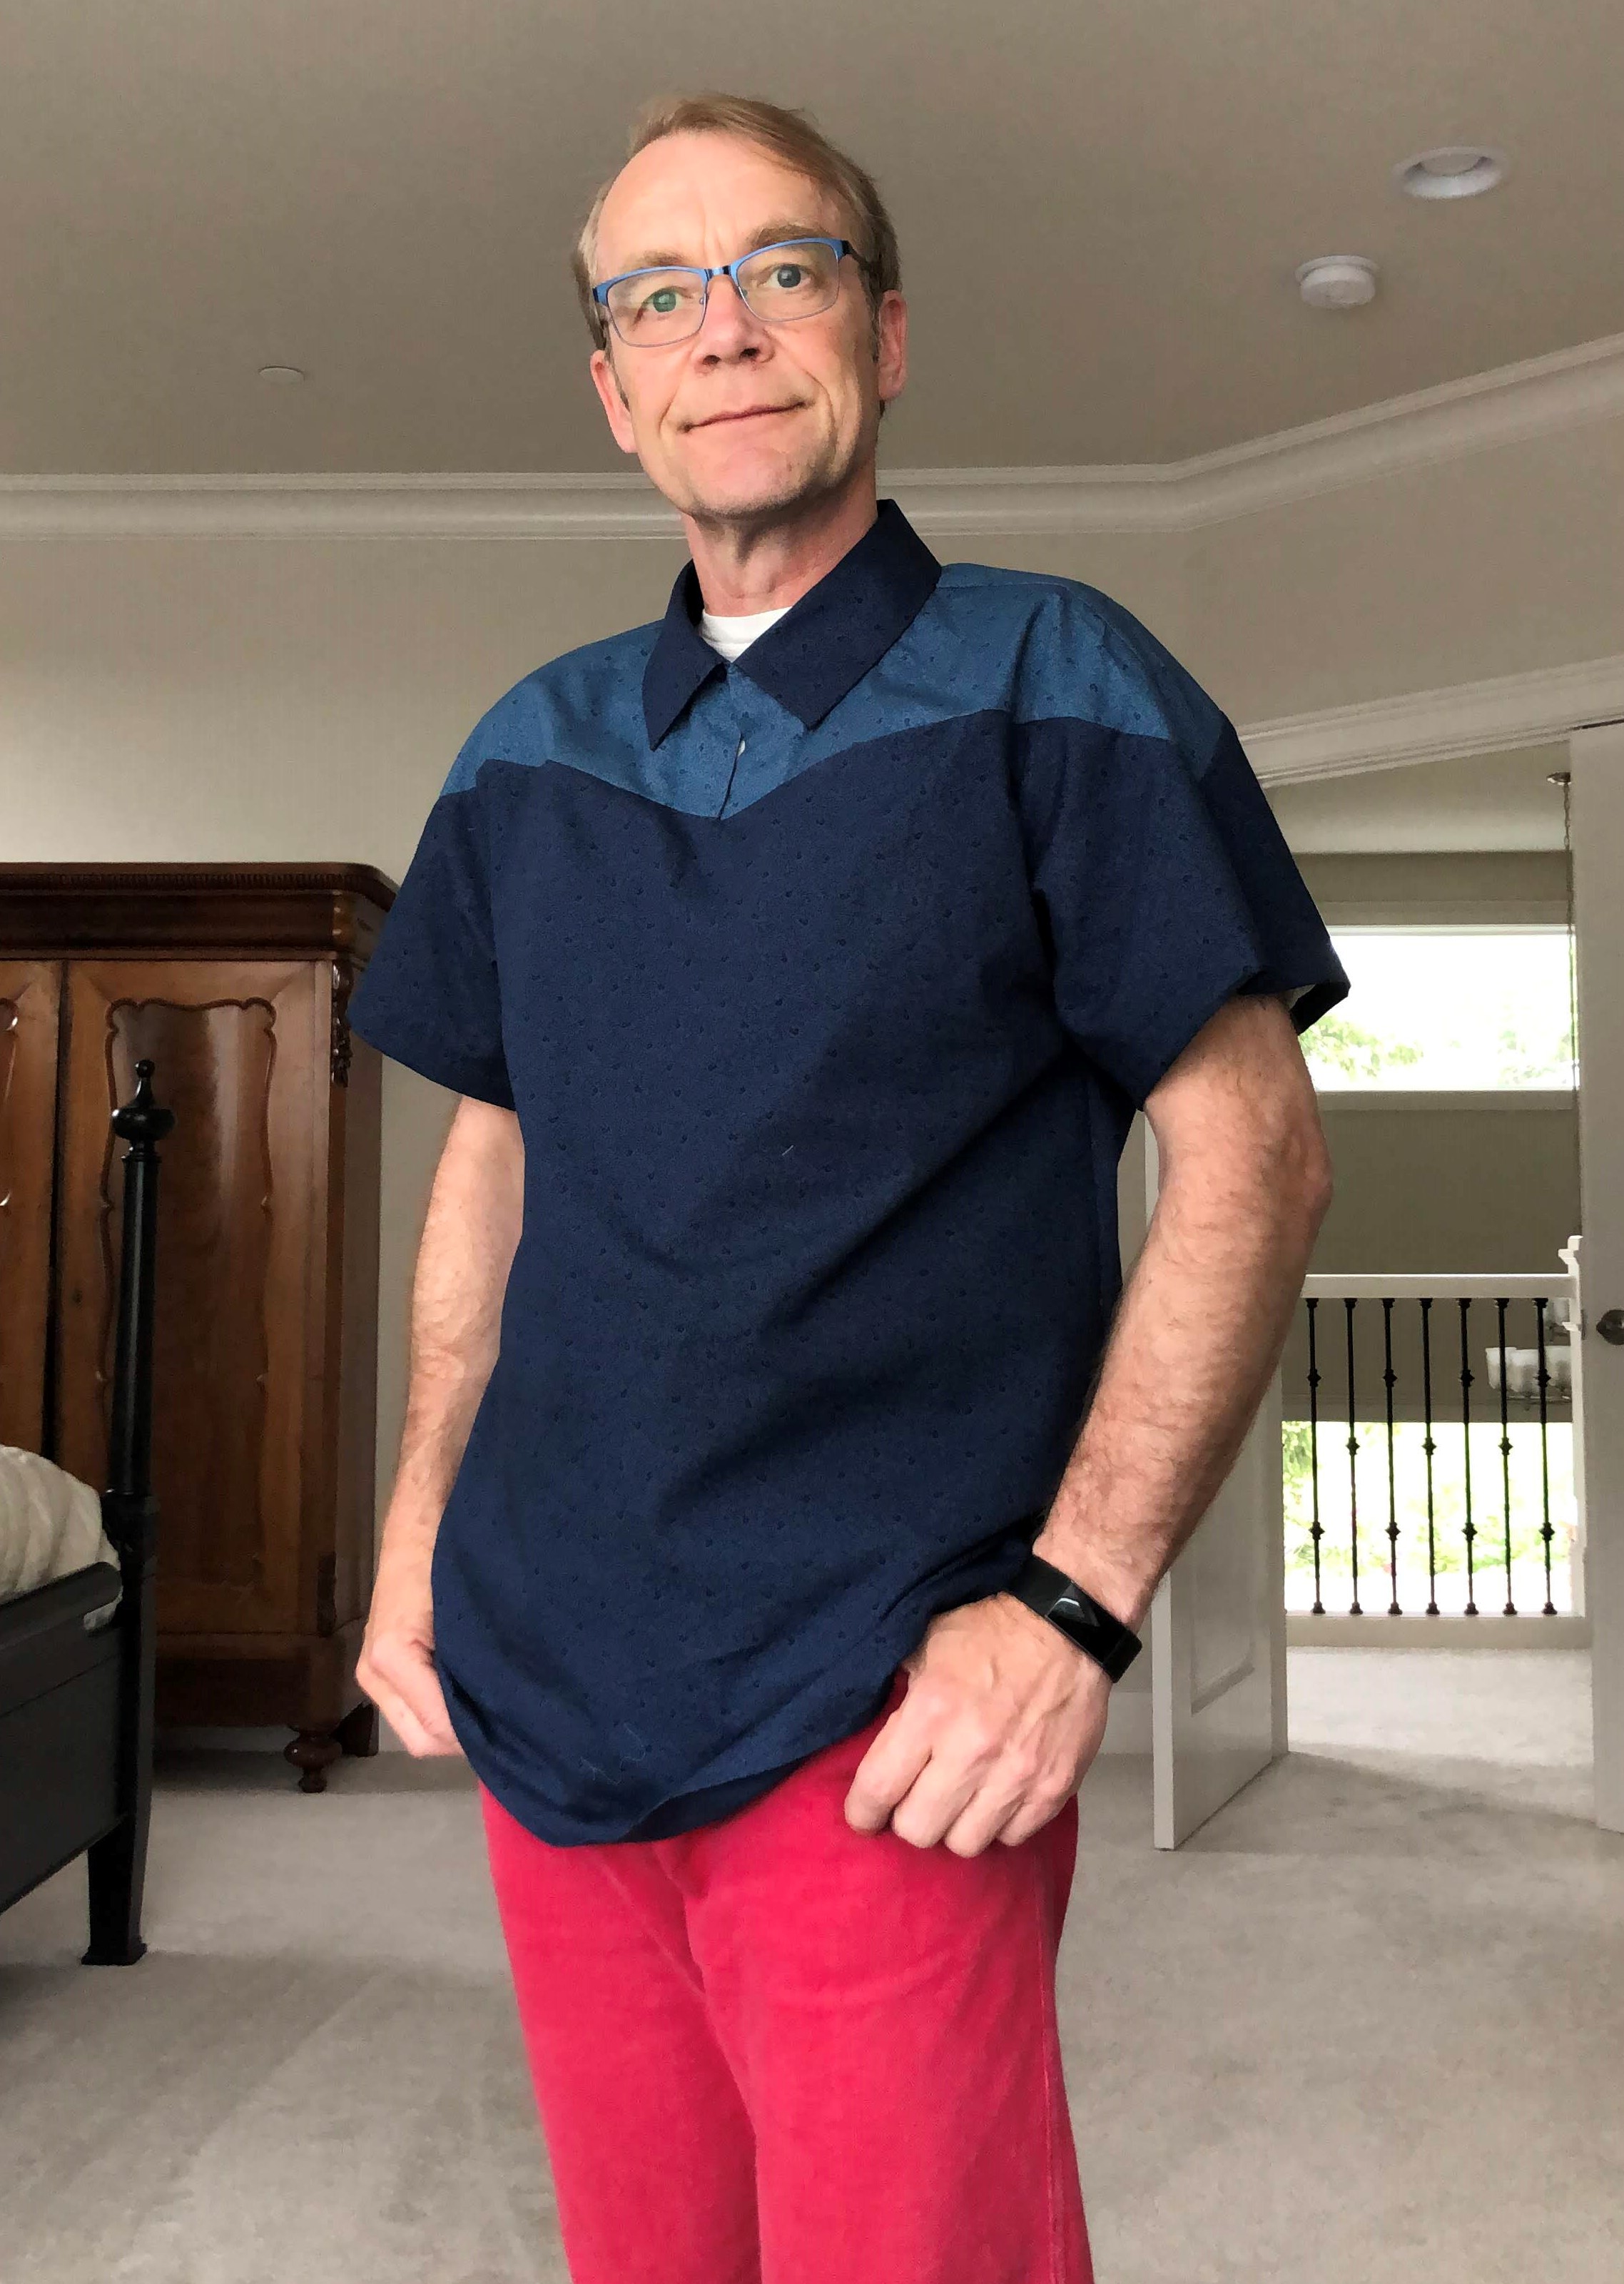
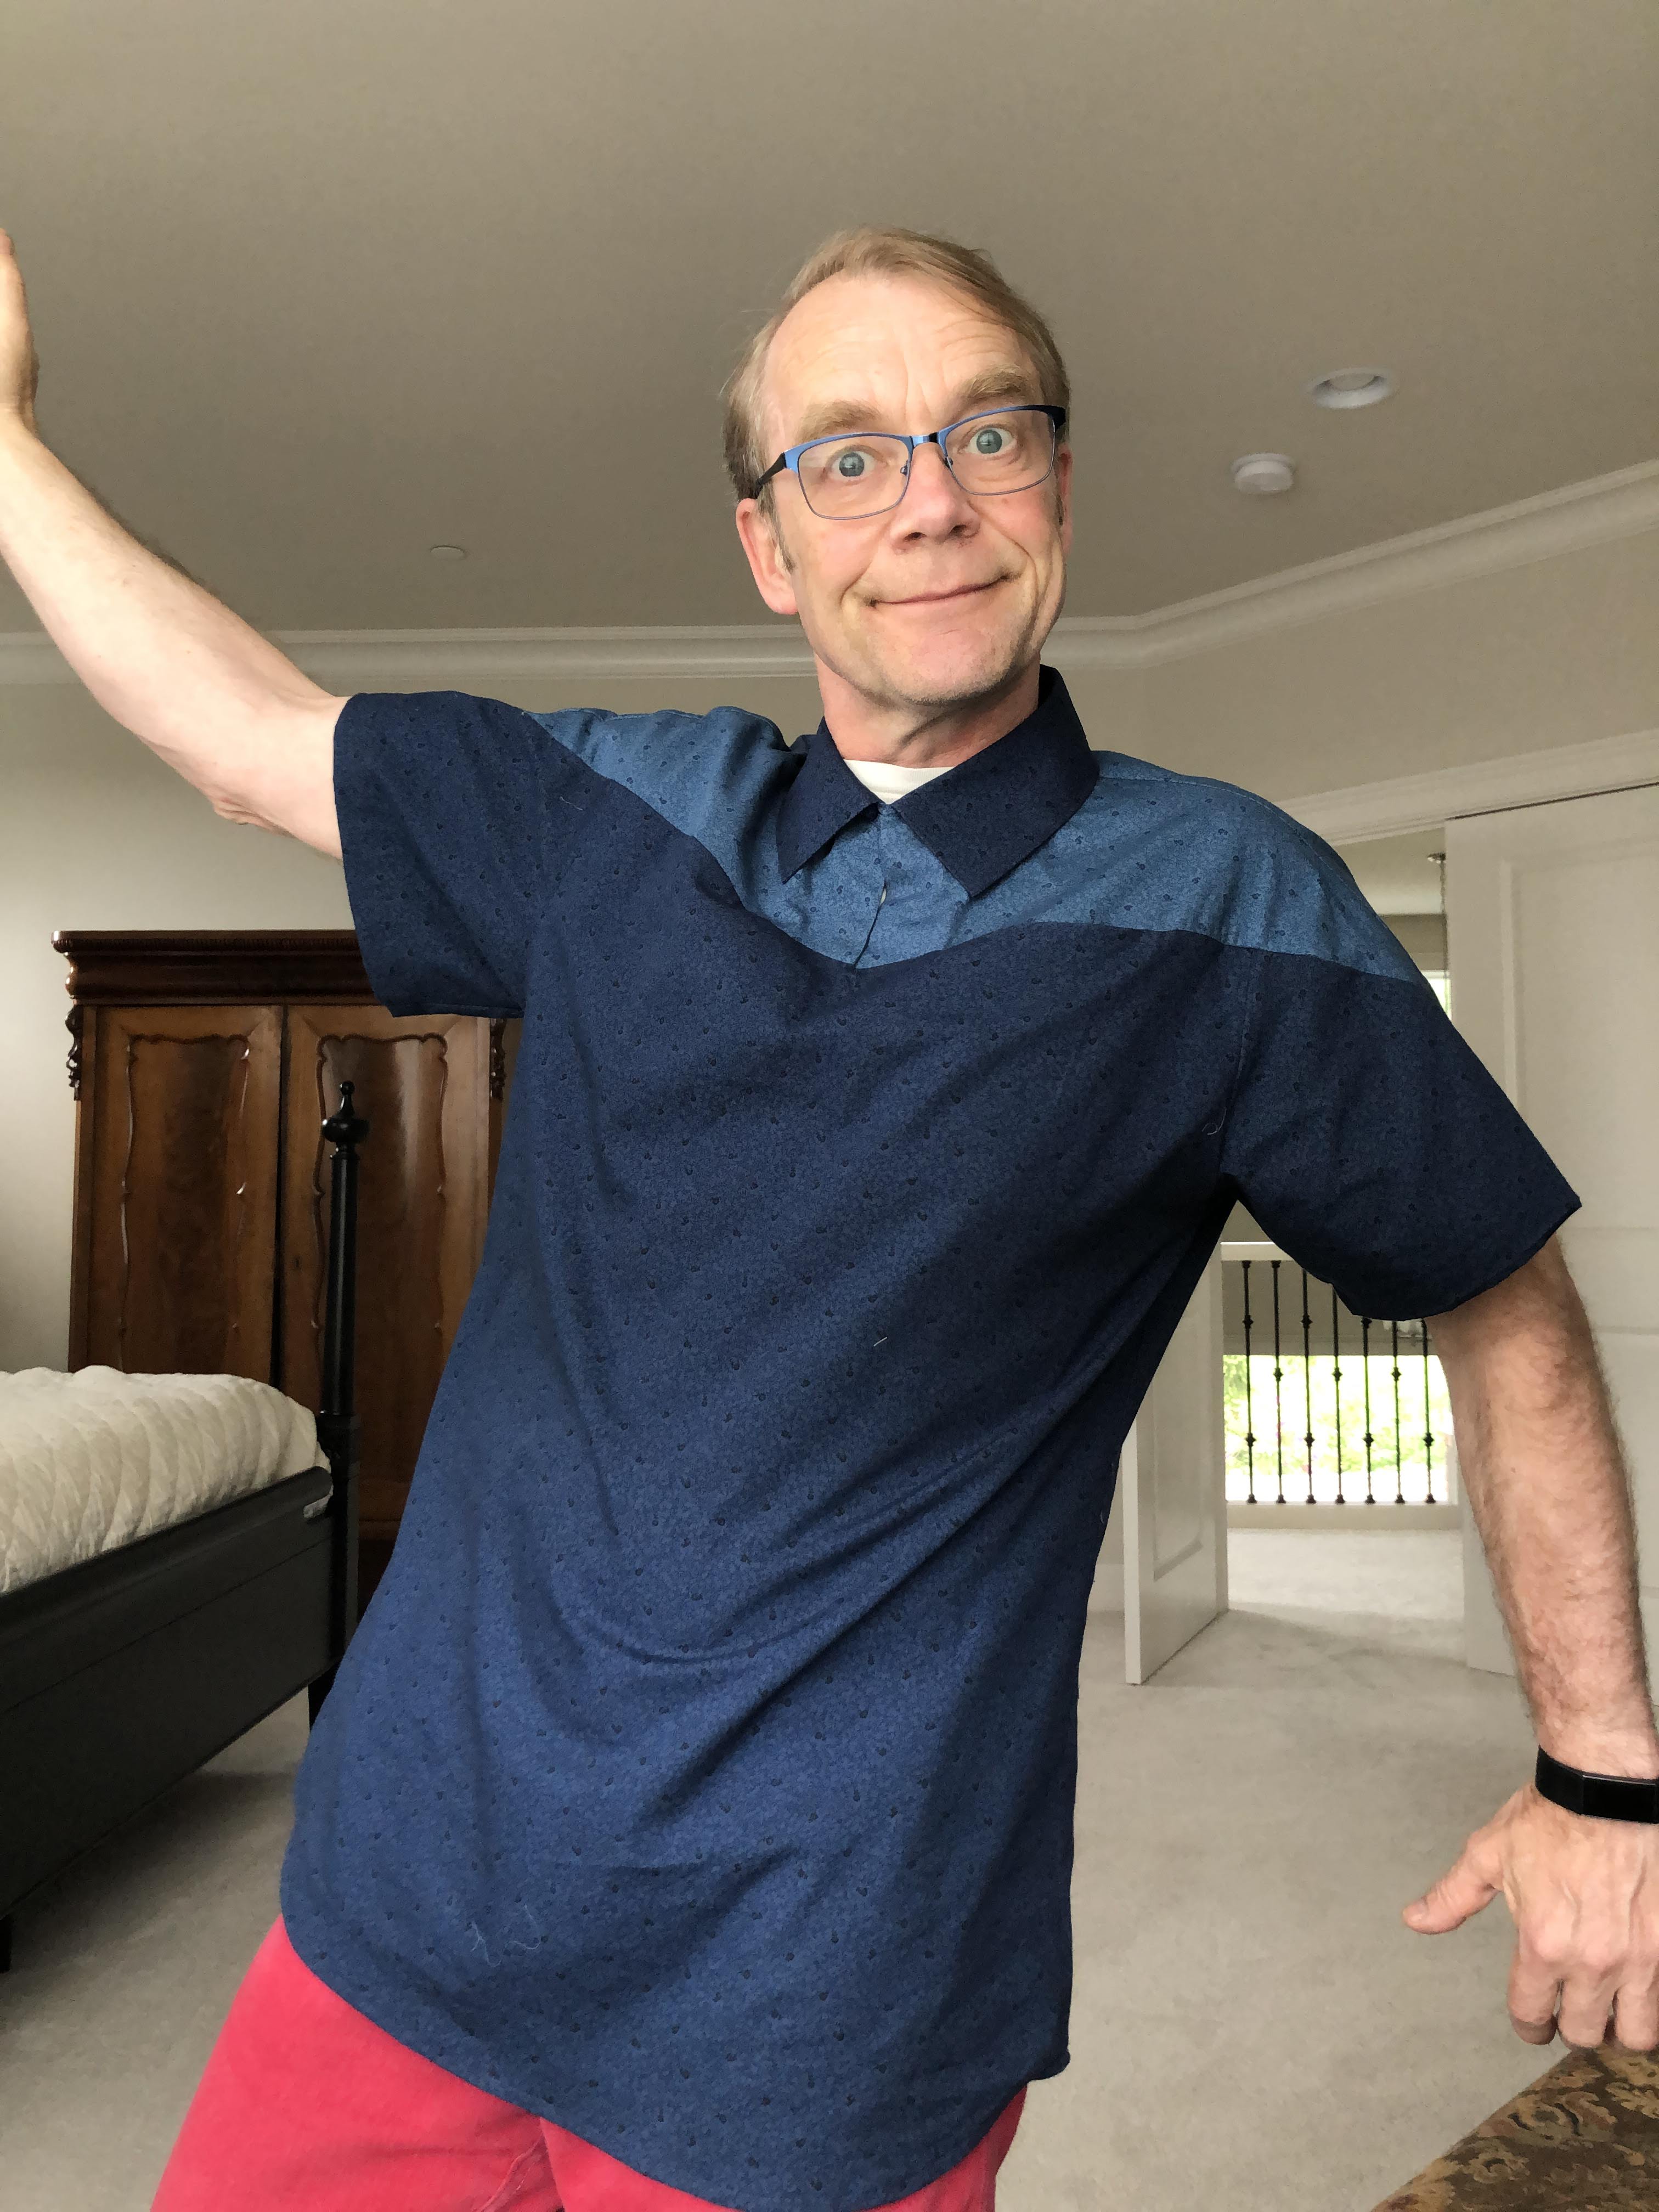
I’ve made numerous shirts in the past years. And I think I can count the times I’ve worn a tie with them on my fingers. But I can do something with this. A shirt and a tie. Not just two things that are combined, but two things that are part of one.

In the past, whenever I’ve seen some fabric with a pattern that I liked, I’ve looked for the same pattern in different colors. There is always something fun you can do with that. If I liked those additional colors, they would come home too. That is basically how things like the Faces shirt came about. With so much fabric in my stash, there should be something appropriate for what I had in mind.

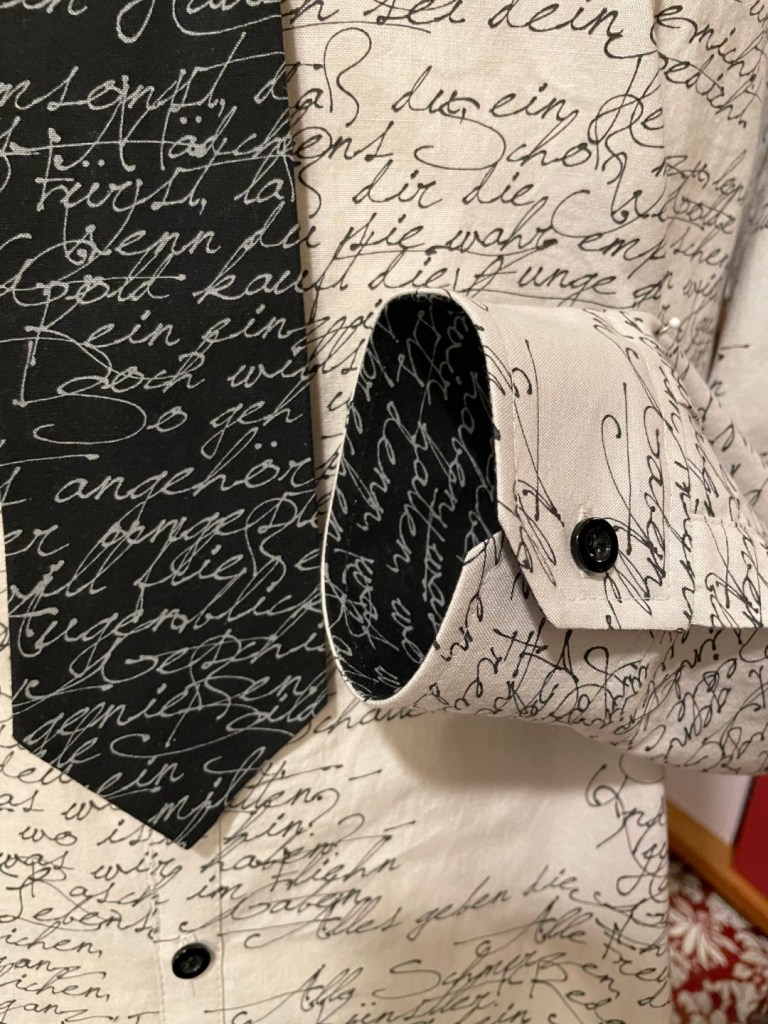
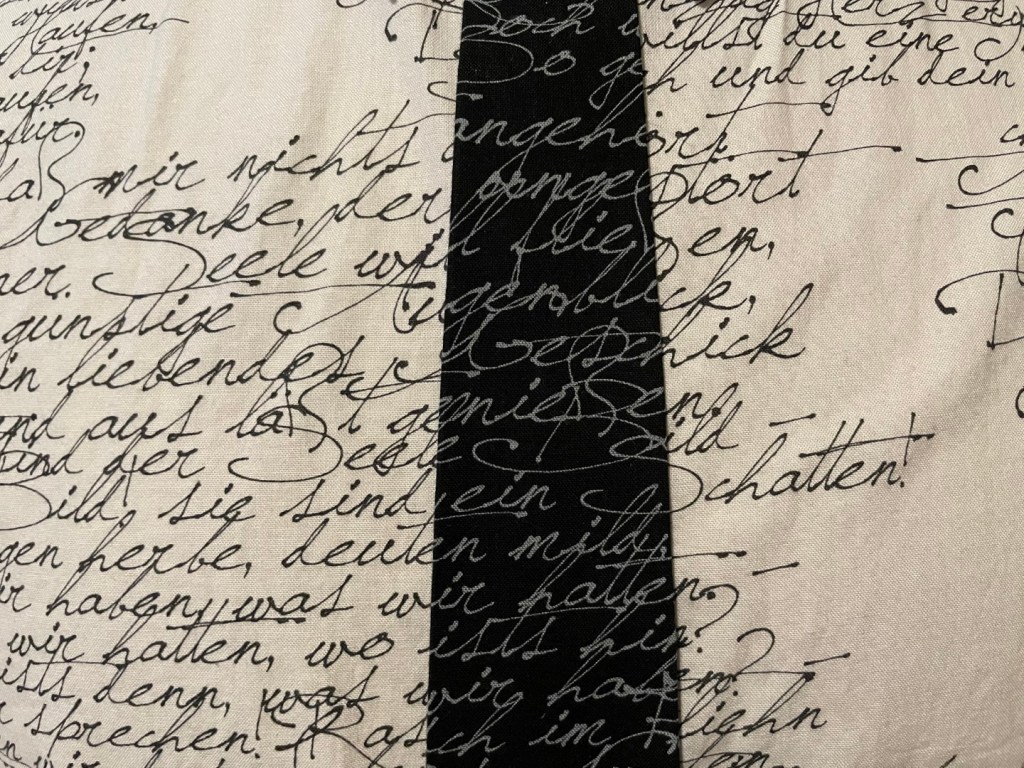
This fabric seemed perfect. A simple off-white color, with poems of Johann Wolfgang von Goethe on it. And I had the matching in black too.

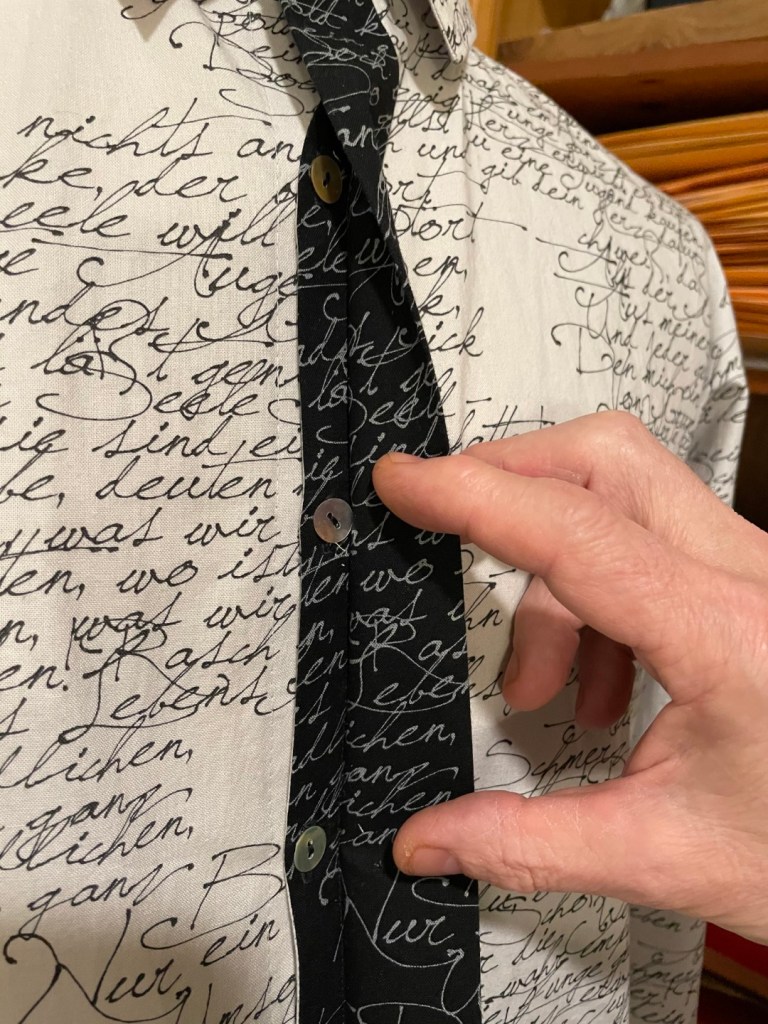
What I thought I could do with this was make a ‘tie’ that was really a hidden button placket. The ‘tie’ and the shirt would be attached, but independent enough that it was not obvious that it was attached. And functional that it allowed the buttons to be hidden behind it.

Of course, I only had bought a fat quarter of the black fabric. Maybe I only intended to make a contrasting pocket or cuffs? That really limited how long the tie could be. 18 inches is short for a tie, but it would have to do.

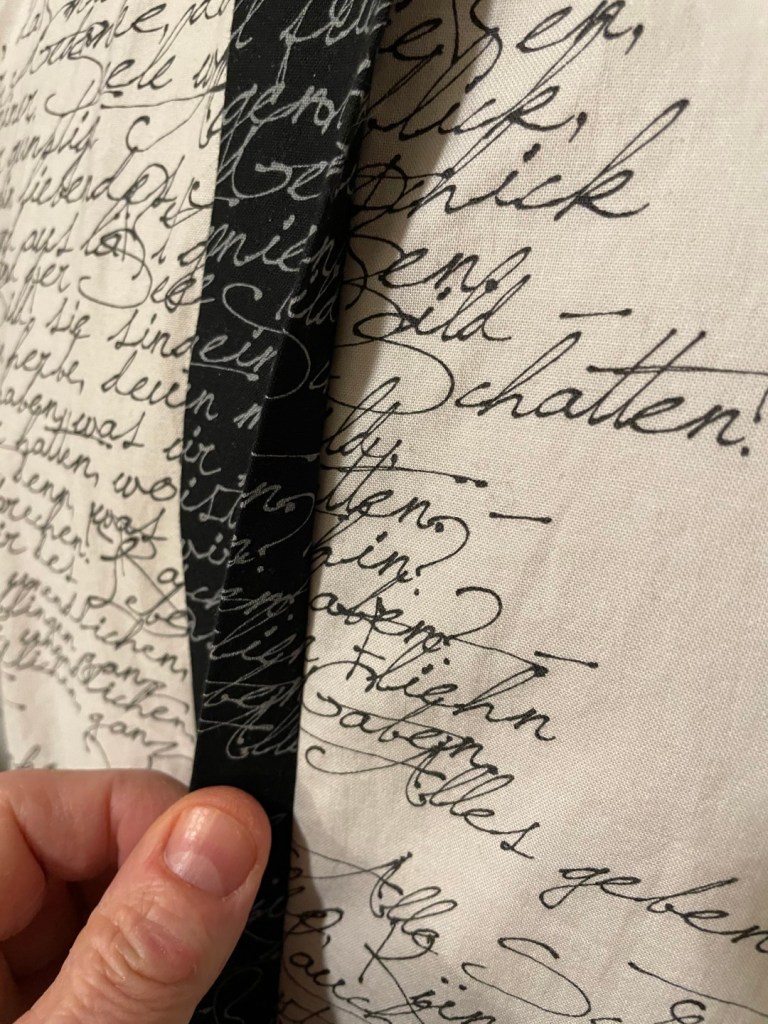
Since both the fabrics have the same poems on them, I had to see if I could match the pattern across the whole front. This seemed difficult, given the amount of fabric I had to work with, but definitely maybe possible.

And once that thought had crept into my mind, that was going to be the goal. Next was going to be the puzzle of figuring out where which pattern piece would have to be extracted from the limited fabric I had. And I had to create the pattern piece for the tie itself.

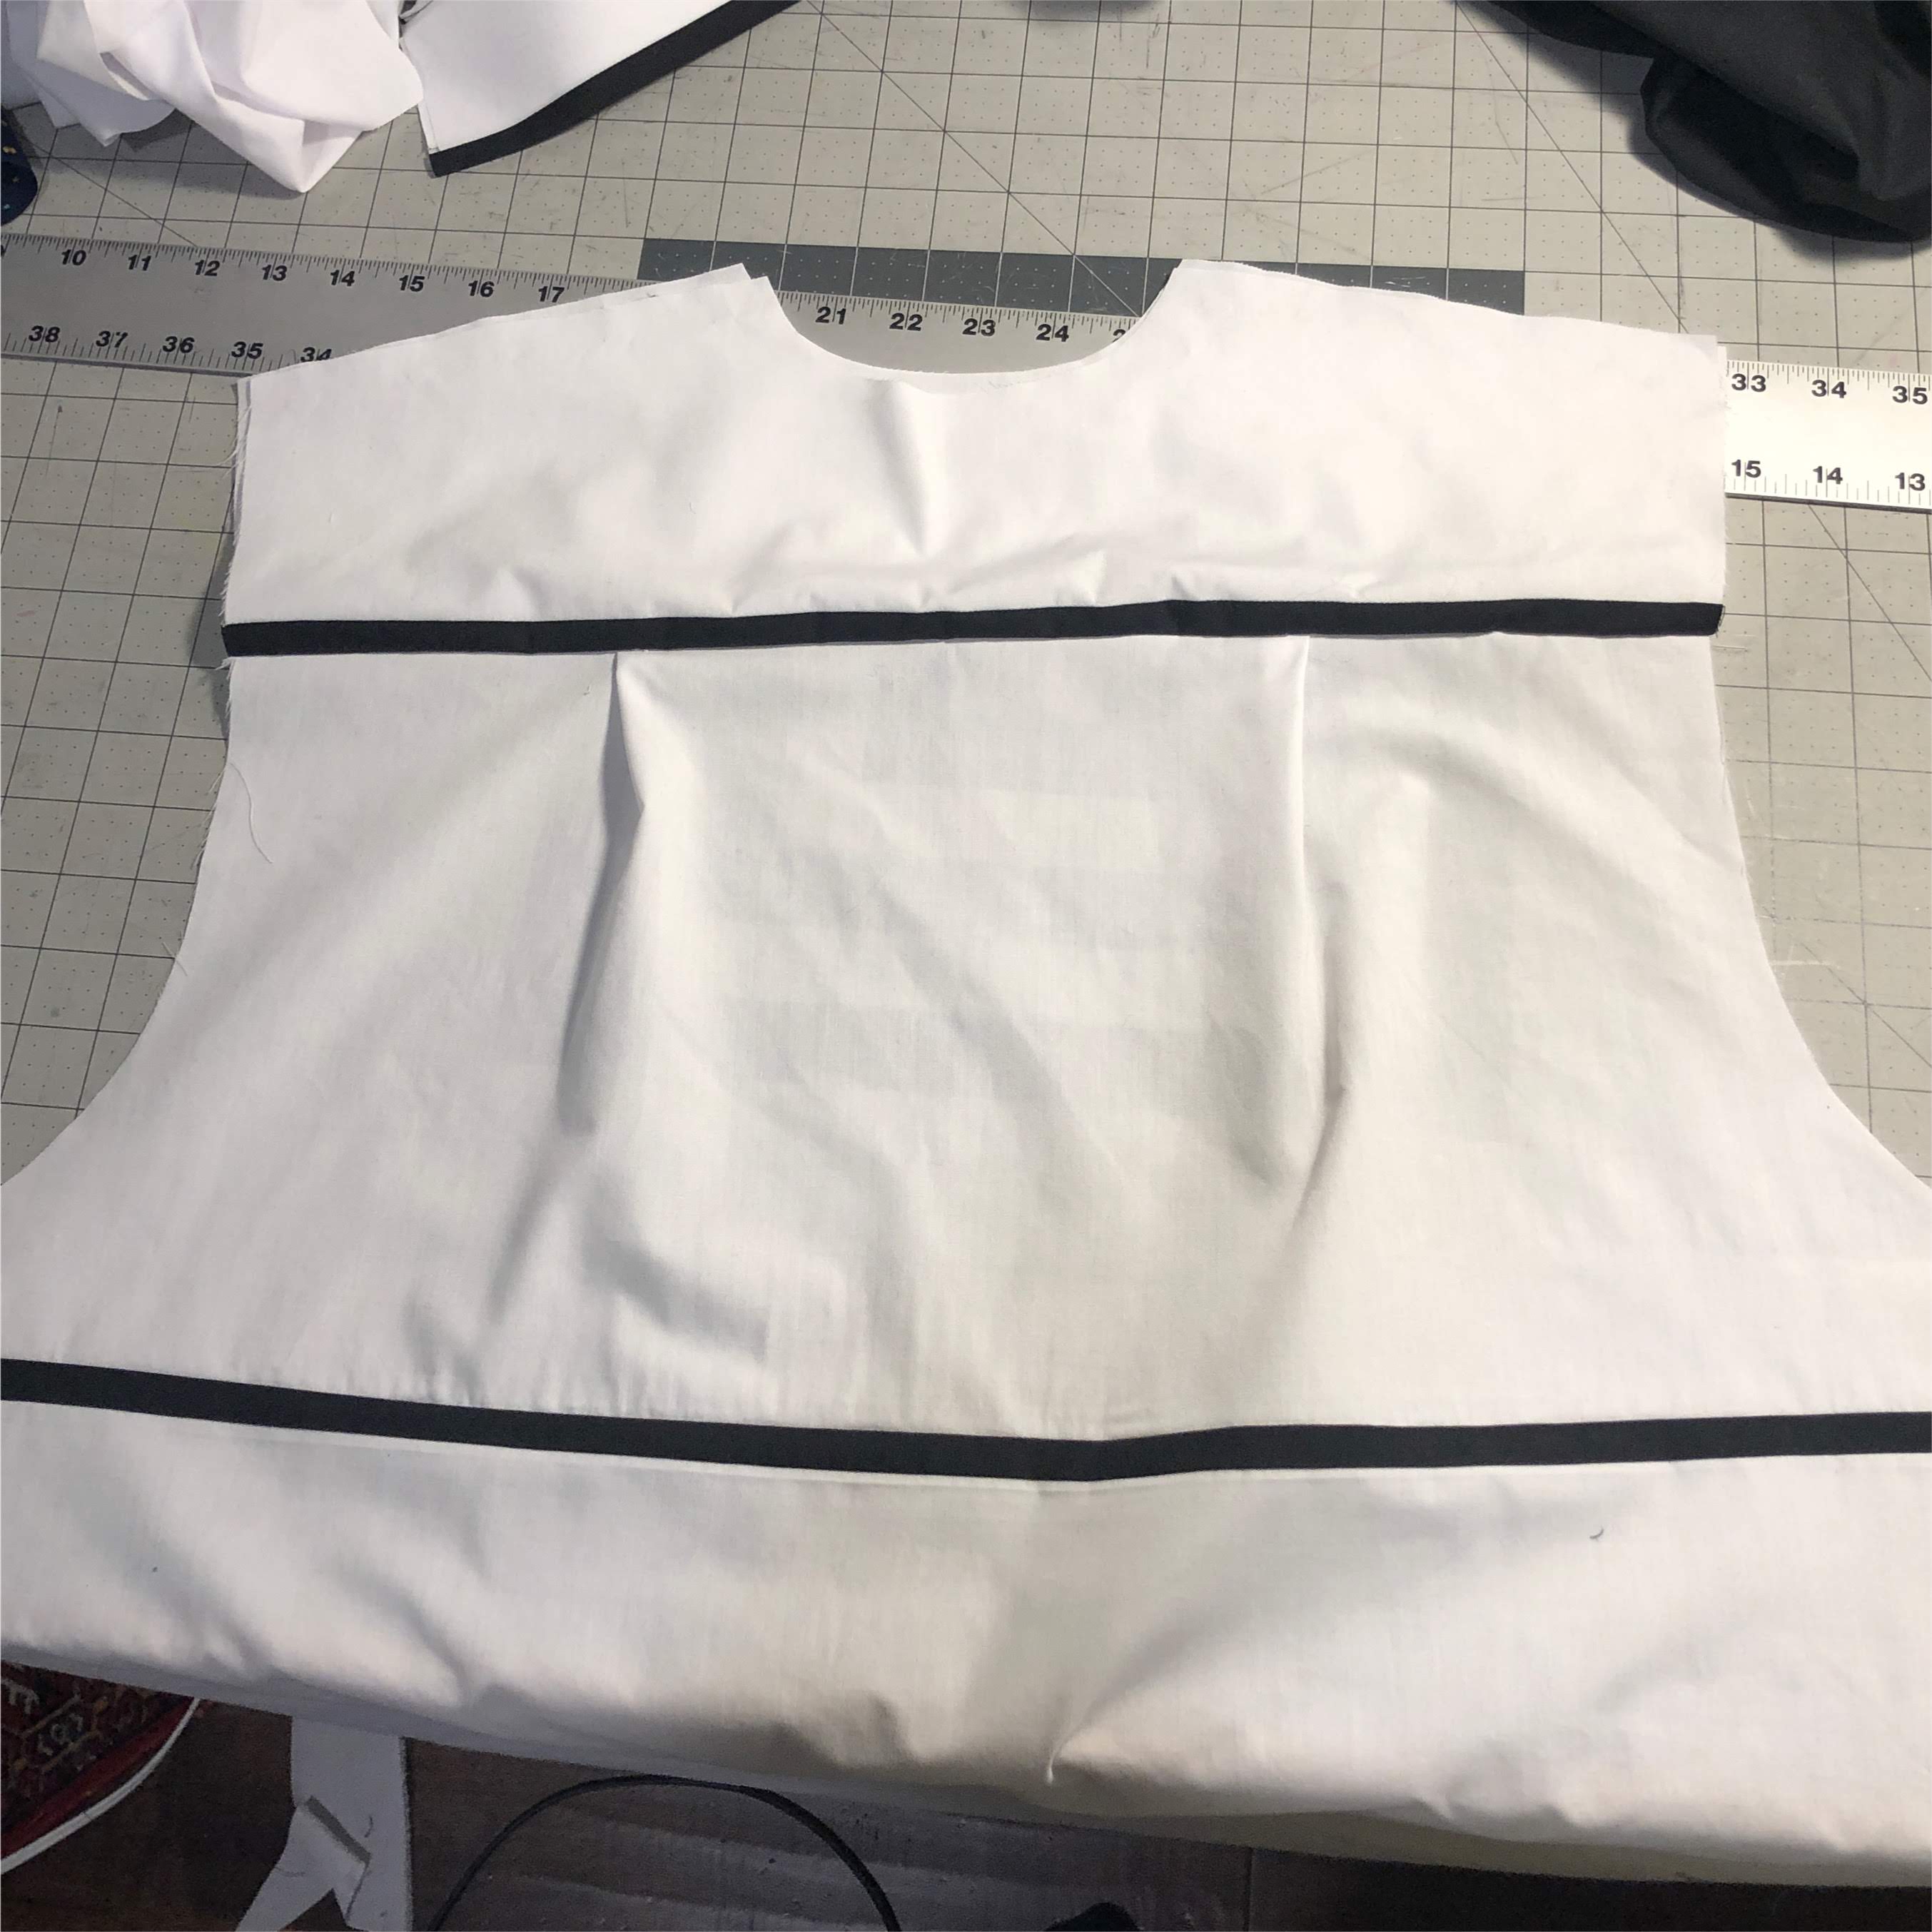
The latter turned out to be easier than I thought. The length was determined by the length of the black fabric. A standard tie is 3 inches wide, and I figured I would make the real placket, which would extend below the tie, 3/4 inches wide. Then it is just draw the tie diamond shape on a piece of paper, and add all the folds that will end up behind it. Before I was done with it, I had caught myself making a couple of mistakes. Forgetting the seam allowance, making a part that was supposed to be parallel tapered, etc. Since all of this is done with paper, a liberal amount of sellotape will fix those errors before you commit them to the fabric. And the paper is easy to fold, to check the way the end product will perform.

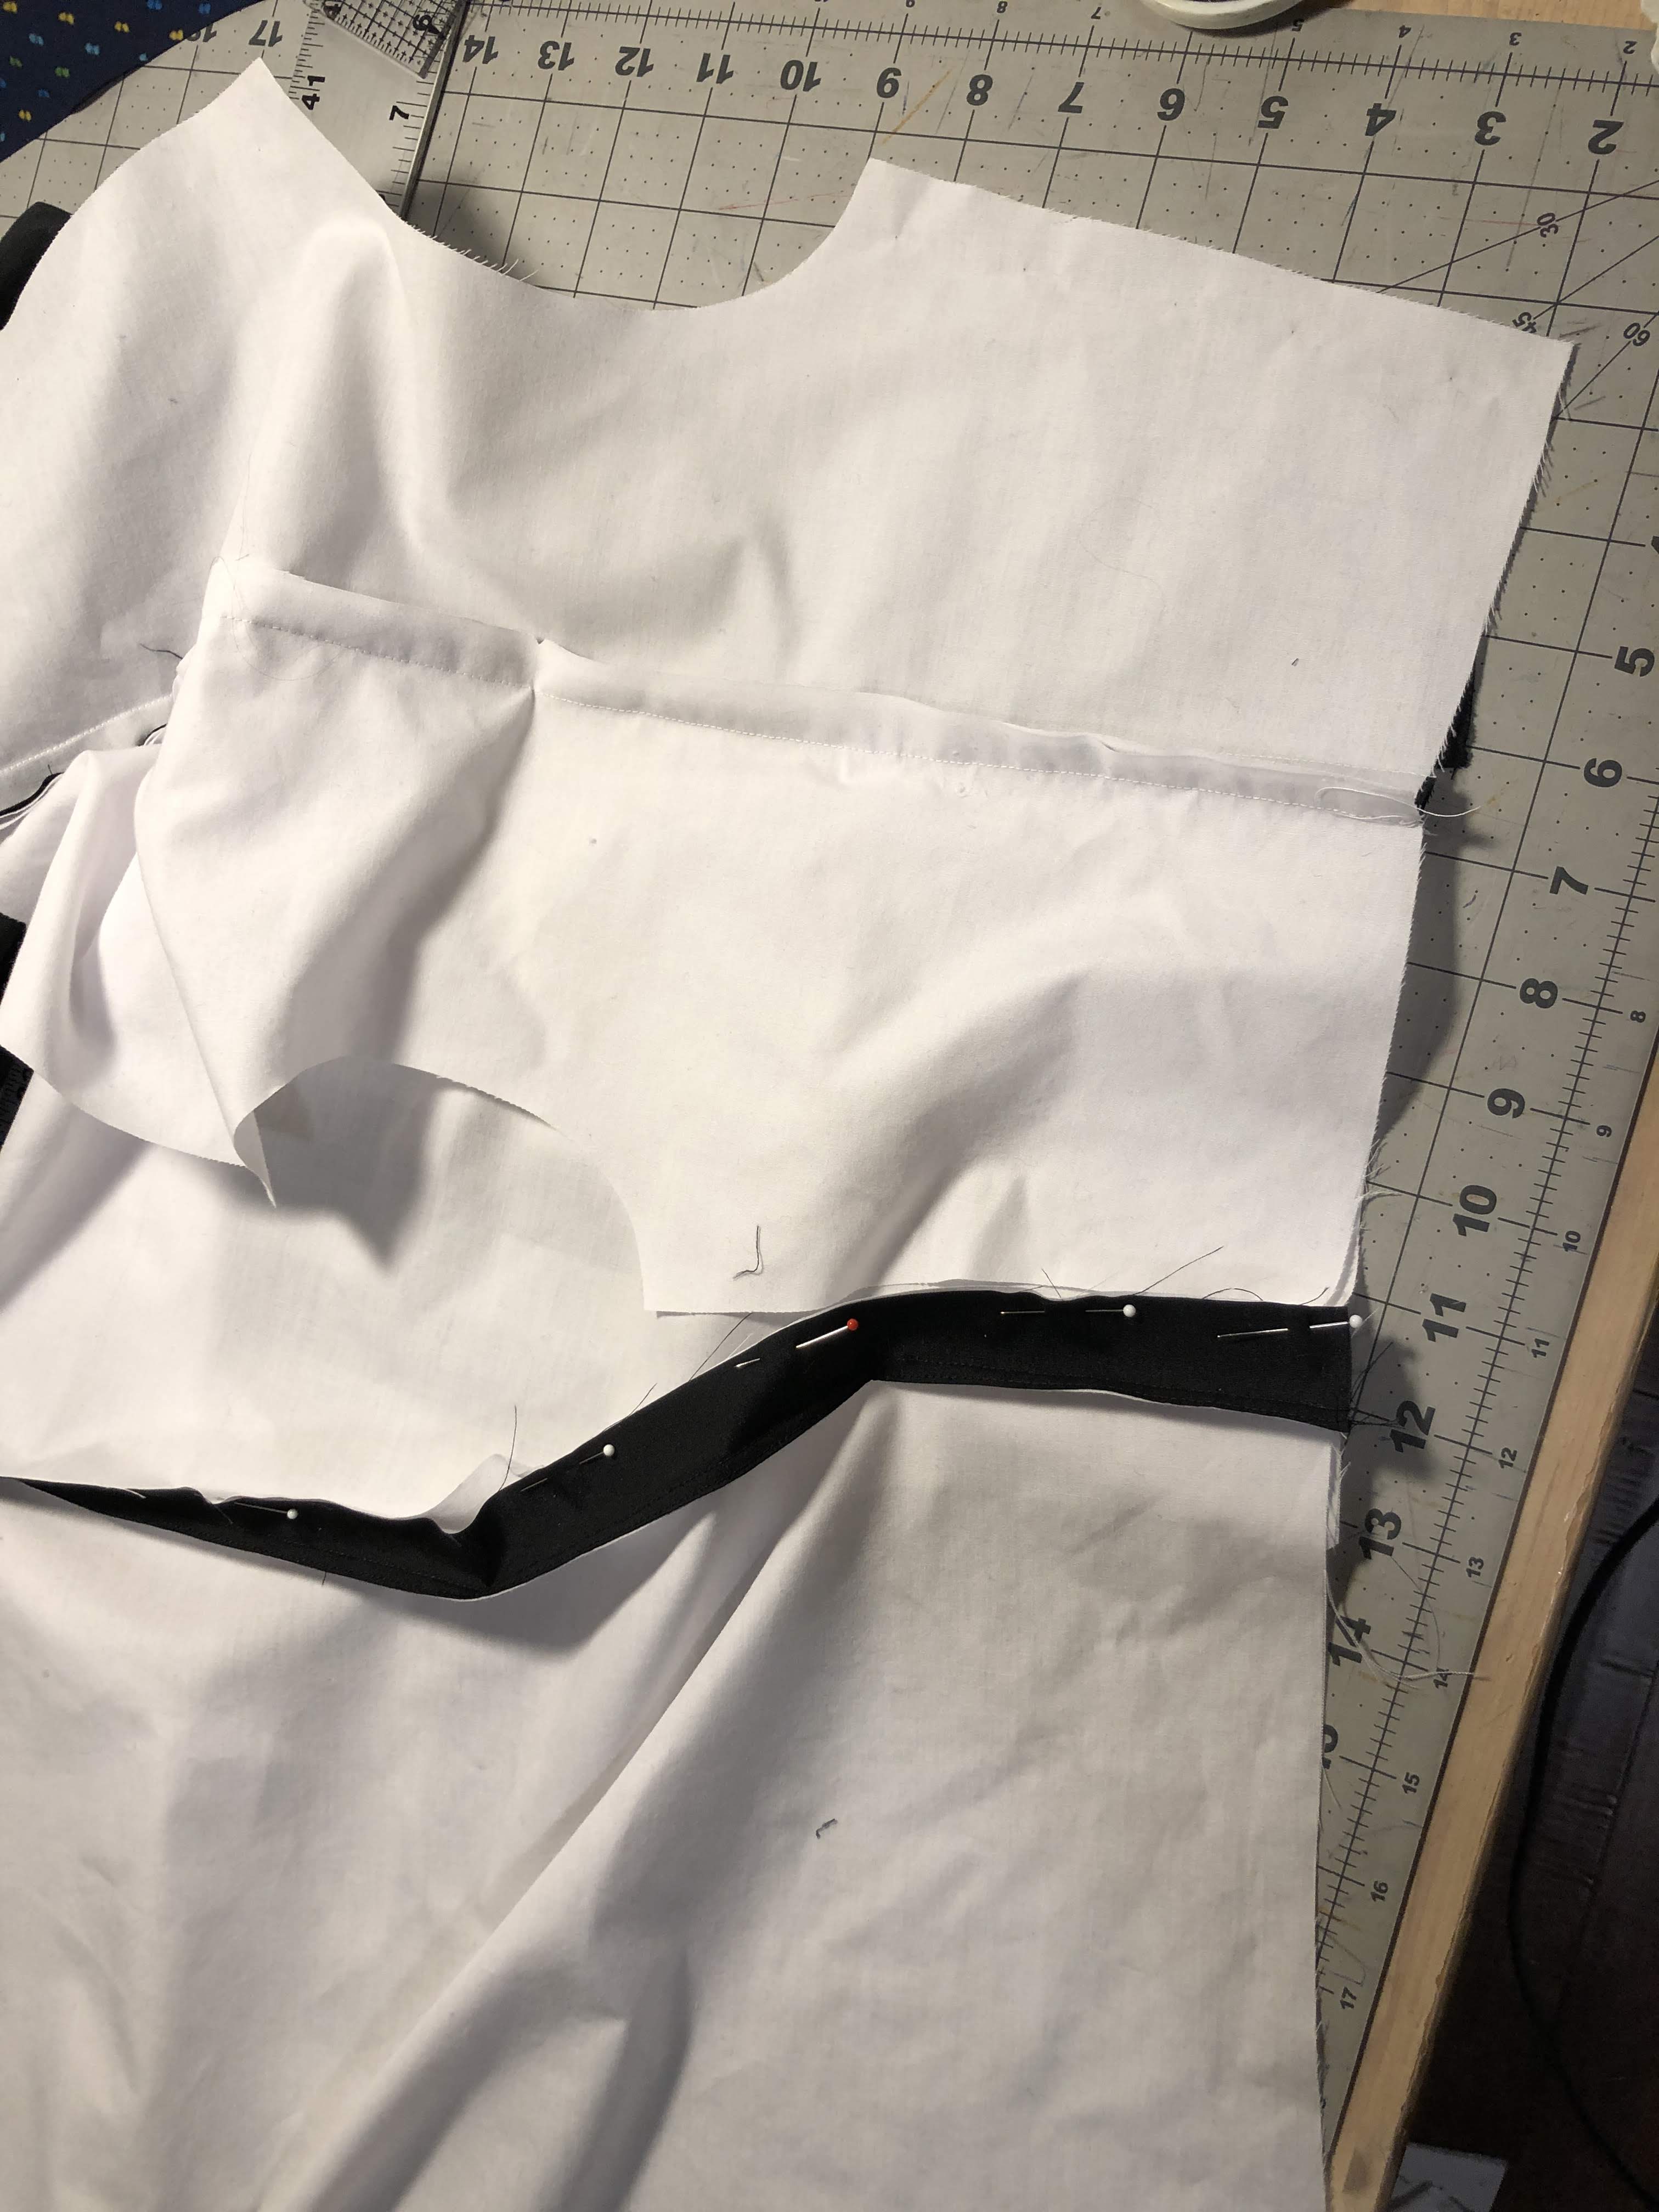
The pattern in the photo here is actually upside down. What is not obvious from this photo is how this is supposed to be used. Here is a diagram that makes that hopefully a bit clearer:
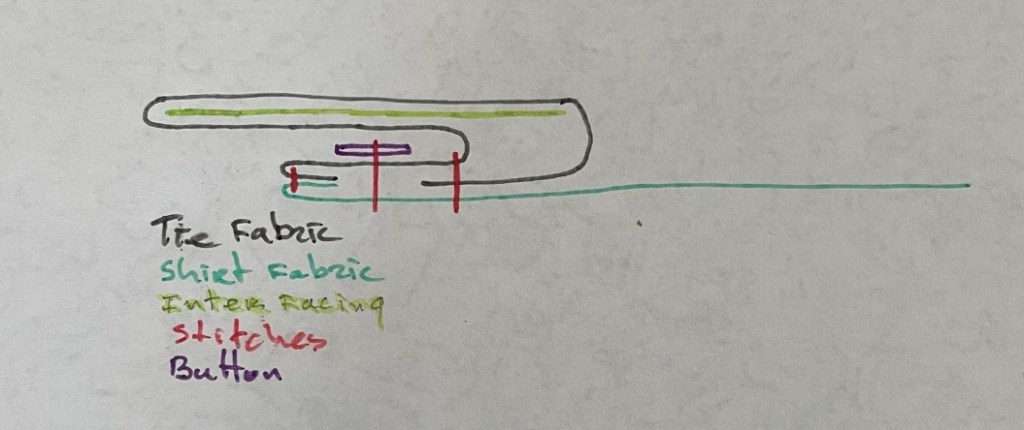
Most hidden button plackets I make are ‘grown on’, but this one needs to be ‘sewn on’. Not a huge difference, but you do have to keep your wits about you to avoid missing a required seam allowance.

I did what I normally do when trying to pattern match fronts; drawsome landmarks on the pattern pieces. First on the tie, because that had a limited fabric supply. Then align the front center marking on the tie pattern and one of the front patterns and transfer the landmarks (just pieces of text I could easily find). And then align that with the fabric. Repeat for the other front. You do have to make sure that all the pieces of fabric have been squared before you start, or you may end up with alignments at the top, but not the bottom.

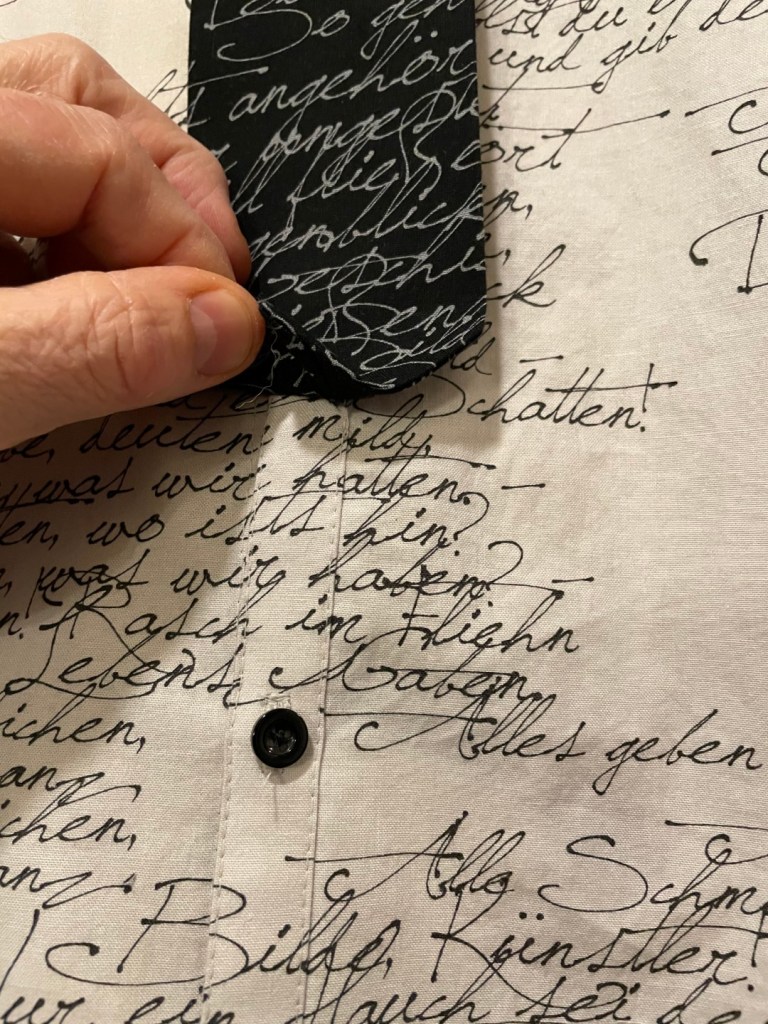
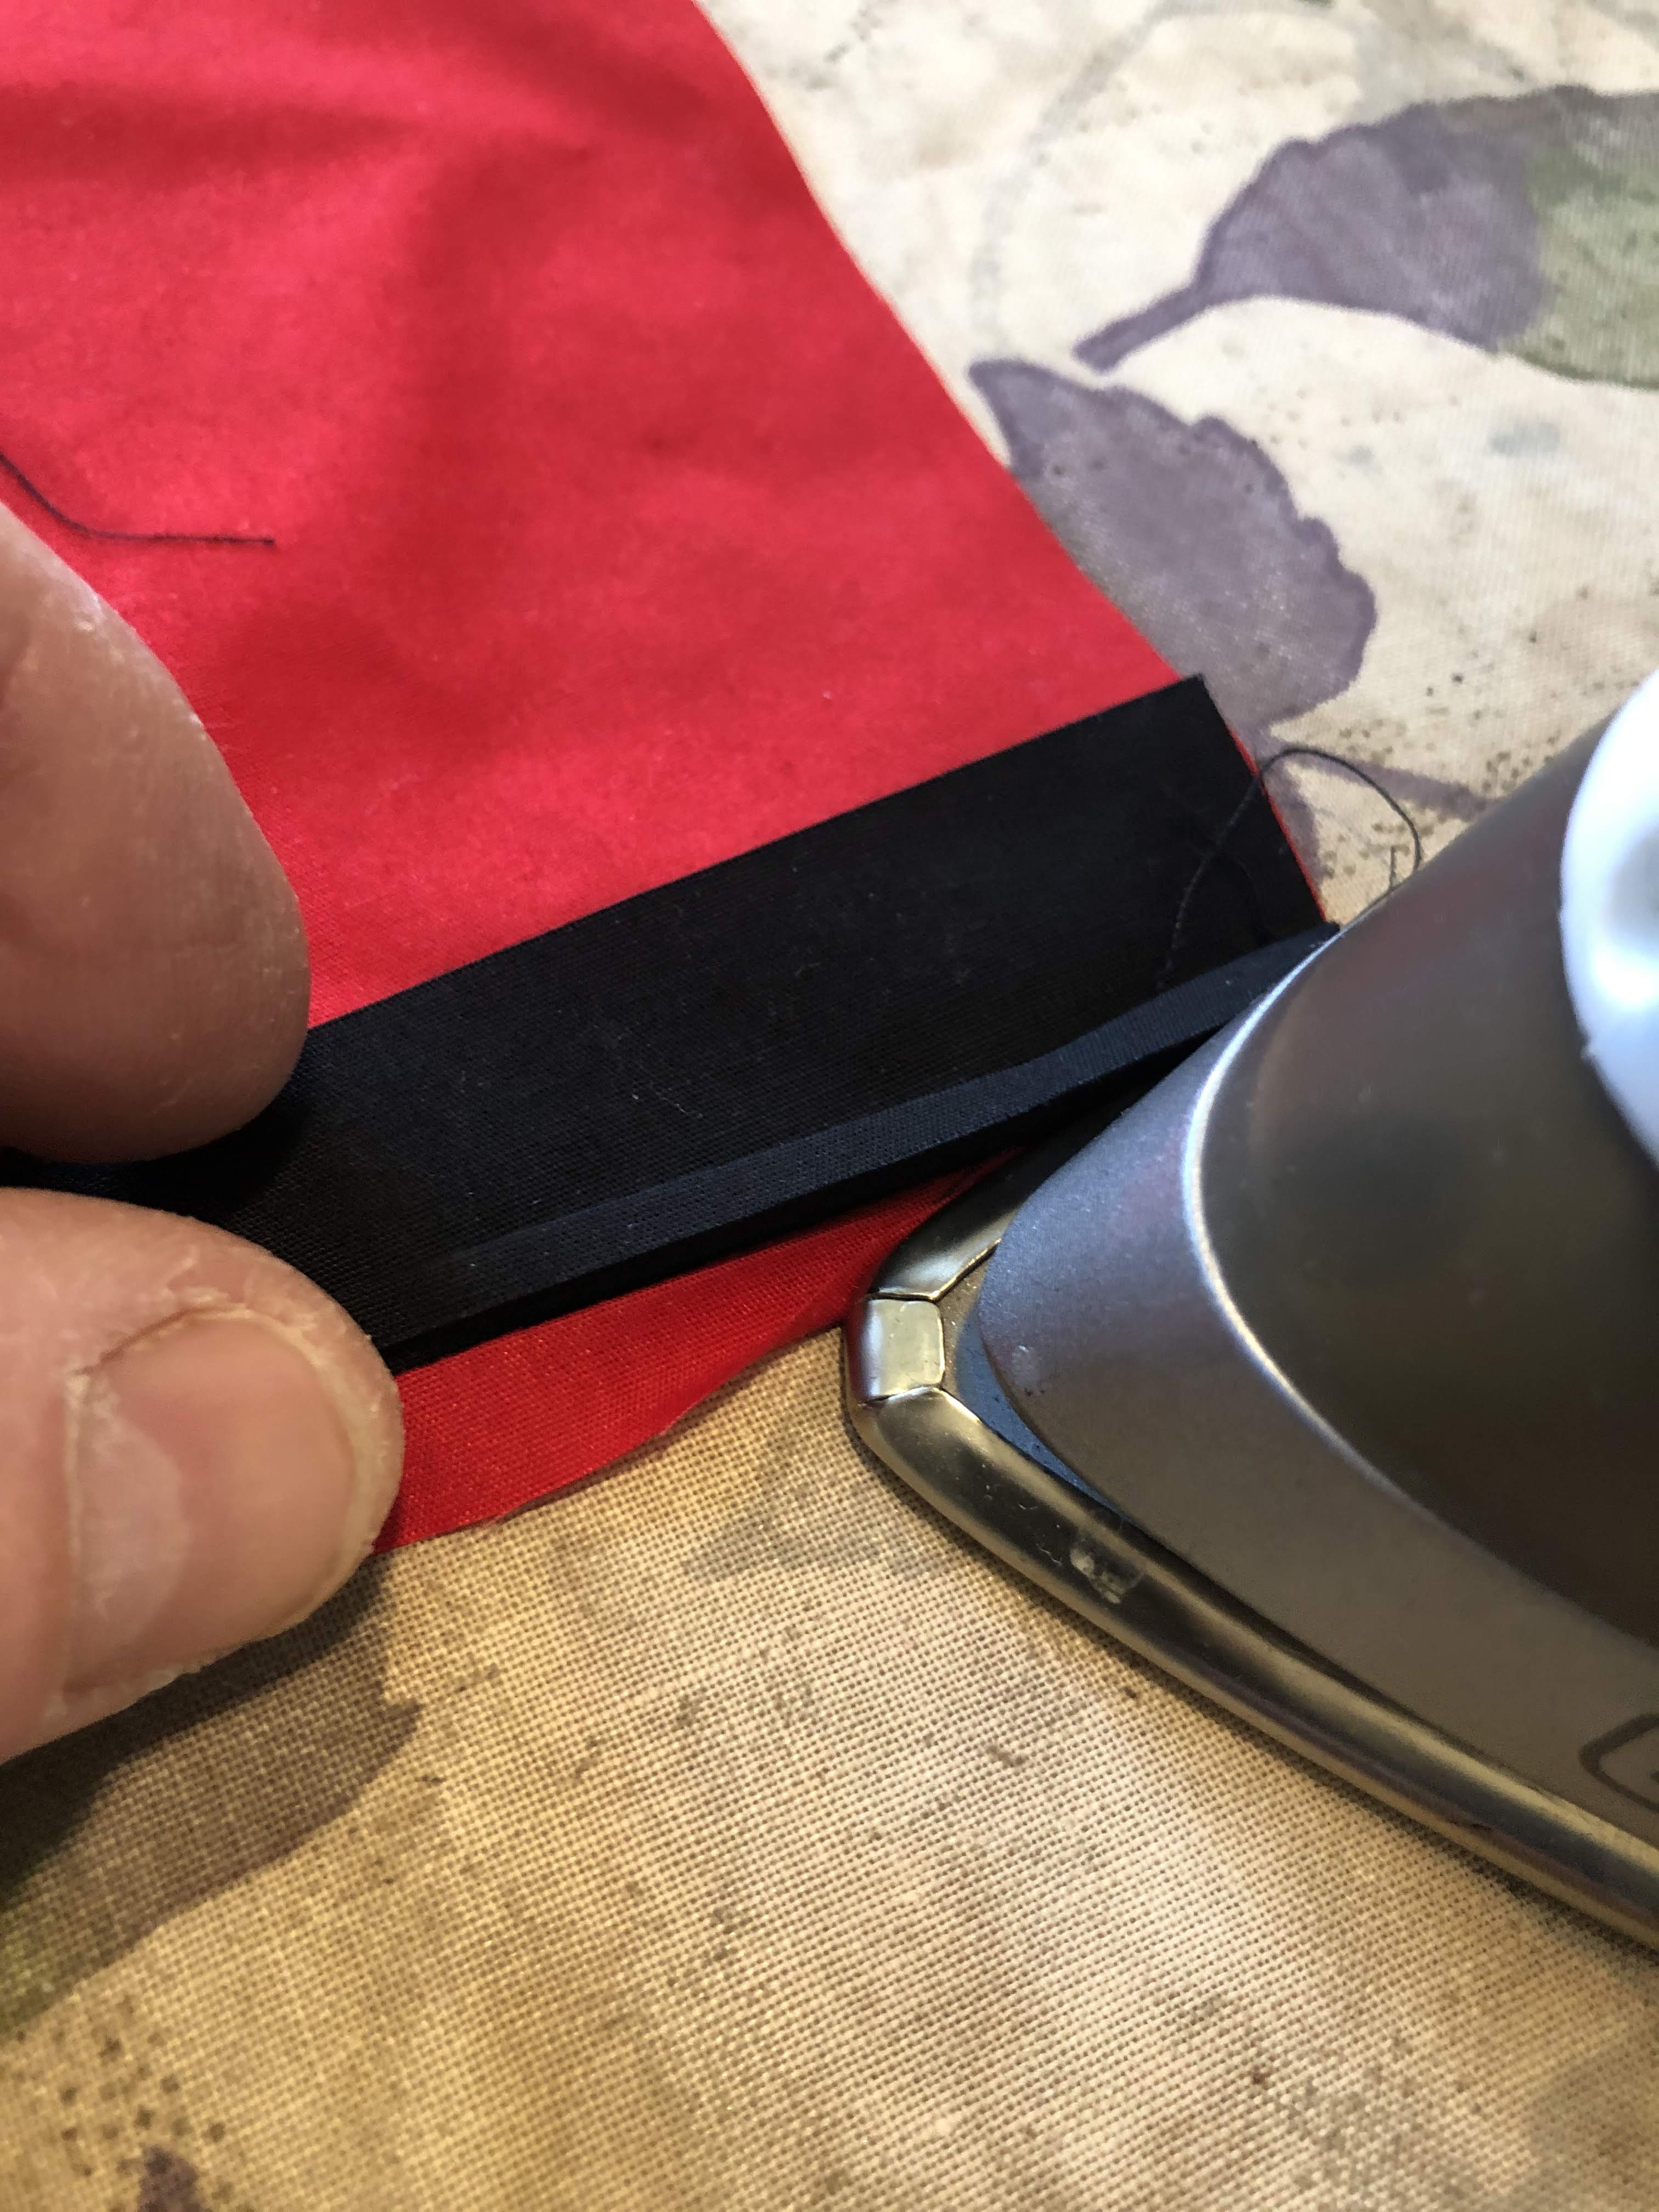
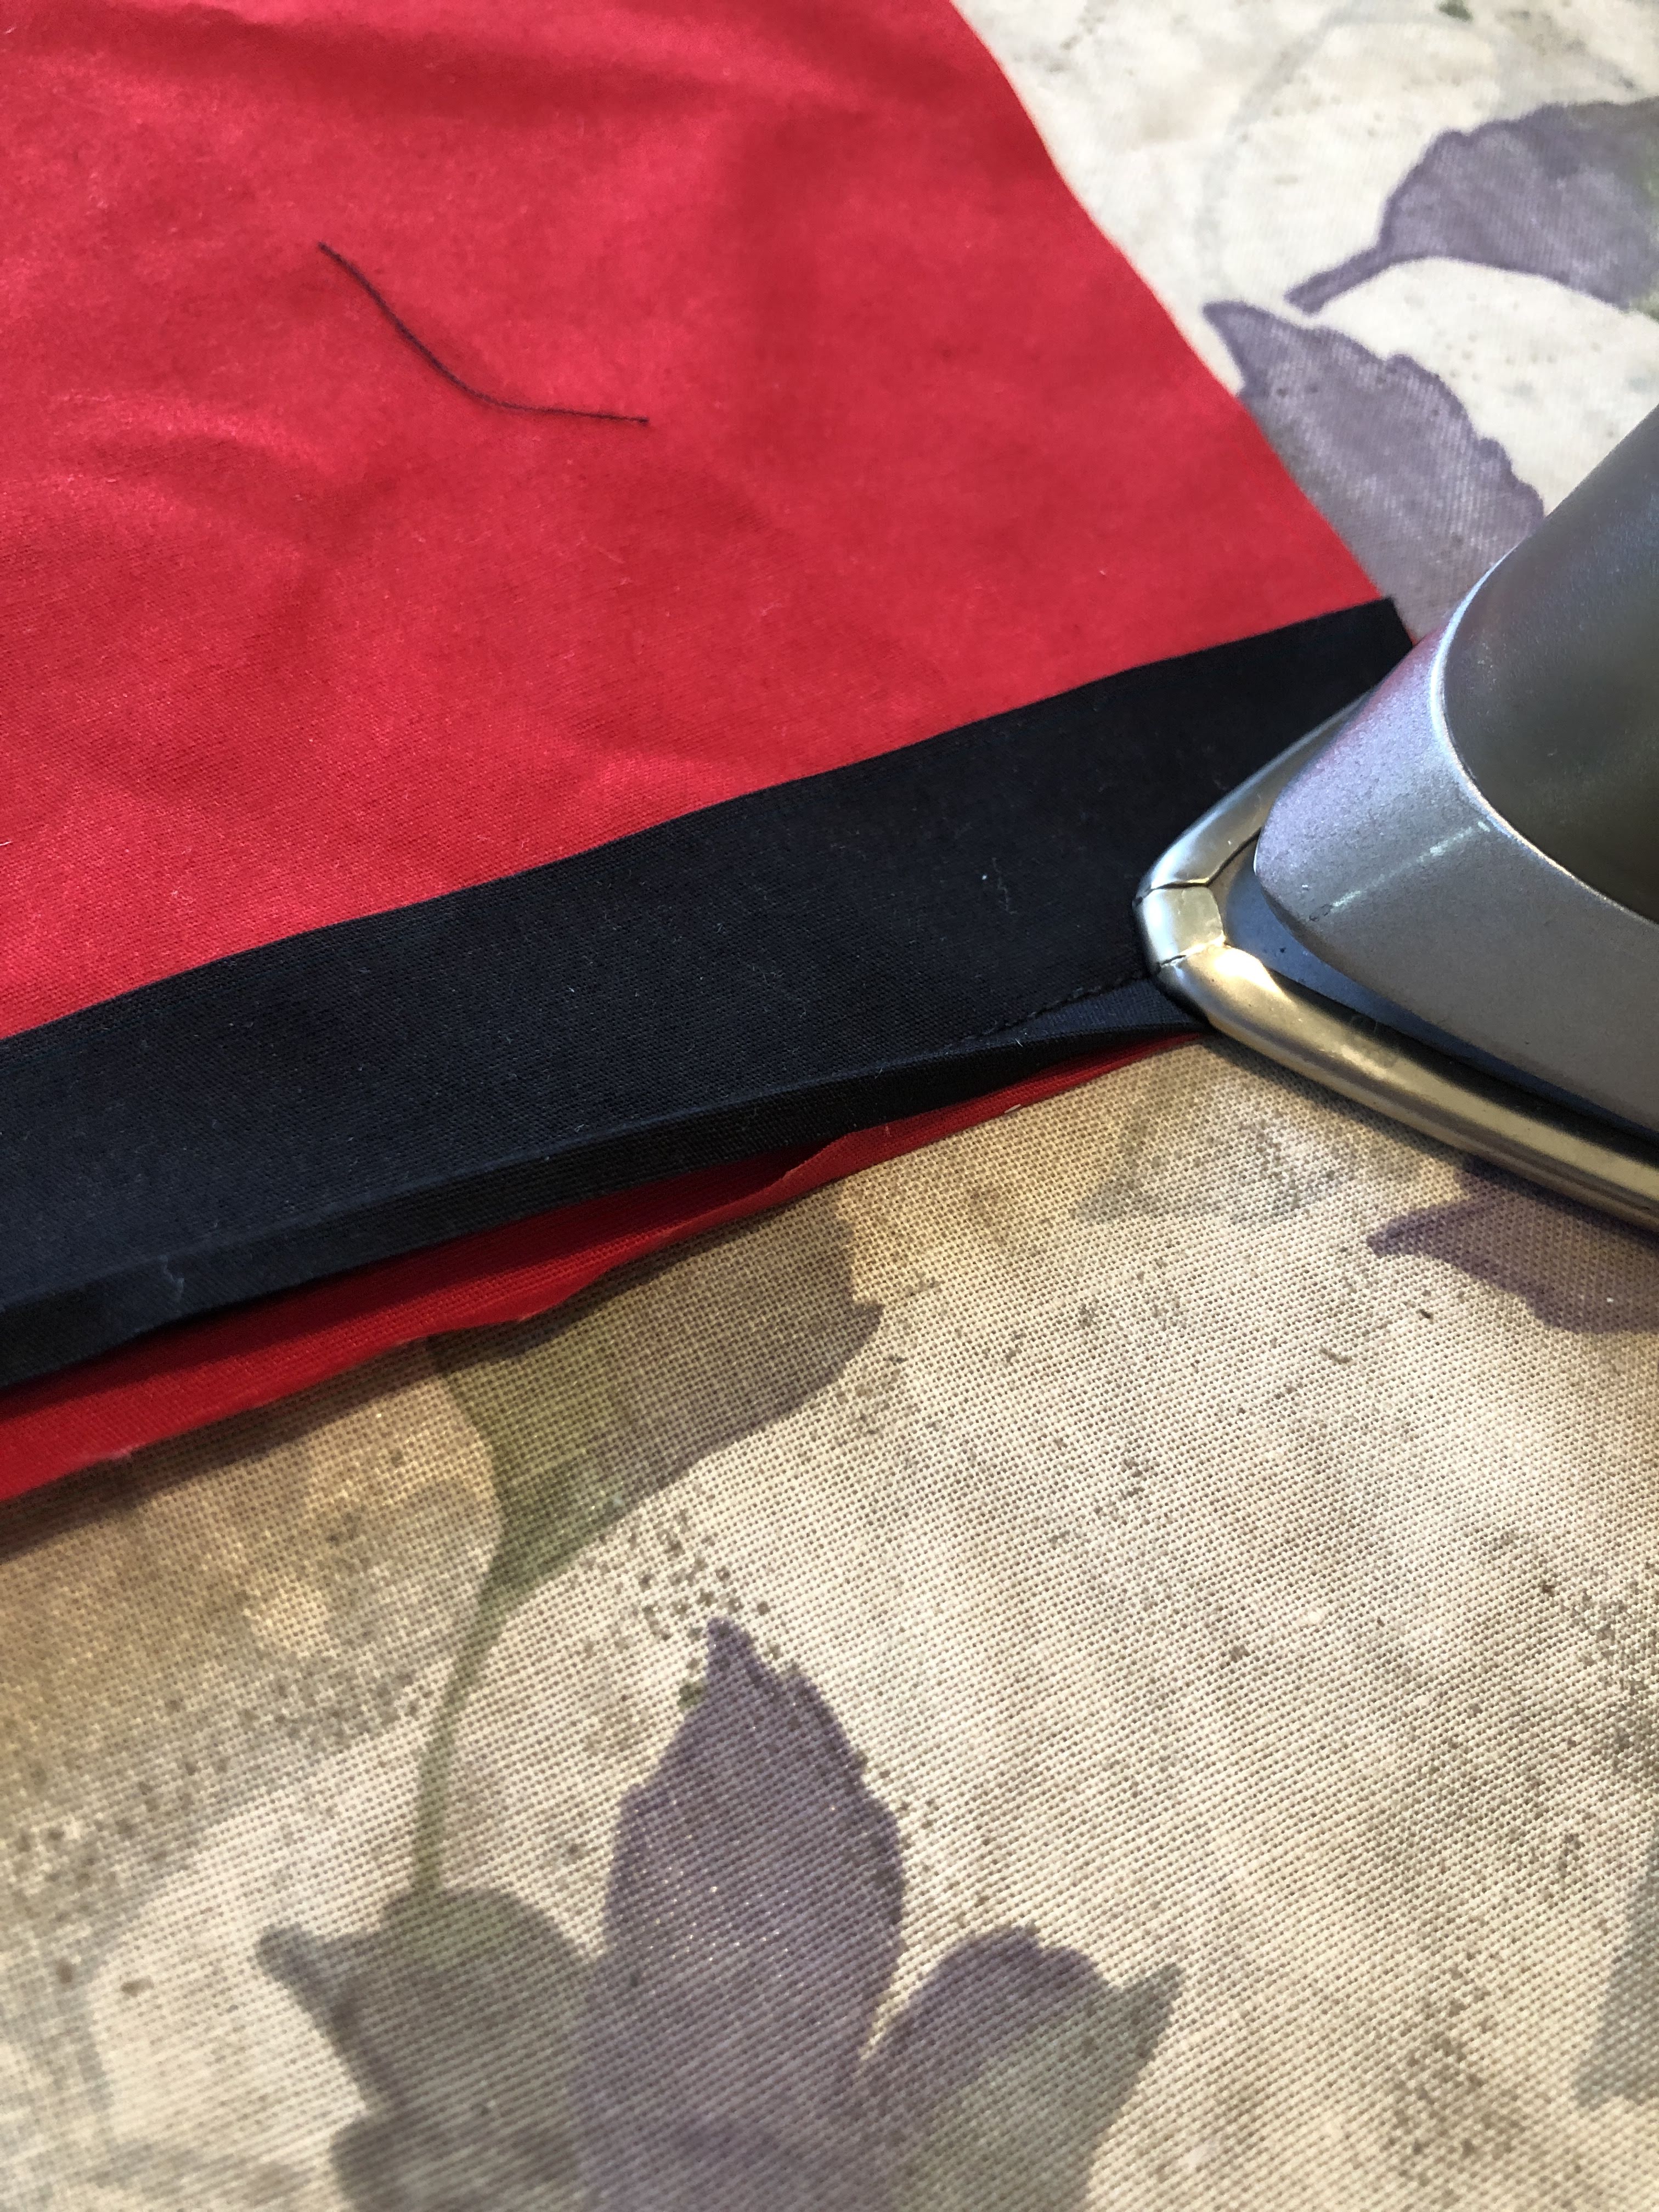
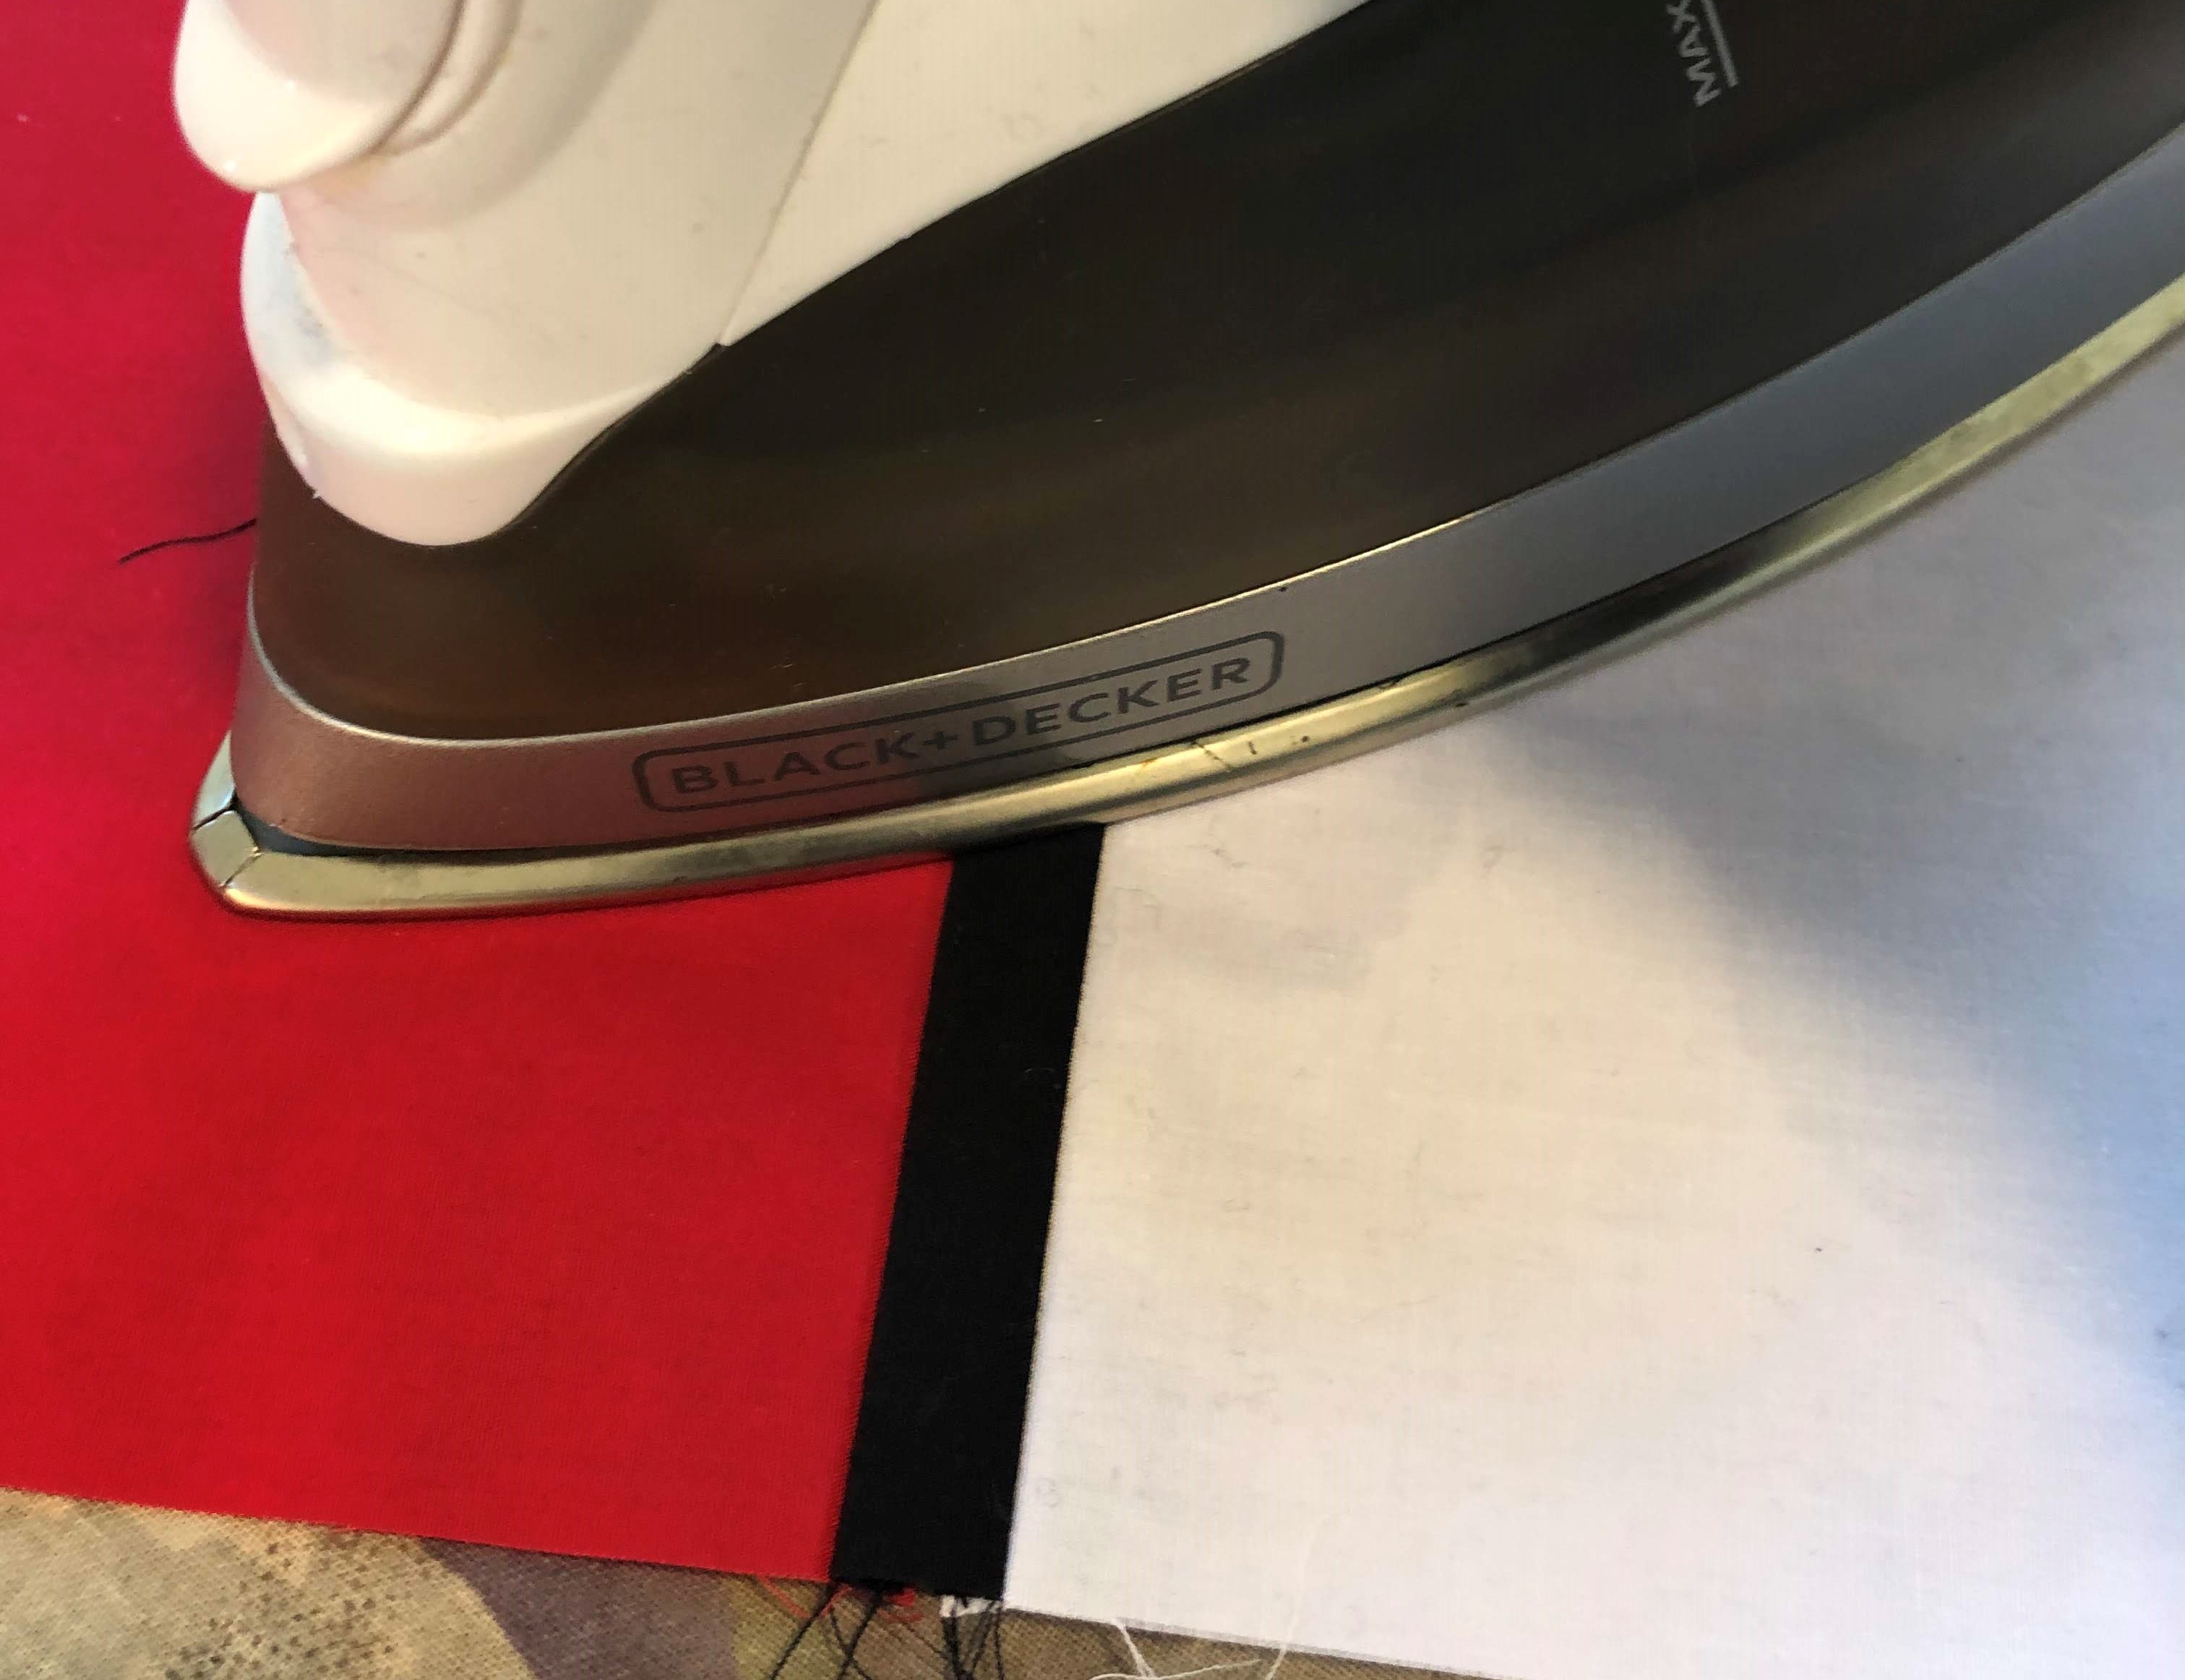
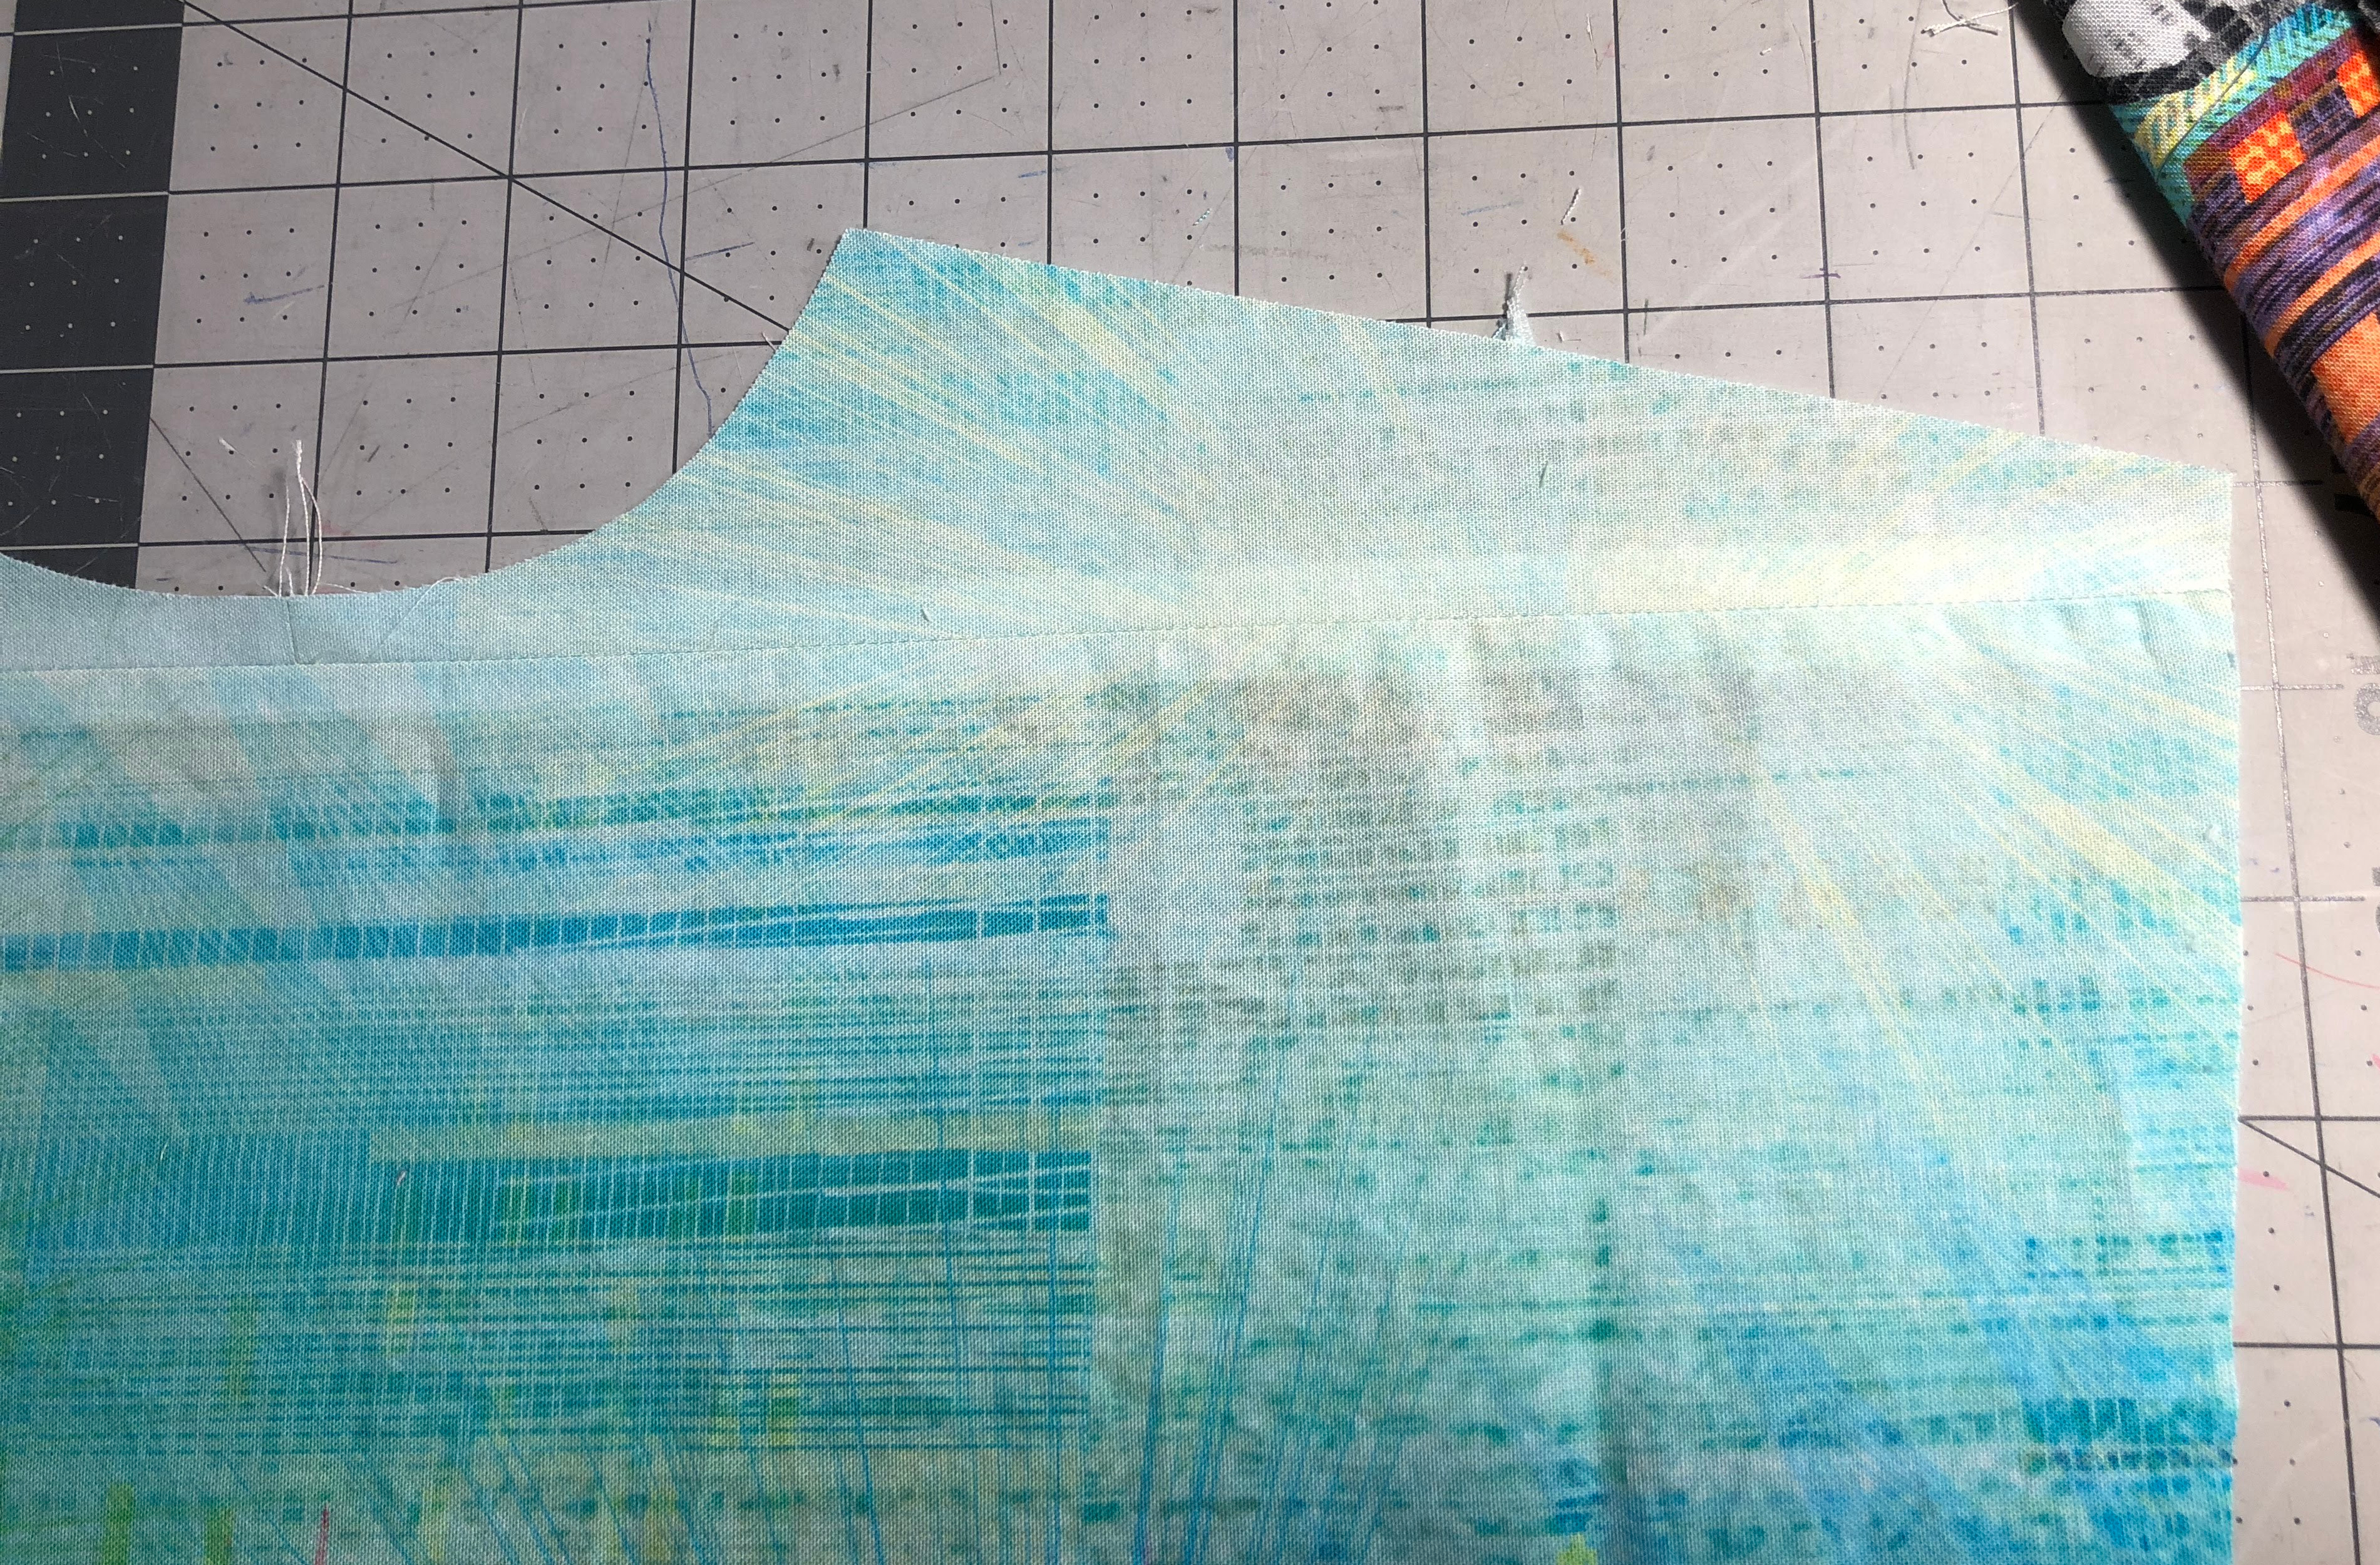
The tie and front came together easily once I had everything cut out. The only issue was the extra ‘normal’ placket that would continue down from where the tie ended. The tie’s tip is not connected to the shirt, and I had to figure out how to connect the two without showing that the tie was connected to the front. I ended up creating a strip of fabric that I sewed to the part you see on the right in the photo above, under a 45 degree angle. This way you could not see the seam without lifting the tie up. Aligning this, to maintain the pattern match was a hassle and took me many tries to get it done well. Basting this proved to be a requirement for a good result.

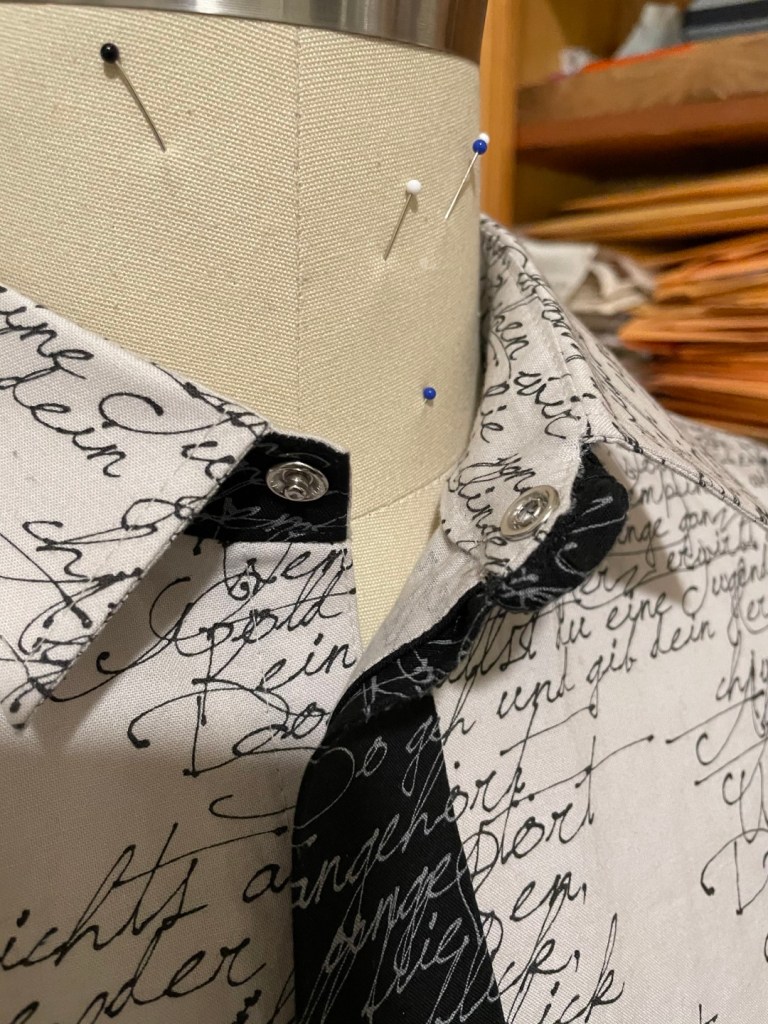
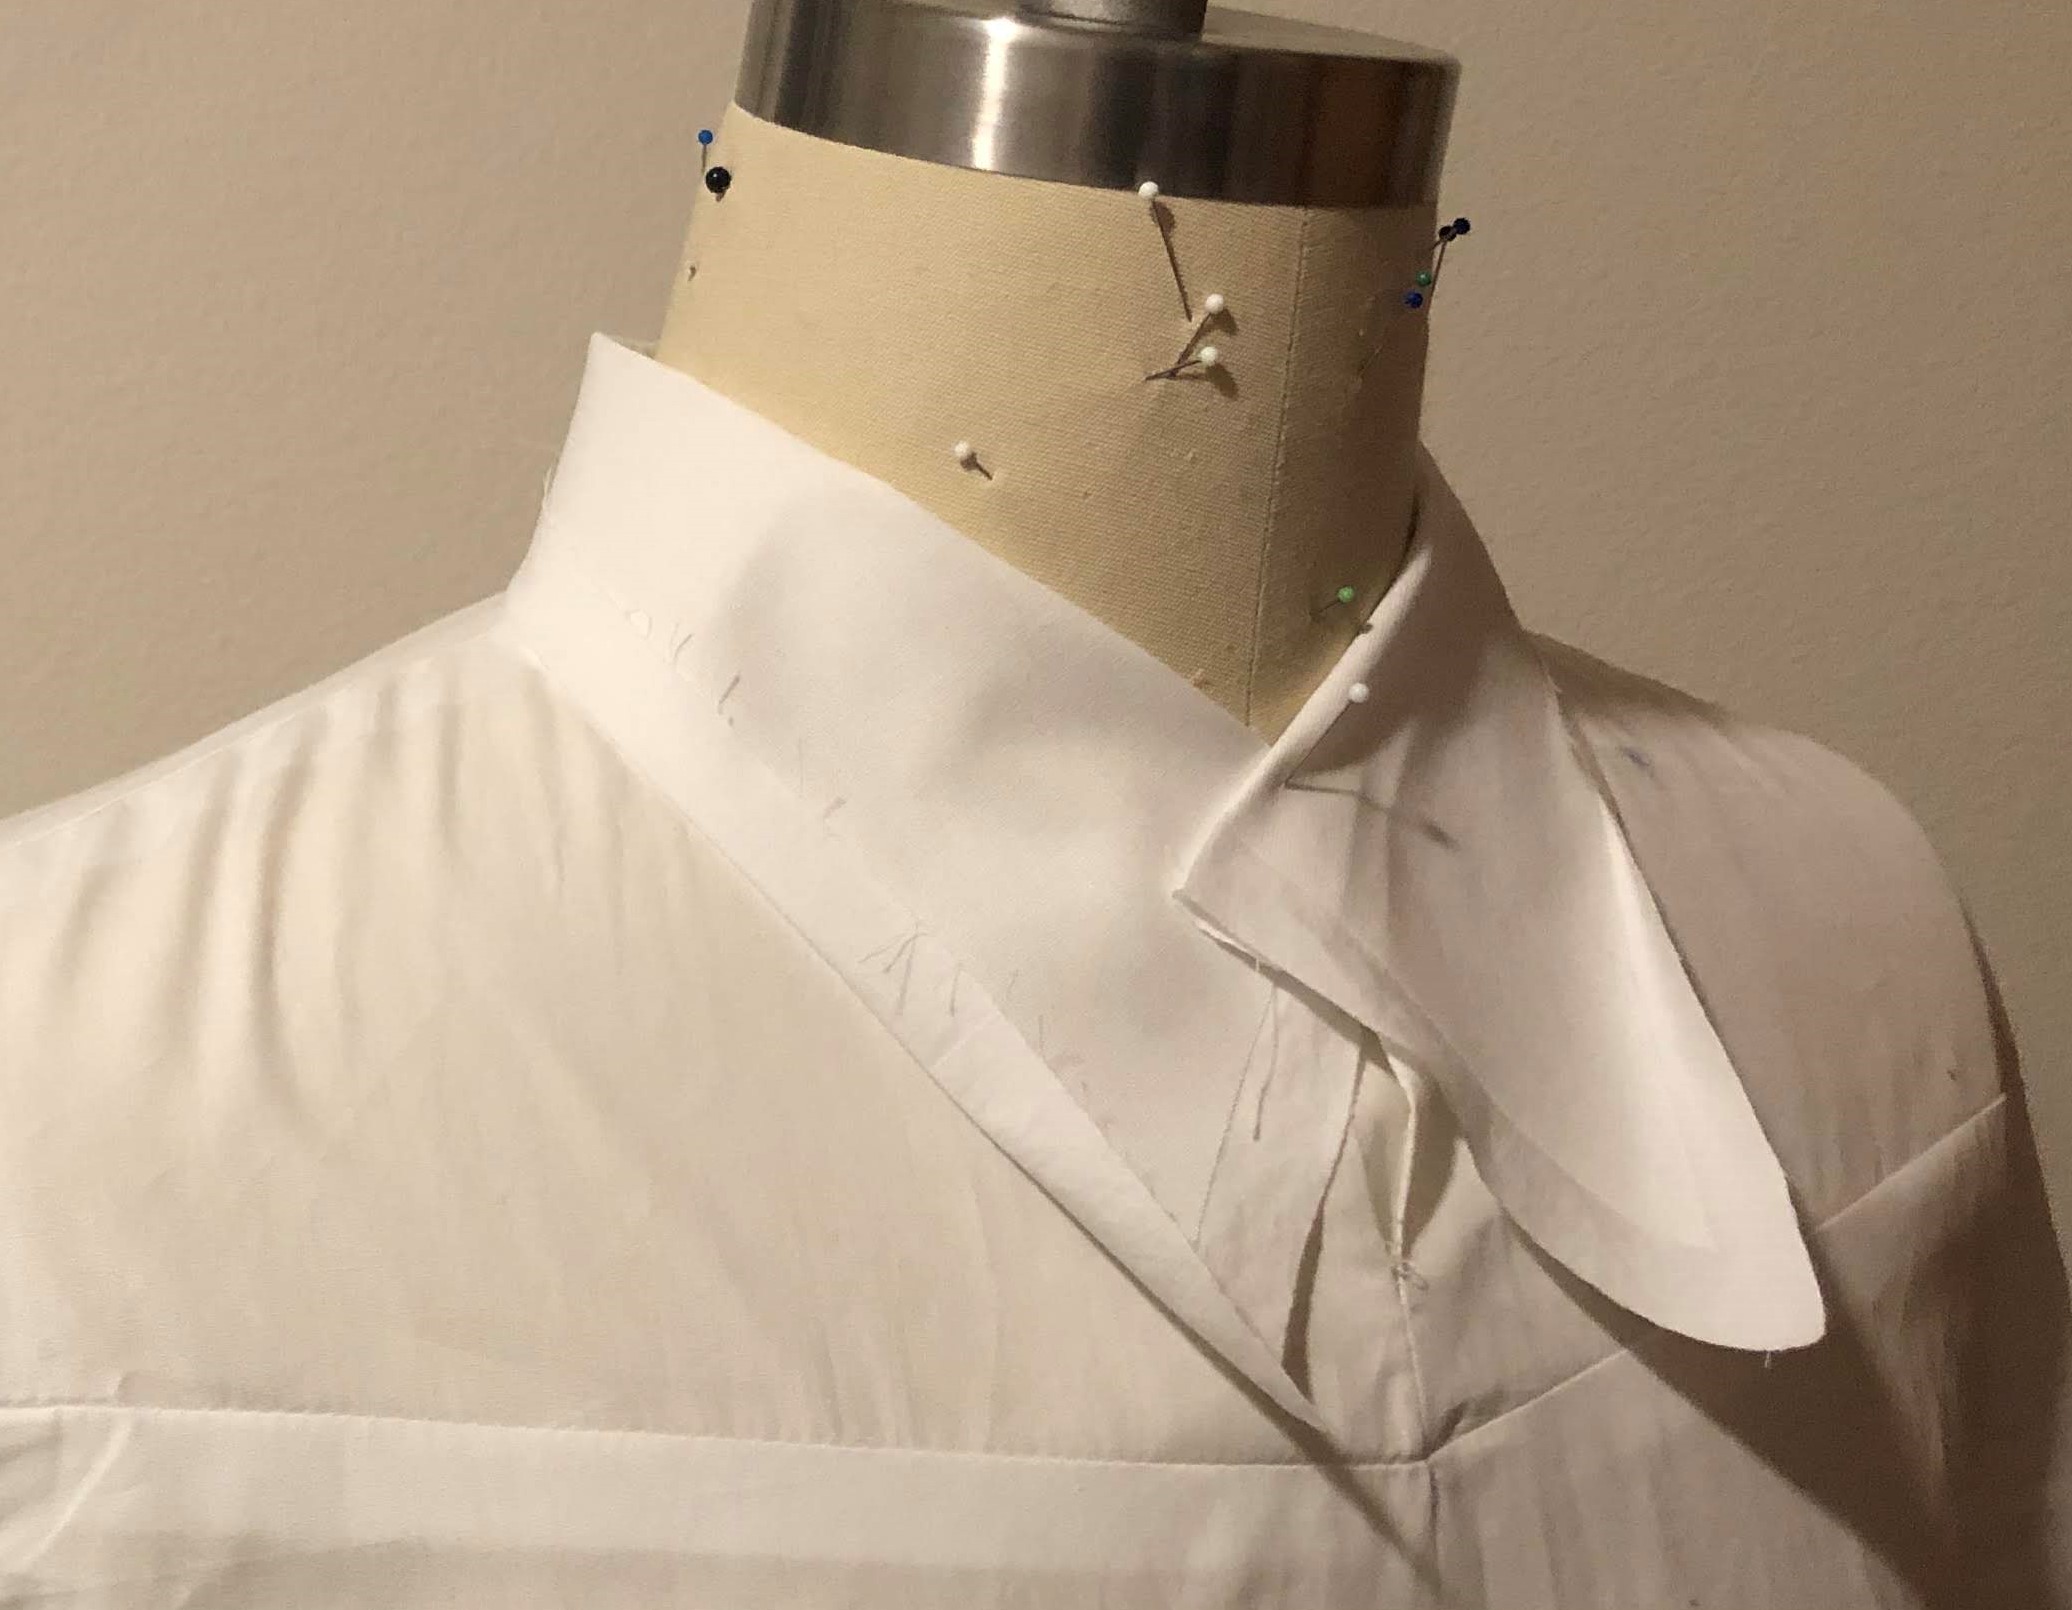
When I had this done I wanted to see how it looked on the dress form. And since I hadn’t made any shirts in what seemed like forever, I got a bit ahead of myself. I did the burrito method, and then sewed the side seams. It looked great on the form. Made the collar, with the outside of the collar stand in the black fabric to mimic the rest of the tie. But then came the sleeves, and after attaching the plackets, I realized that you don’t sew the side seam until you have the sleeves attached. And I had already made the flat felled seams. I had to laugh at myself, forgetting such an elementary step. After thinking it over a bit I just decided to make the sleeves separately, including the cuffs, and then set them in as you would do with a jacket. A bit more fussy, but in the end you can’t tell.

I made a little double triangle of the black fabric, and stuffed it with scraps. This would become the fake knot of the tie. The collar I chose to close with a snap, for I couldn’t think of a good way to hide a button there.

Thanks for reading!

Japanese fusion

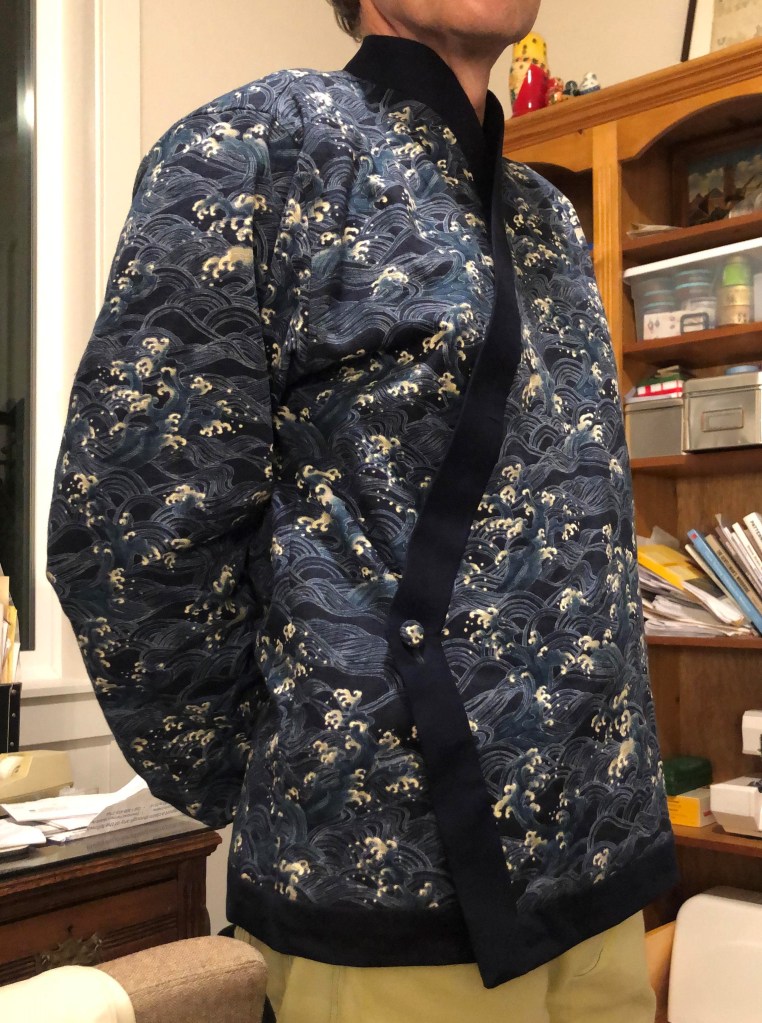
About a year ago I bought some fabric from Miss Matatabi, a cotton dobby with a print reminiscent of the Waves shirt I had made some time ago. I bought it without having a project in mind for it. I just liked it a lot and didn’t want to regret not buying some.

After laying in my stash for a while, I finally decided to make a shirt with it. The fabric, being a dobby, has quite a different feel and drape than the normal cottons I sew with. It is a little stiff, like it is a light canvas. And so as usual, my mind starts to drift and wonders what changes I should make to make this a more interesting project. With the Japanese print, looking for inspiration in Japanese garments seemed logical.

Making a Kimono seemed too easy, too obvious. And I don’t know when I would ever wear a kimono. Exploring this a bit further brought me to Samue. This seemed like something I could use. The patterns I found were all comparable to a kimono pattern; angled pieces with straight seams.

I figured I could create a combination of a button-up shirt and a samue. Use my shirt pattern and adjust it for the different front opening. Make the sleeves somewhat wider at the cuff. But keep the shaped sleeve-head. And keep the back yoke and pleat. Add cuffs like a normal button-up shirt.

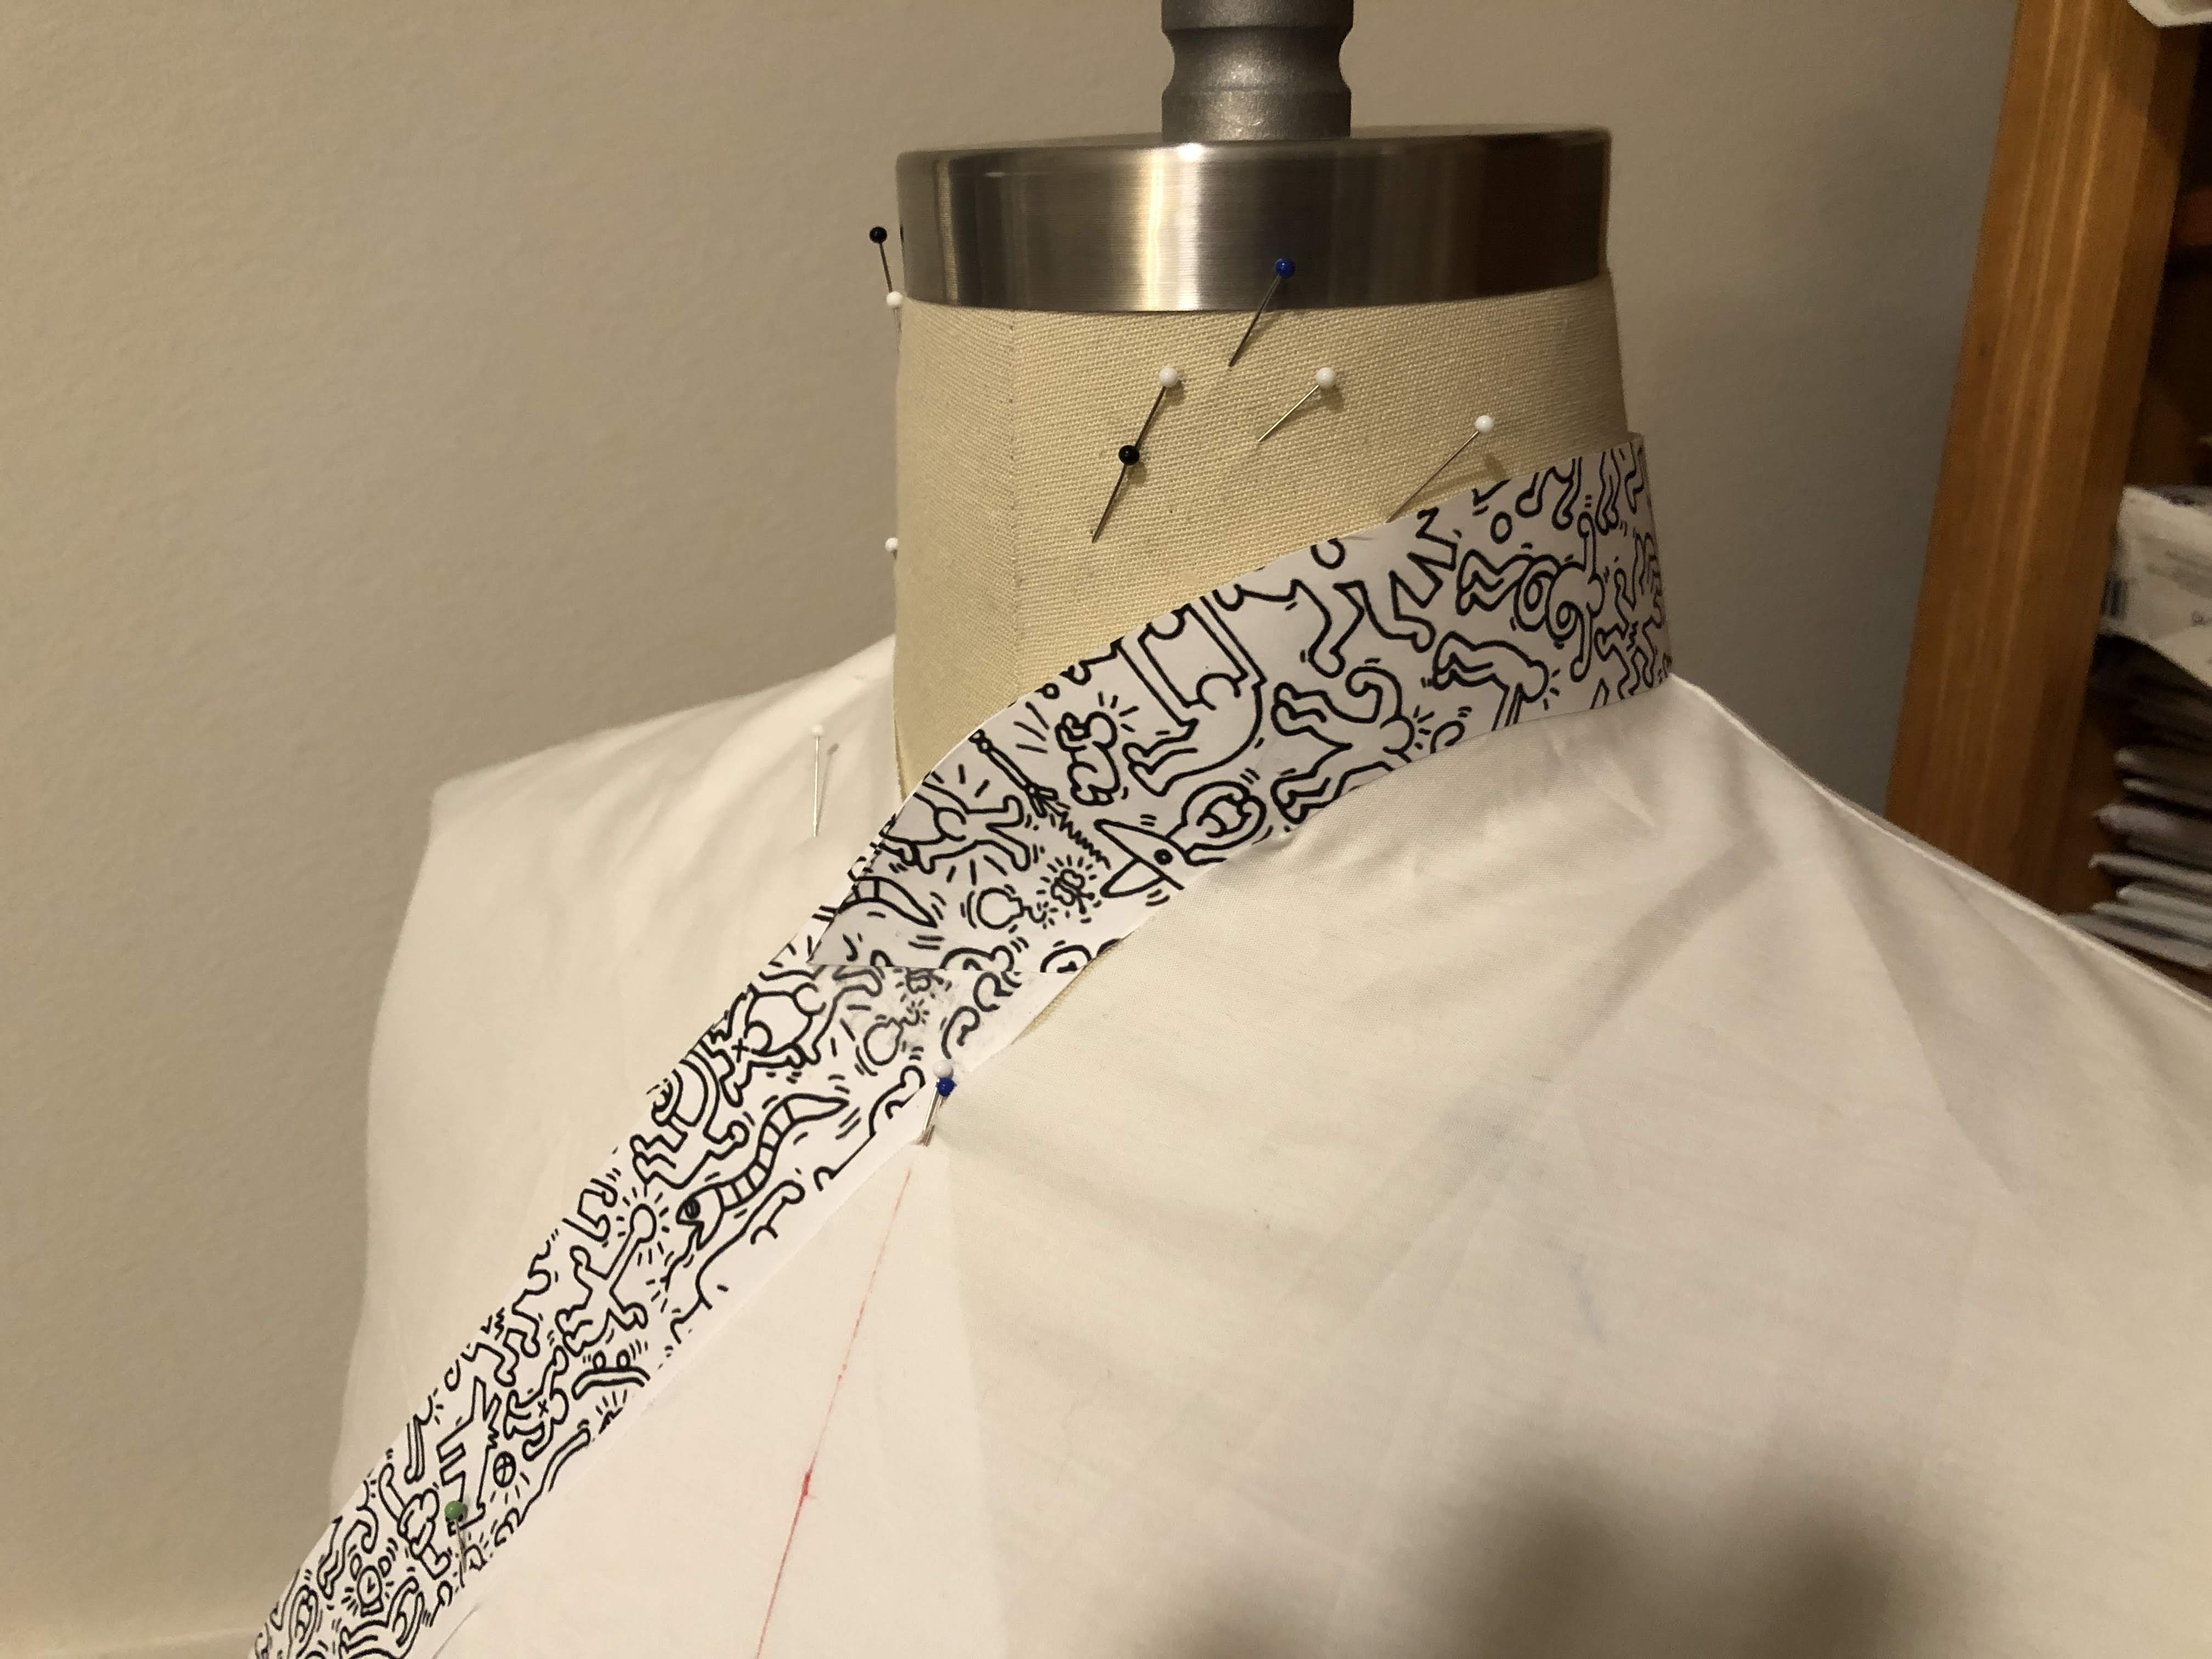
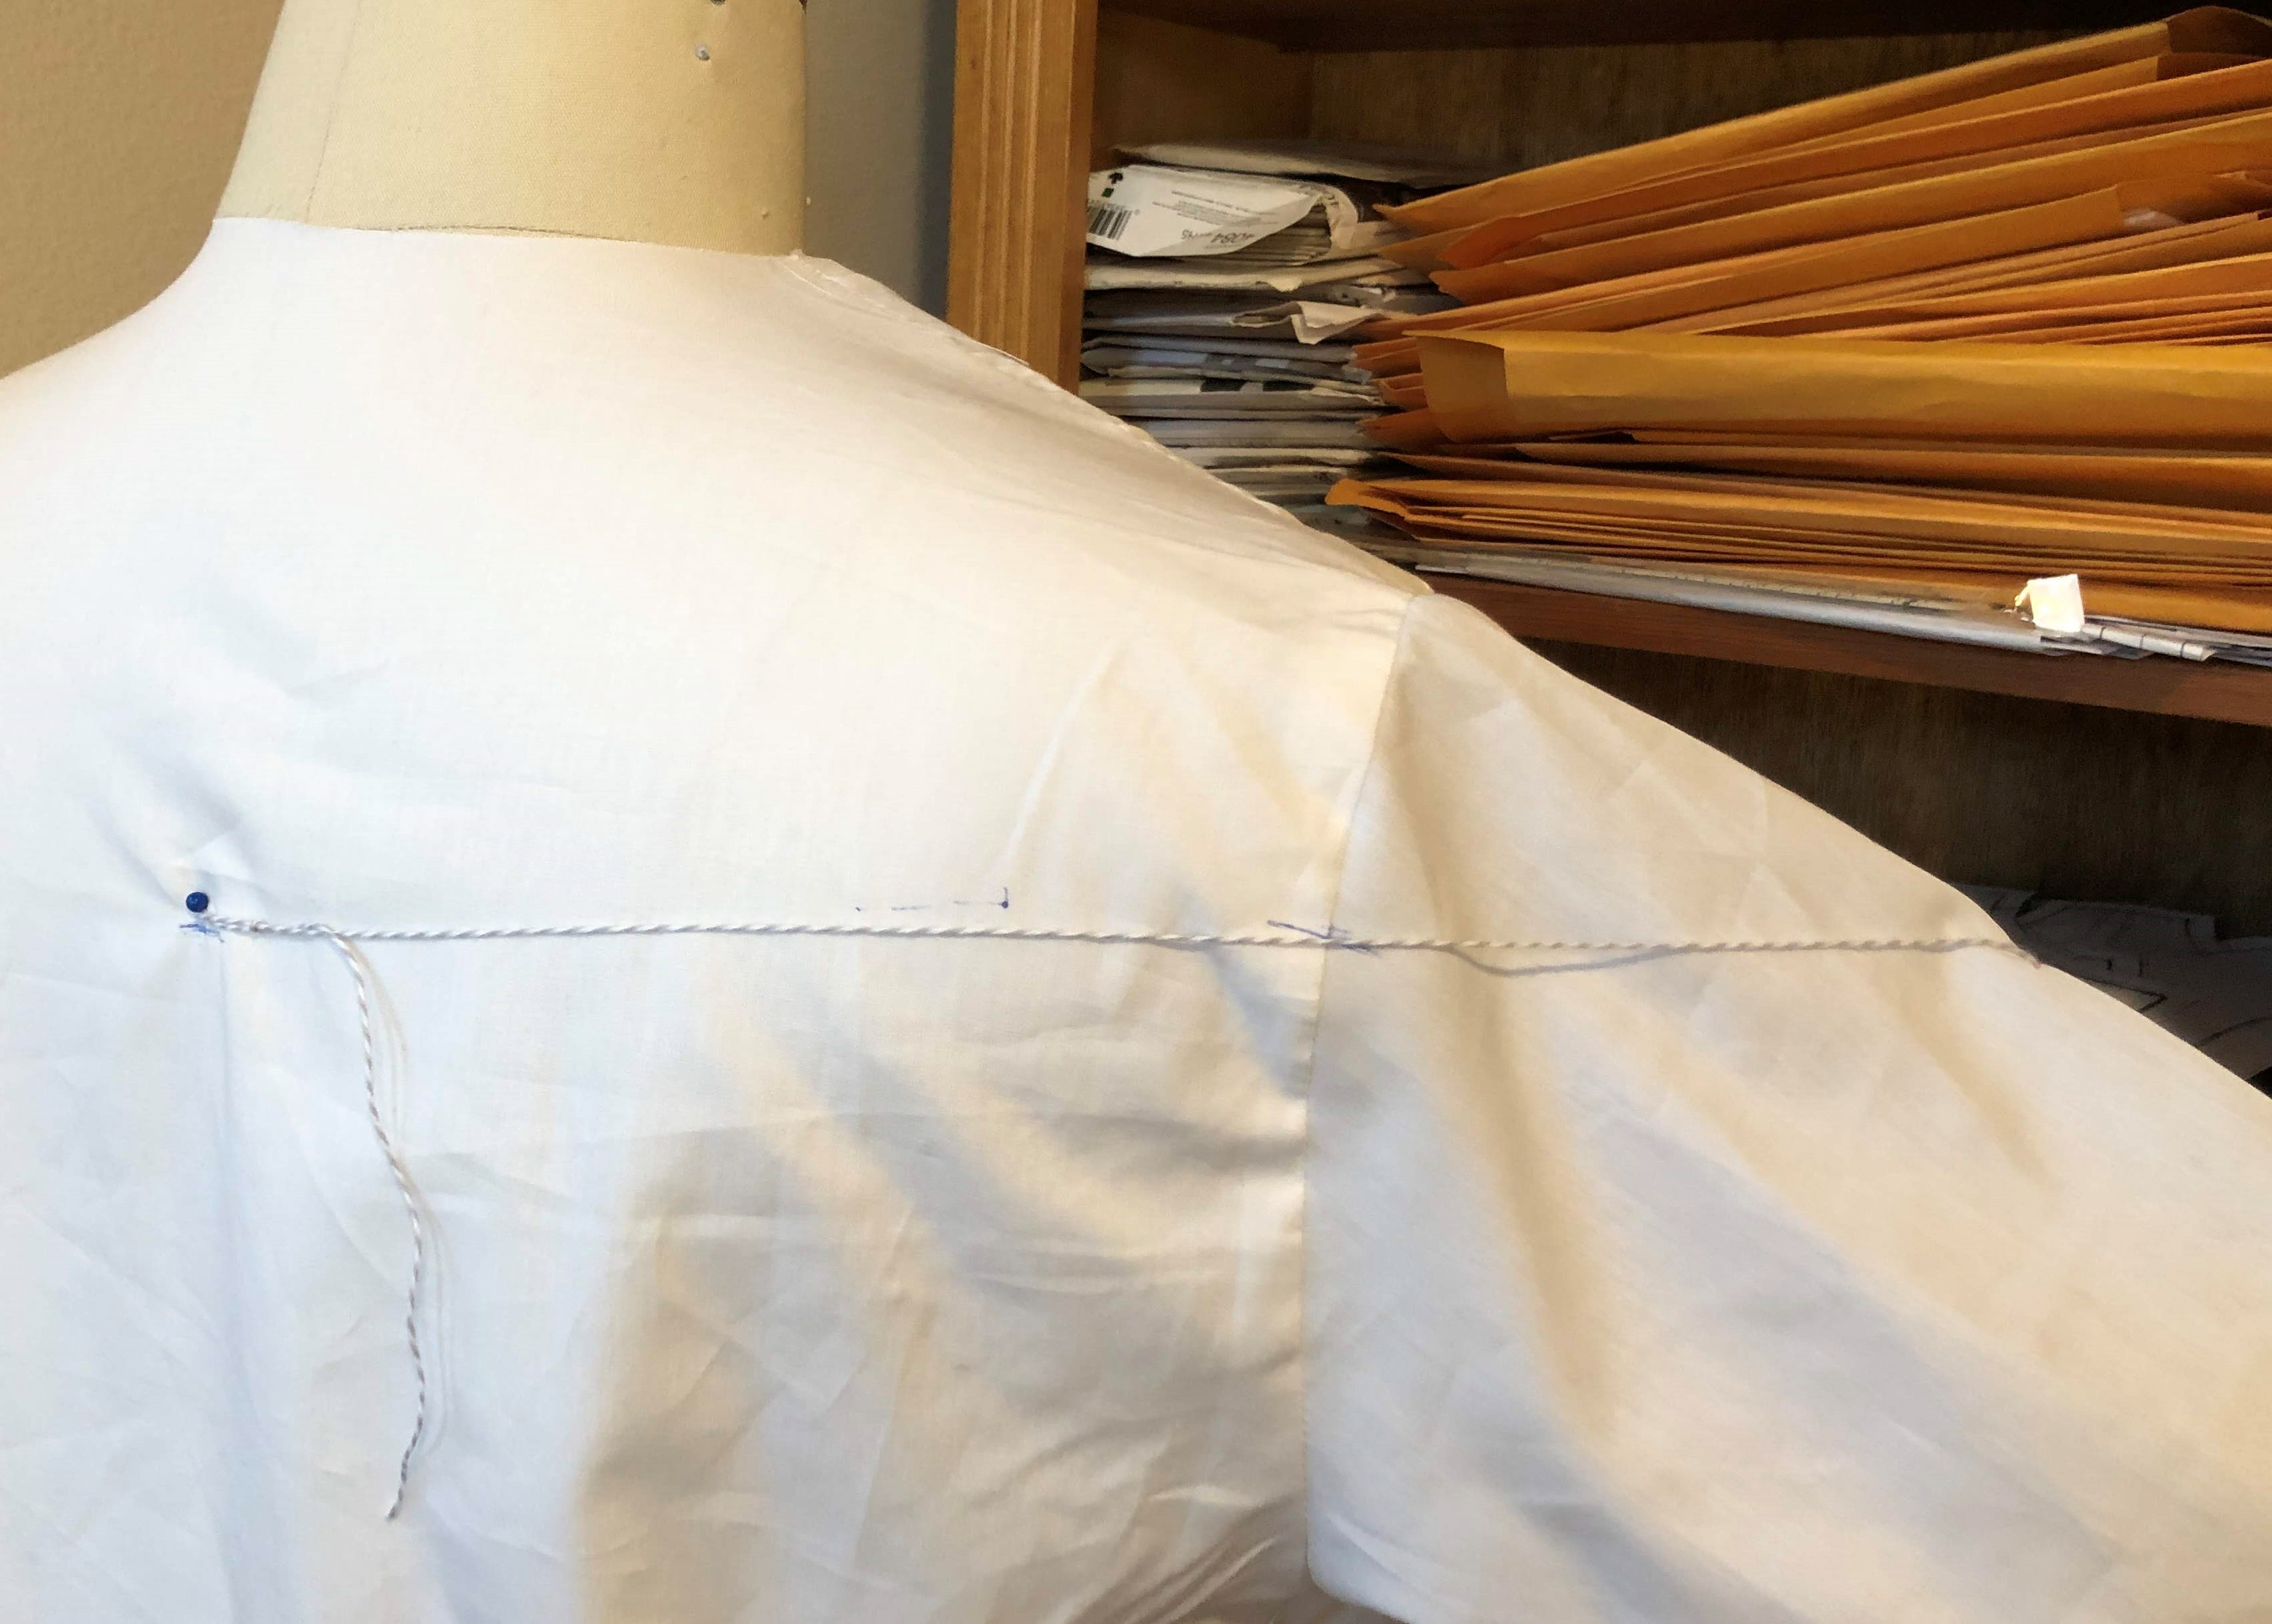
First thing to tackle was figuring out where I wanted the diagonals for the closure to go. With a current shirt of the same pattern, a string, and my dressform, I quickly came to something I found pleasing. I transferred the line to a copy of the front pattern piece and made a muslin with that.

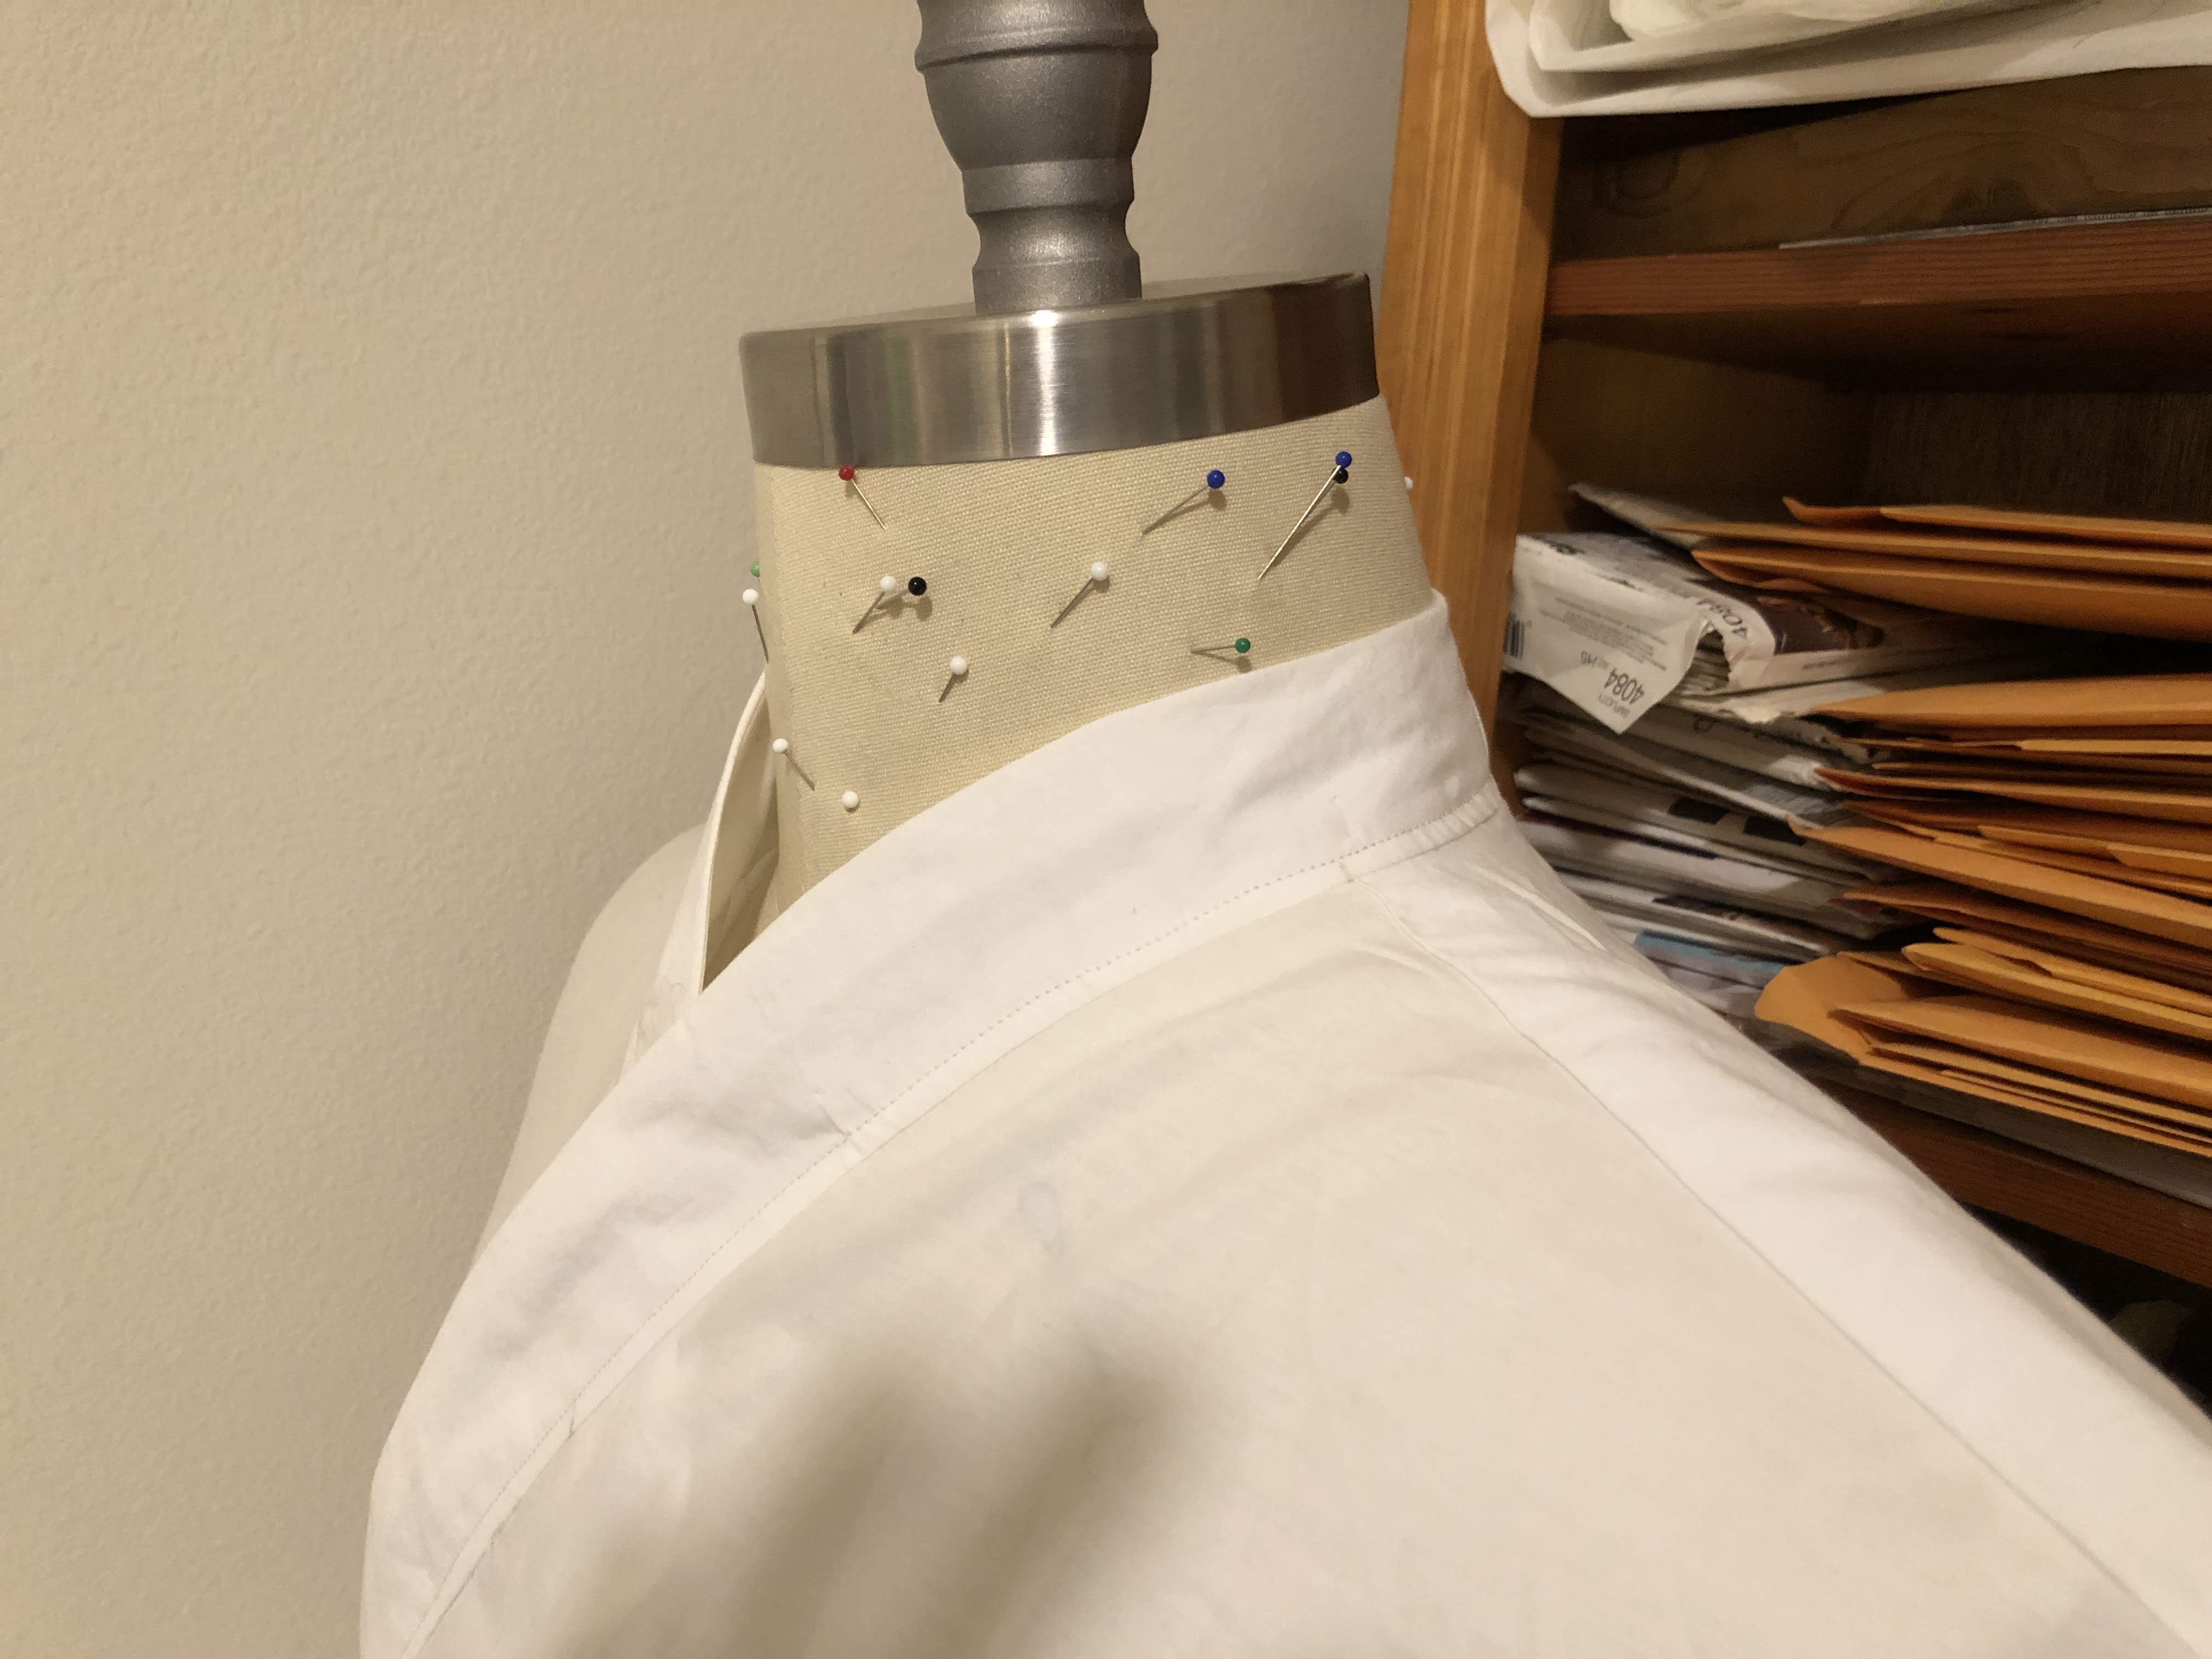
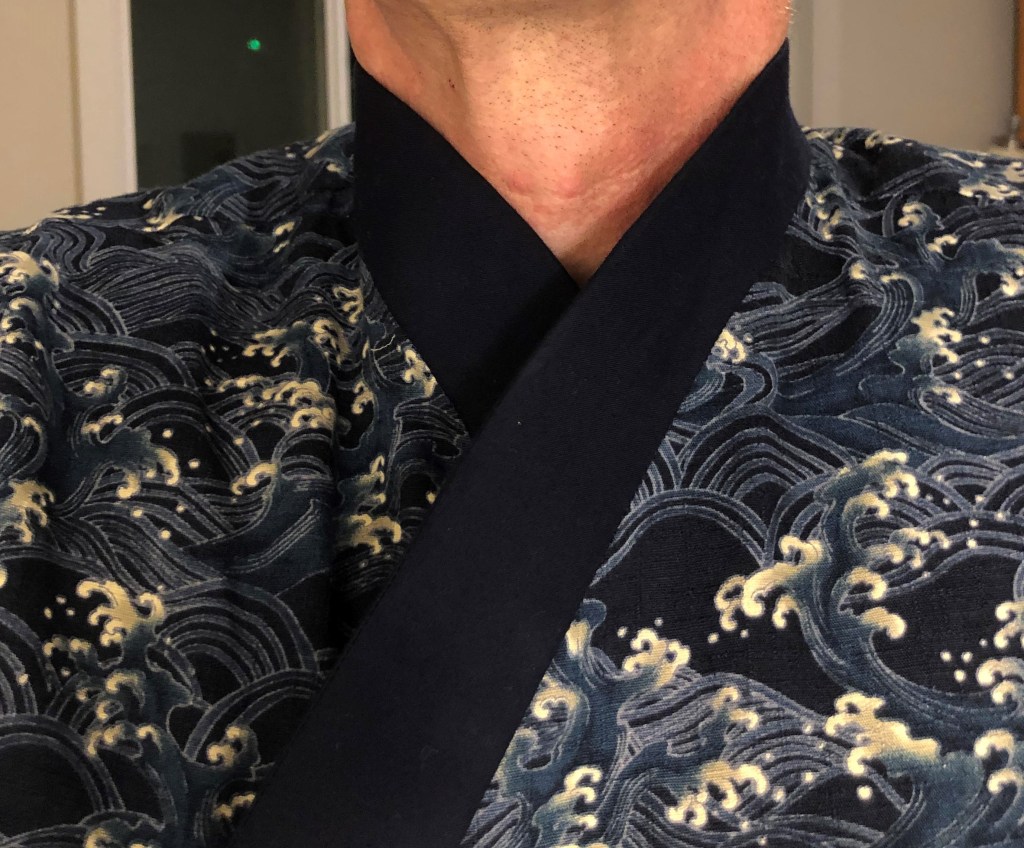
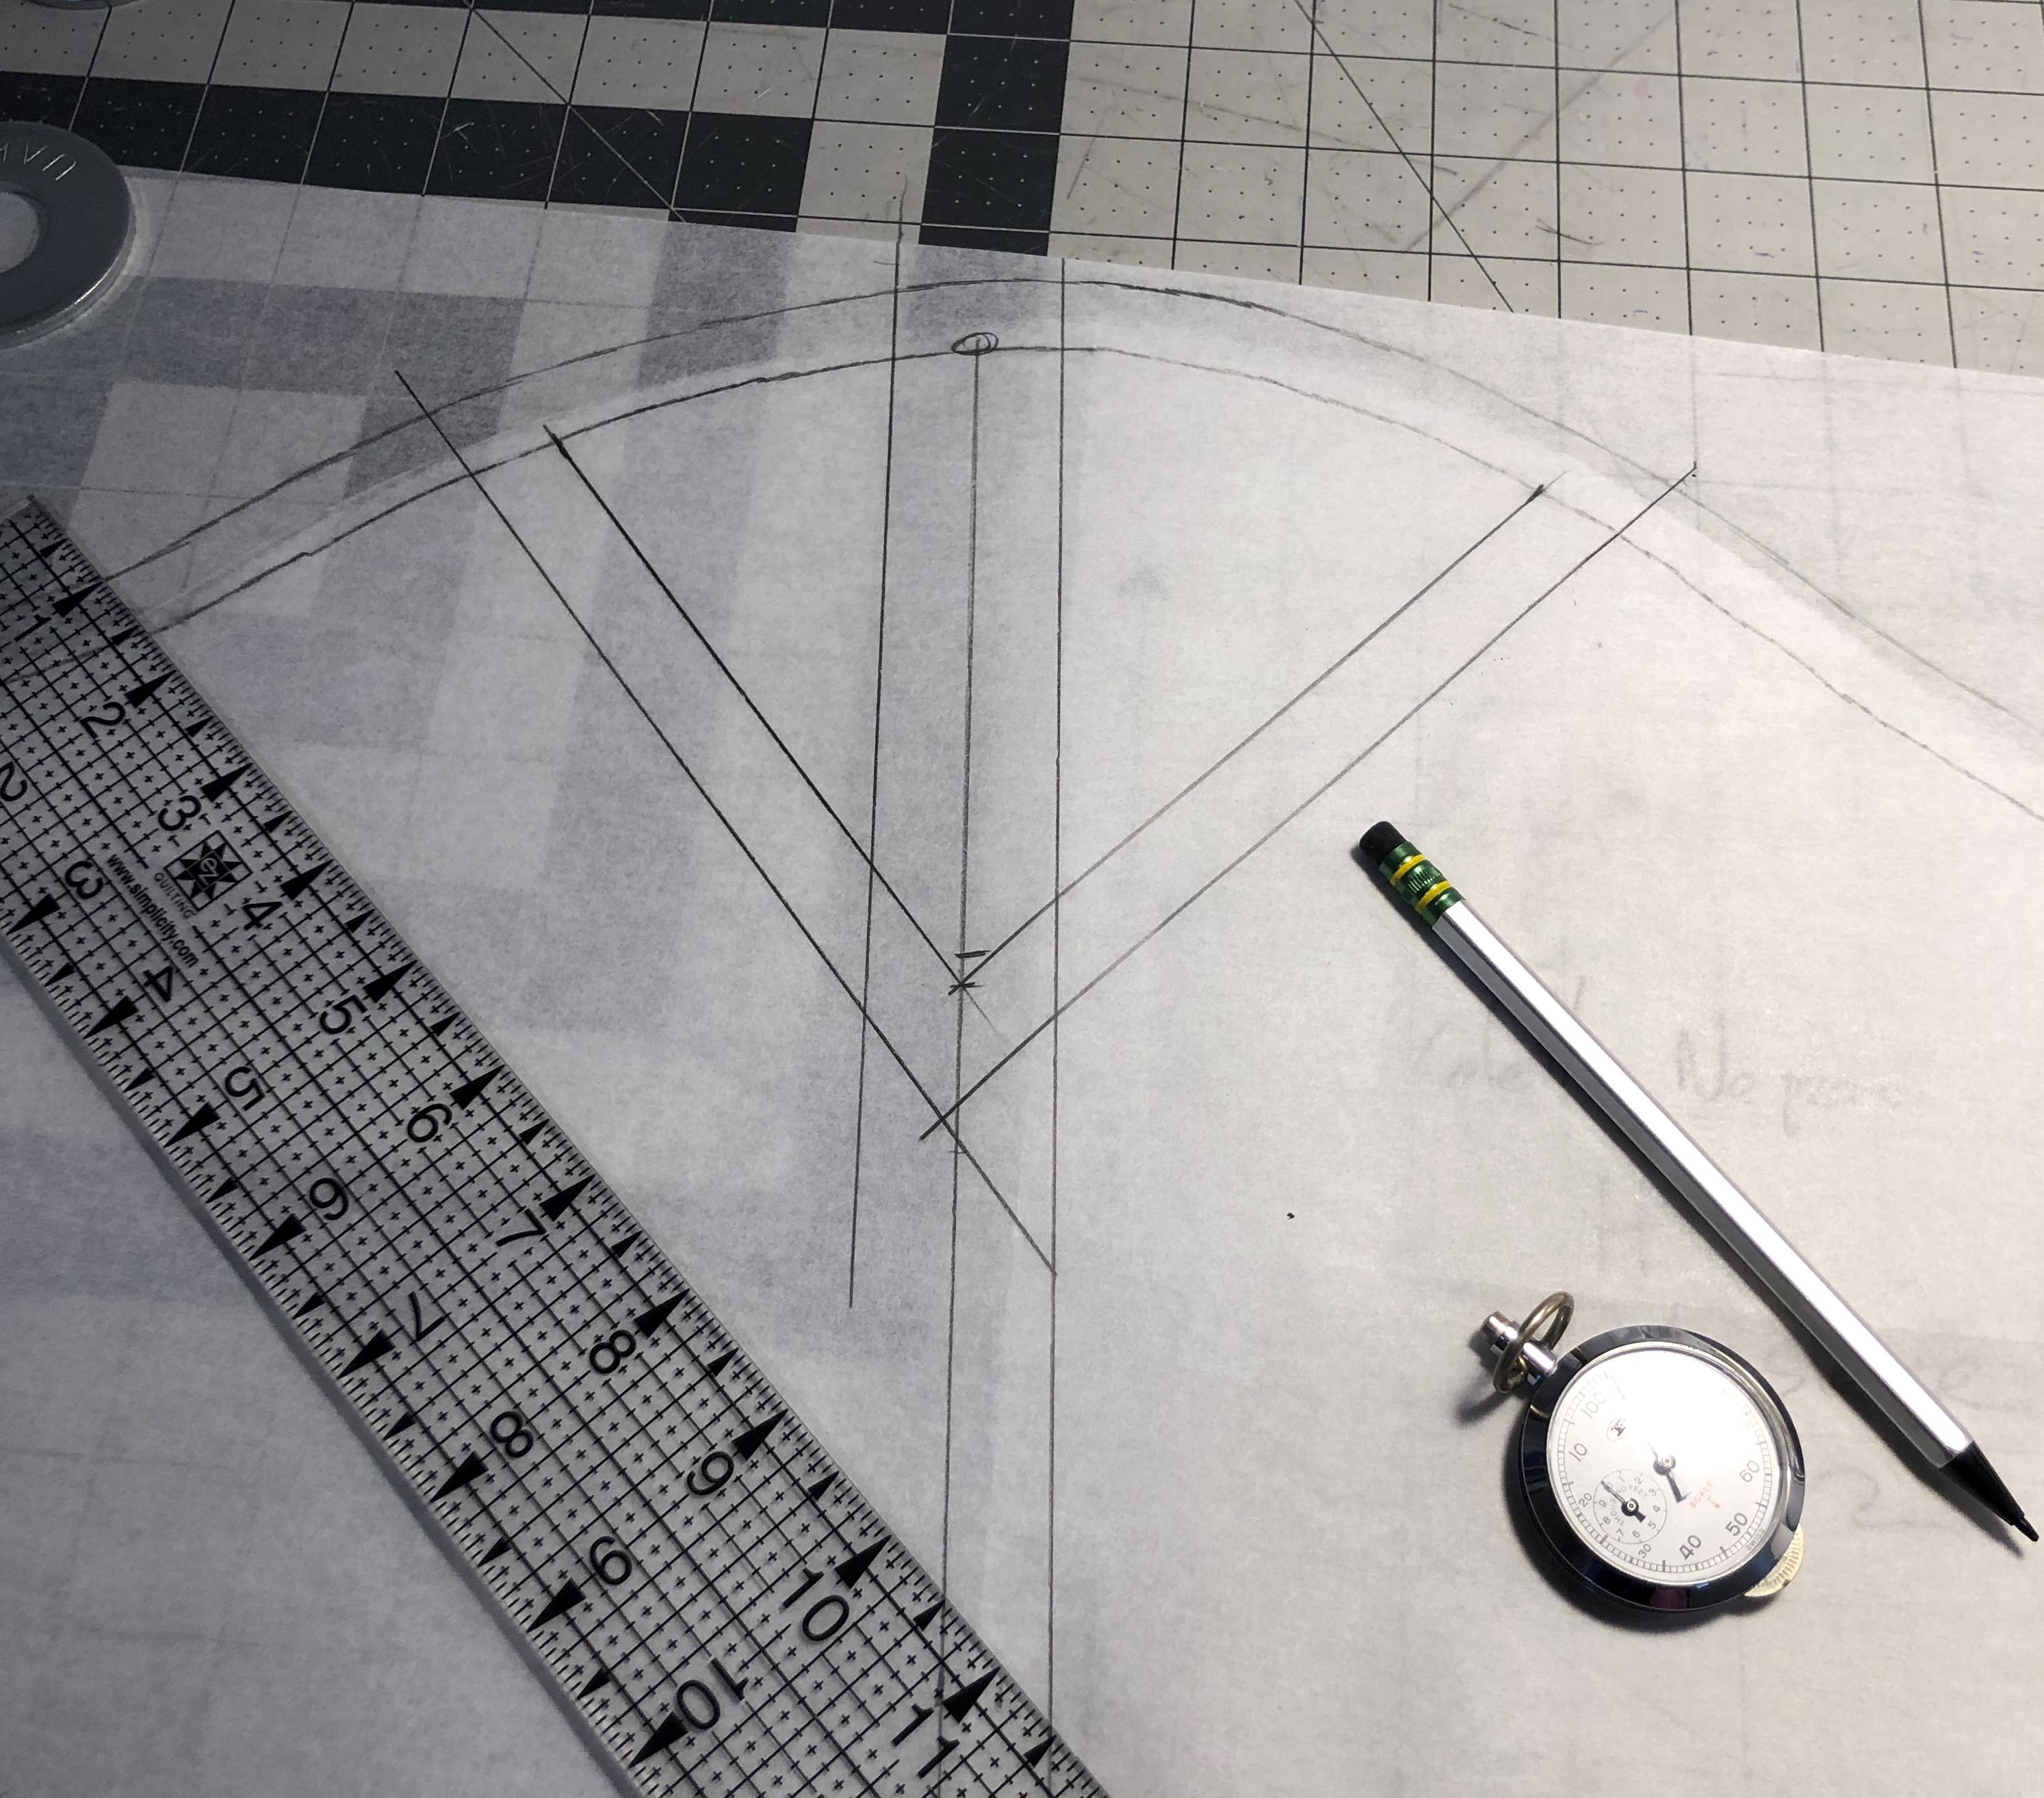
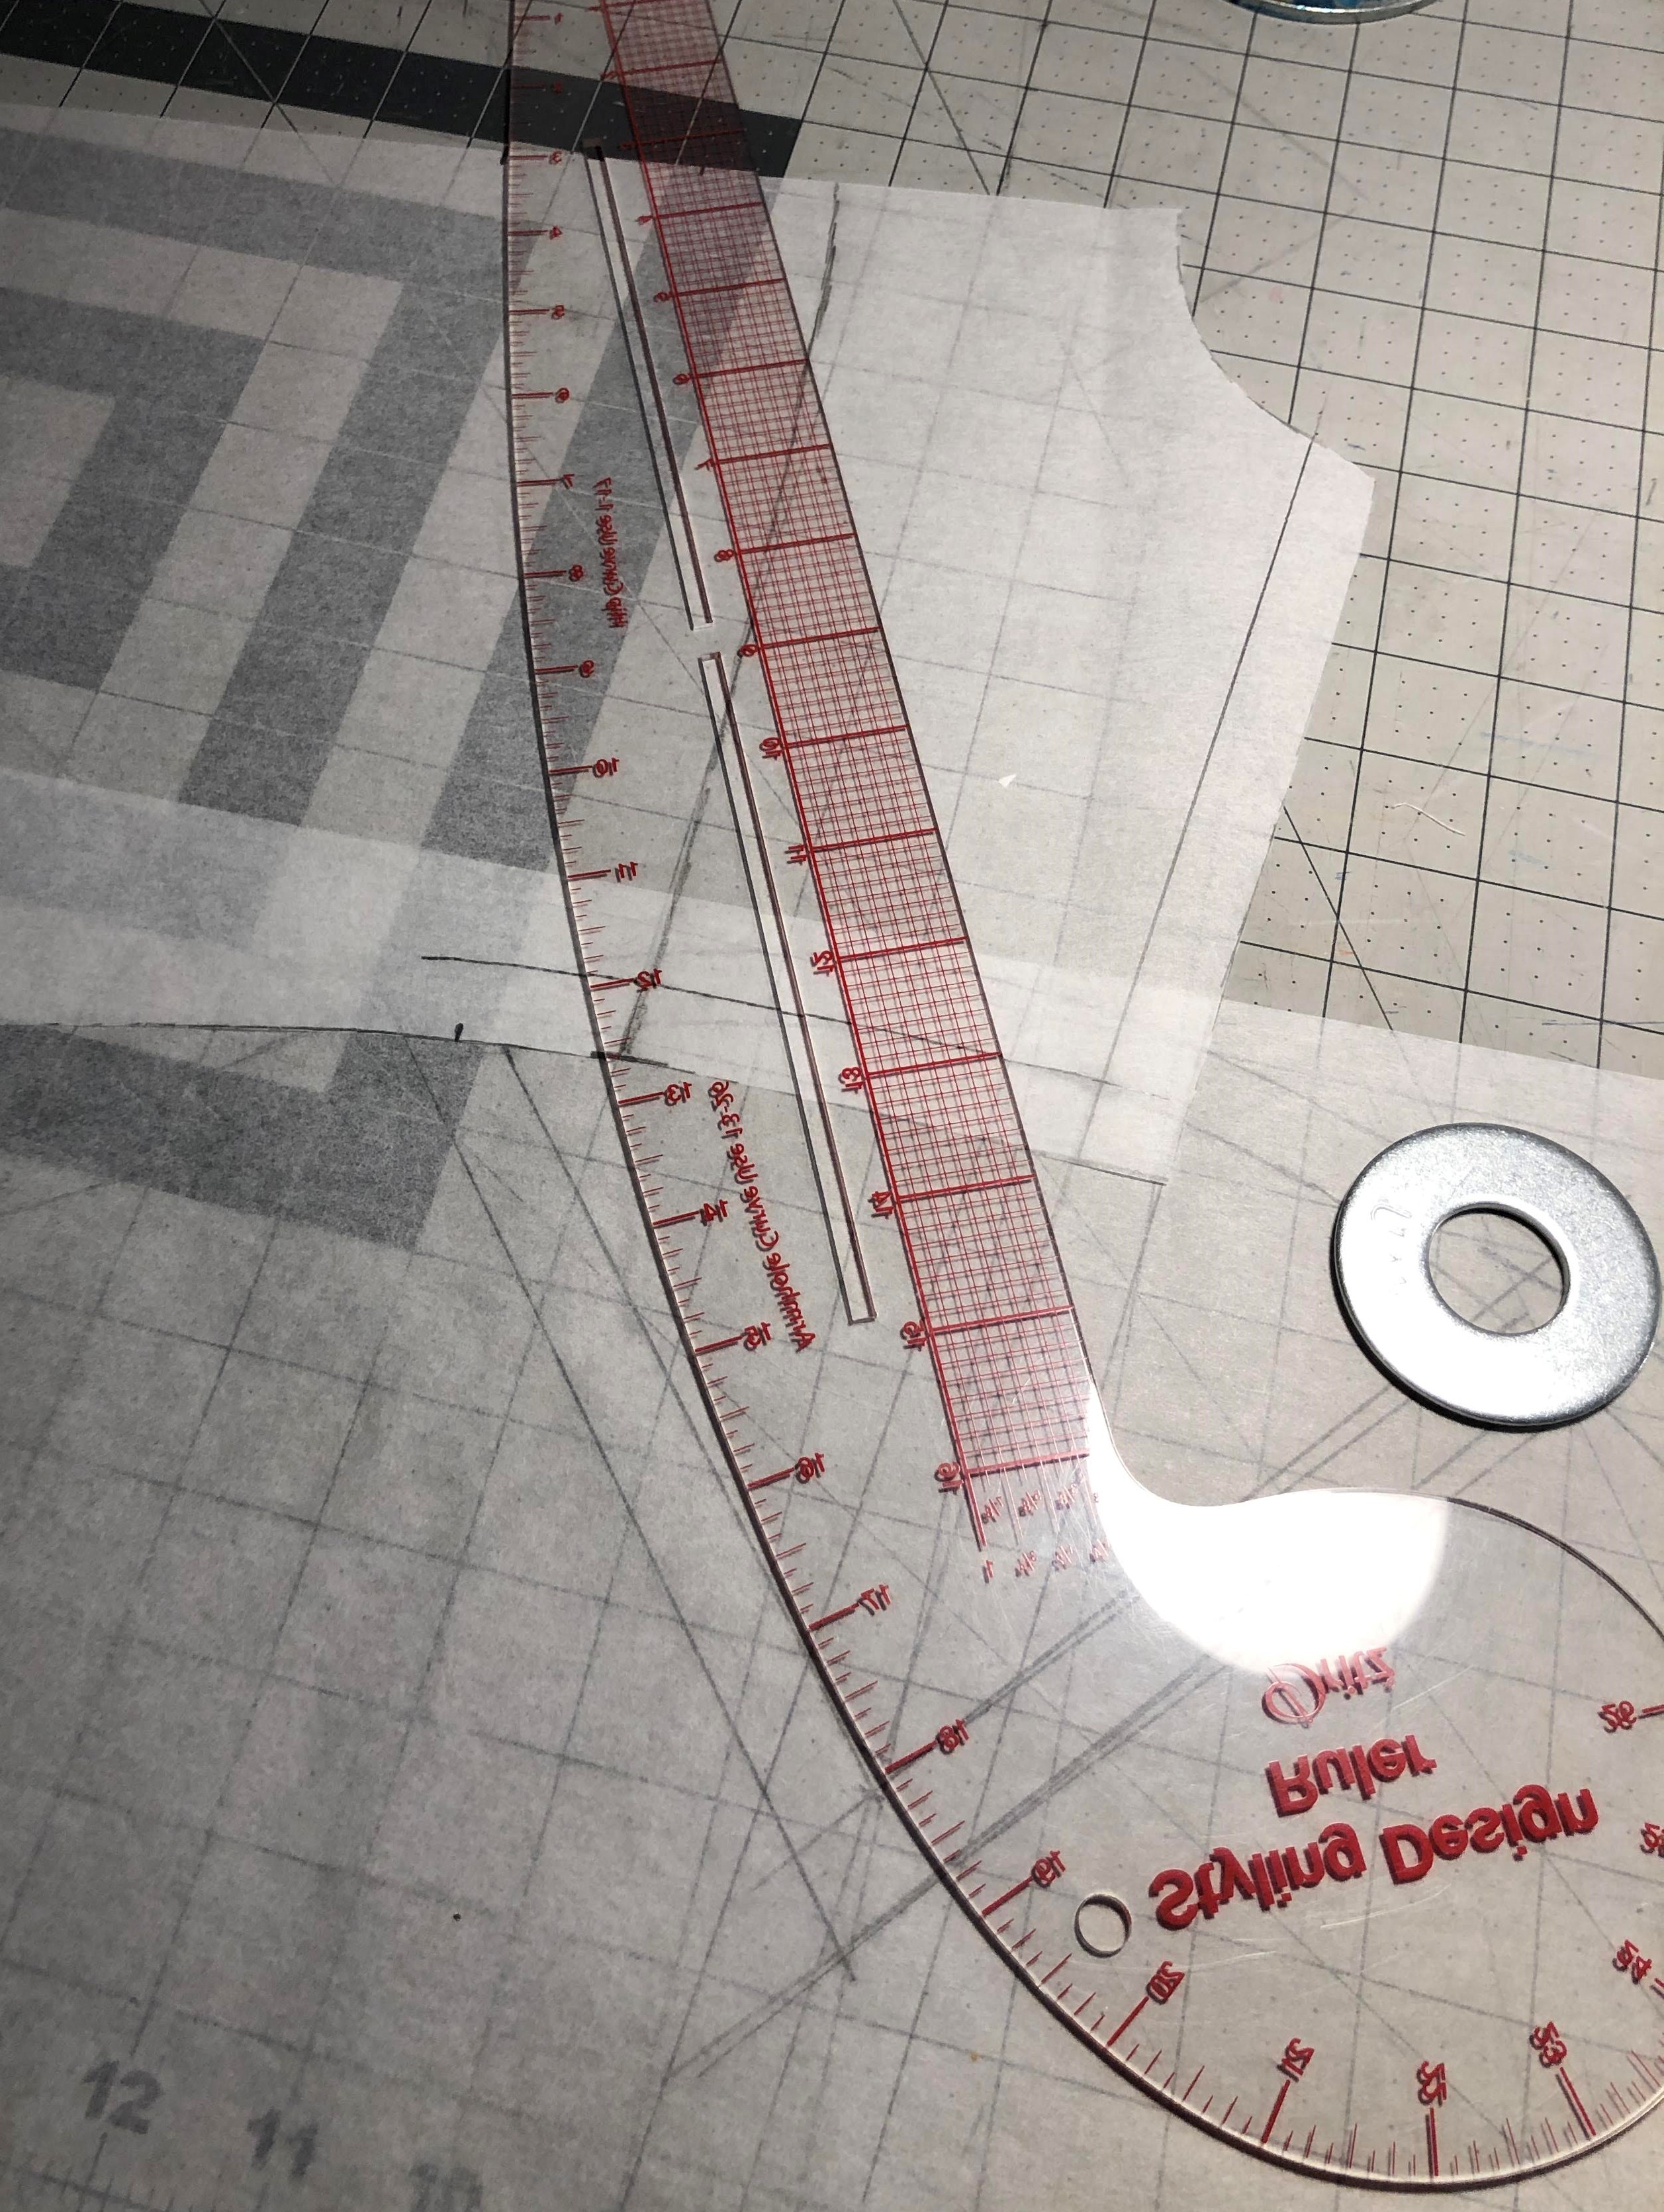
Now I could work on the more challenging part; the collar. With the Japanese patterns, it’s all straight lines. I wanted something that would be more form-fitting. When presented with this problem before with another shirt, I just used paper. Tape it in place, draw where a seam needs to be, cut away what shouldn’t be there, and repeat. Eventually you’ll get to something that resembles what you had in mind. And that you can transfer over to a pattern piece and then onto fabric.

Now that this major hurdle was out of the way, I could start working on the real shirt. This required me to go shopping for some contrast fabric for the collar/placket combination. Creating the idea is one thing, having all the things necessary to put it in practice is another.

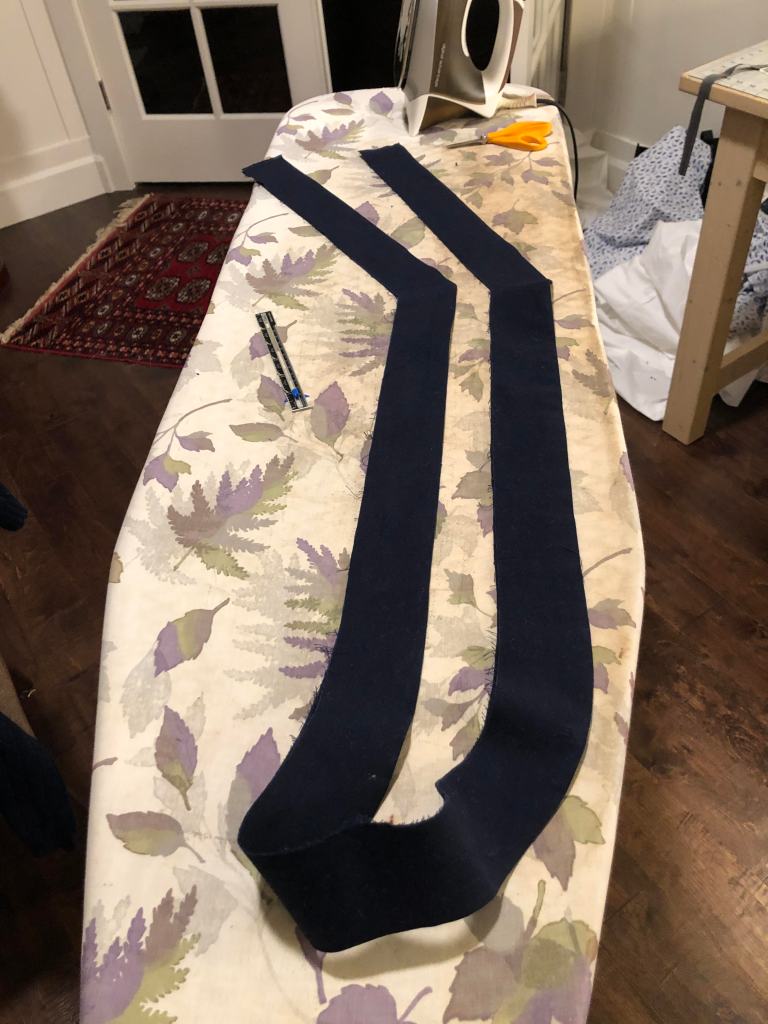
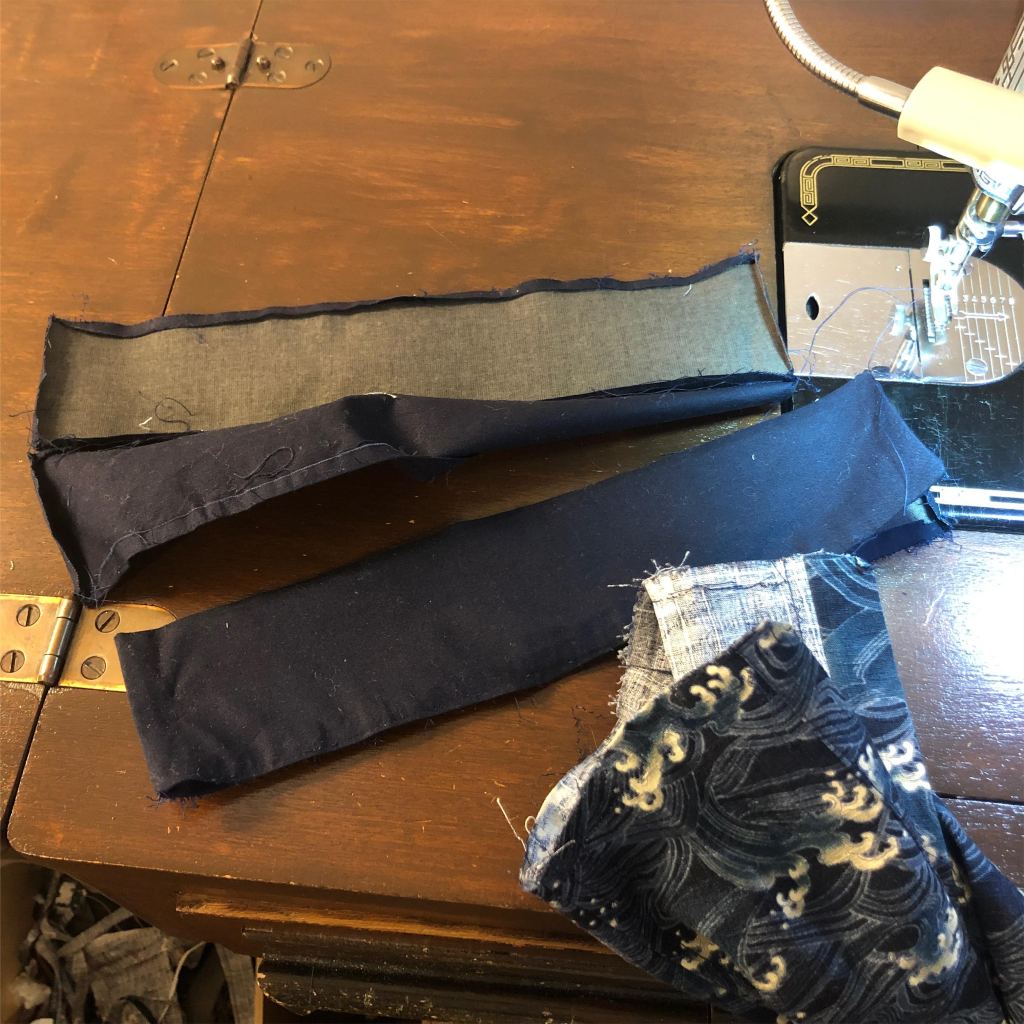
The shape of the collar/placket is really weird, and I made it out of a total of 8 pieces. From the centre back down the front is one piece, and the short vertical part that is almost at the side seam is another. This, of course, is mirrored on the other side, and then every piece has a corresponding one for the inside. It turned out to be the longest collar I’ve made by far.

Basting the cuffs

With this completed, I could do the normal work on the big shirt pieces and join this collar to them. Then add the sleeves and the cuffs. With all of this, I realised that I did not want to see any top stitching. I don’t actually know if this is true, but I don’t think kimonos and such have top stitching. This meant that I needed to stitch-in-a-ditch the collar and cuffs. And that required a lot of hand basting.

I had made the sleeve 3 inches wider at the cuff, to give it somewhat of a feel of a Samue. And once I tried it on, I realized I didn’t like the way I had done the pleats. Nor the size of the cuff. So off it came and I had to redo all of that work.

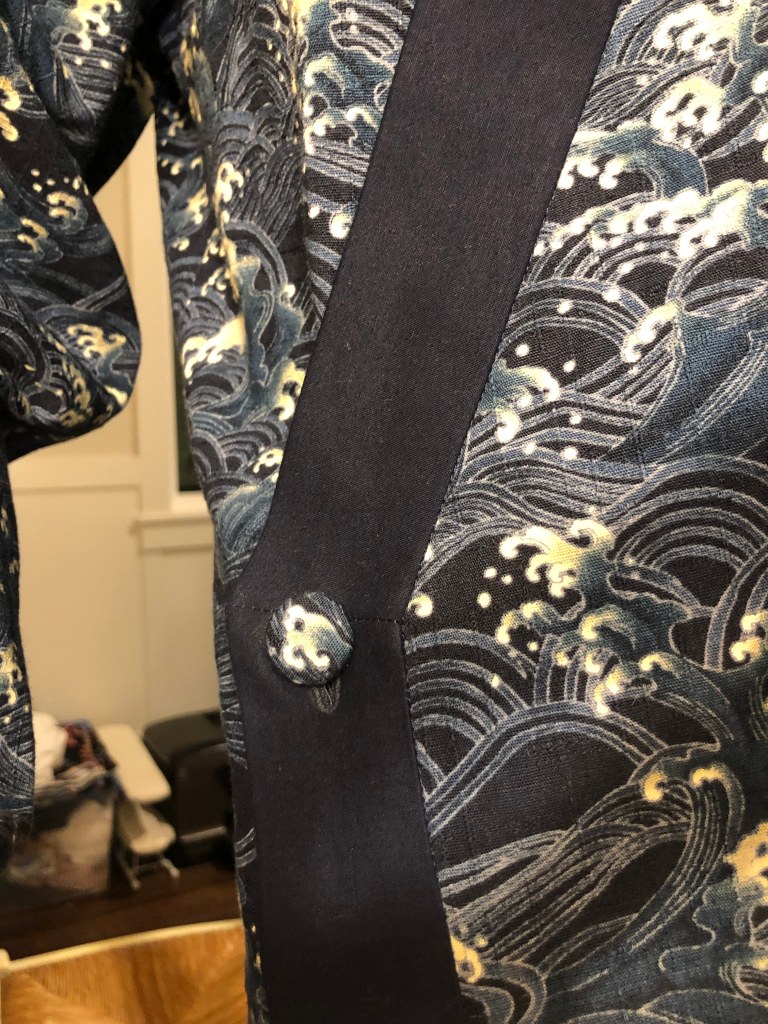
Now that I had almost everything in place, I had to figure out where the buttons needed to be to keep the front closed. A single button at the corner seemed to be enough. The exact placement was more difficult. Where I had initially placed that corner, using my dressform, didn’t work at all. Apparently, My body is different enough from the form to change the whole dynamic of how the shirt fits. This has never been much of an issue, yet for this type of closure it made a huge difference. I ended up taking 4 inches out at the waist, and moving this corner point quite a bit down.

All this time I had the idea that I would just hem the bottom like any of my other shirts. Then when I saw the shirt on me, I realised I should create another band of contrasting fabric along the bottom. And the bottom should be straight. This meant that I needed to buy some more contrasting fabric, and wash it a couple of times before I could continue. Some trail and error , and a lot of looking in the mirror showed me where to cut off the hem. The rest was easy and it came together well.

I’m quite happy with the result, while at the same time I wished I could have taken more time to make it even better. I will have to remember to check designs on my own body and not just on the form.

Challenge shirt

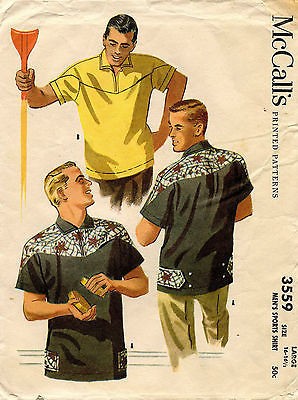
It all started with an Instagram post from mainlymenswear of a vintage McCall’s pattern he found. This pattern had an interesting twist to the yokes, and it therefore intrigued me. So I made a remark that I should try to find it. To which Duane said; “you could probably draft this yourself!”

And with that, the challenge was created. I just could not go and buy it without at least trying to make the pattern first. With only the photos of the front and back of the pattern sleeve, I set out to recreate this as well as I could.

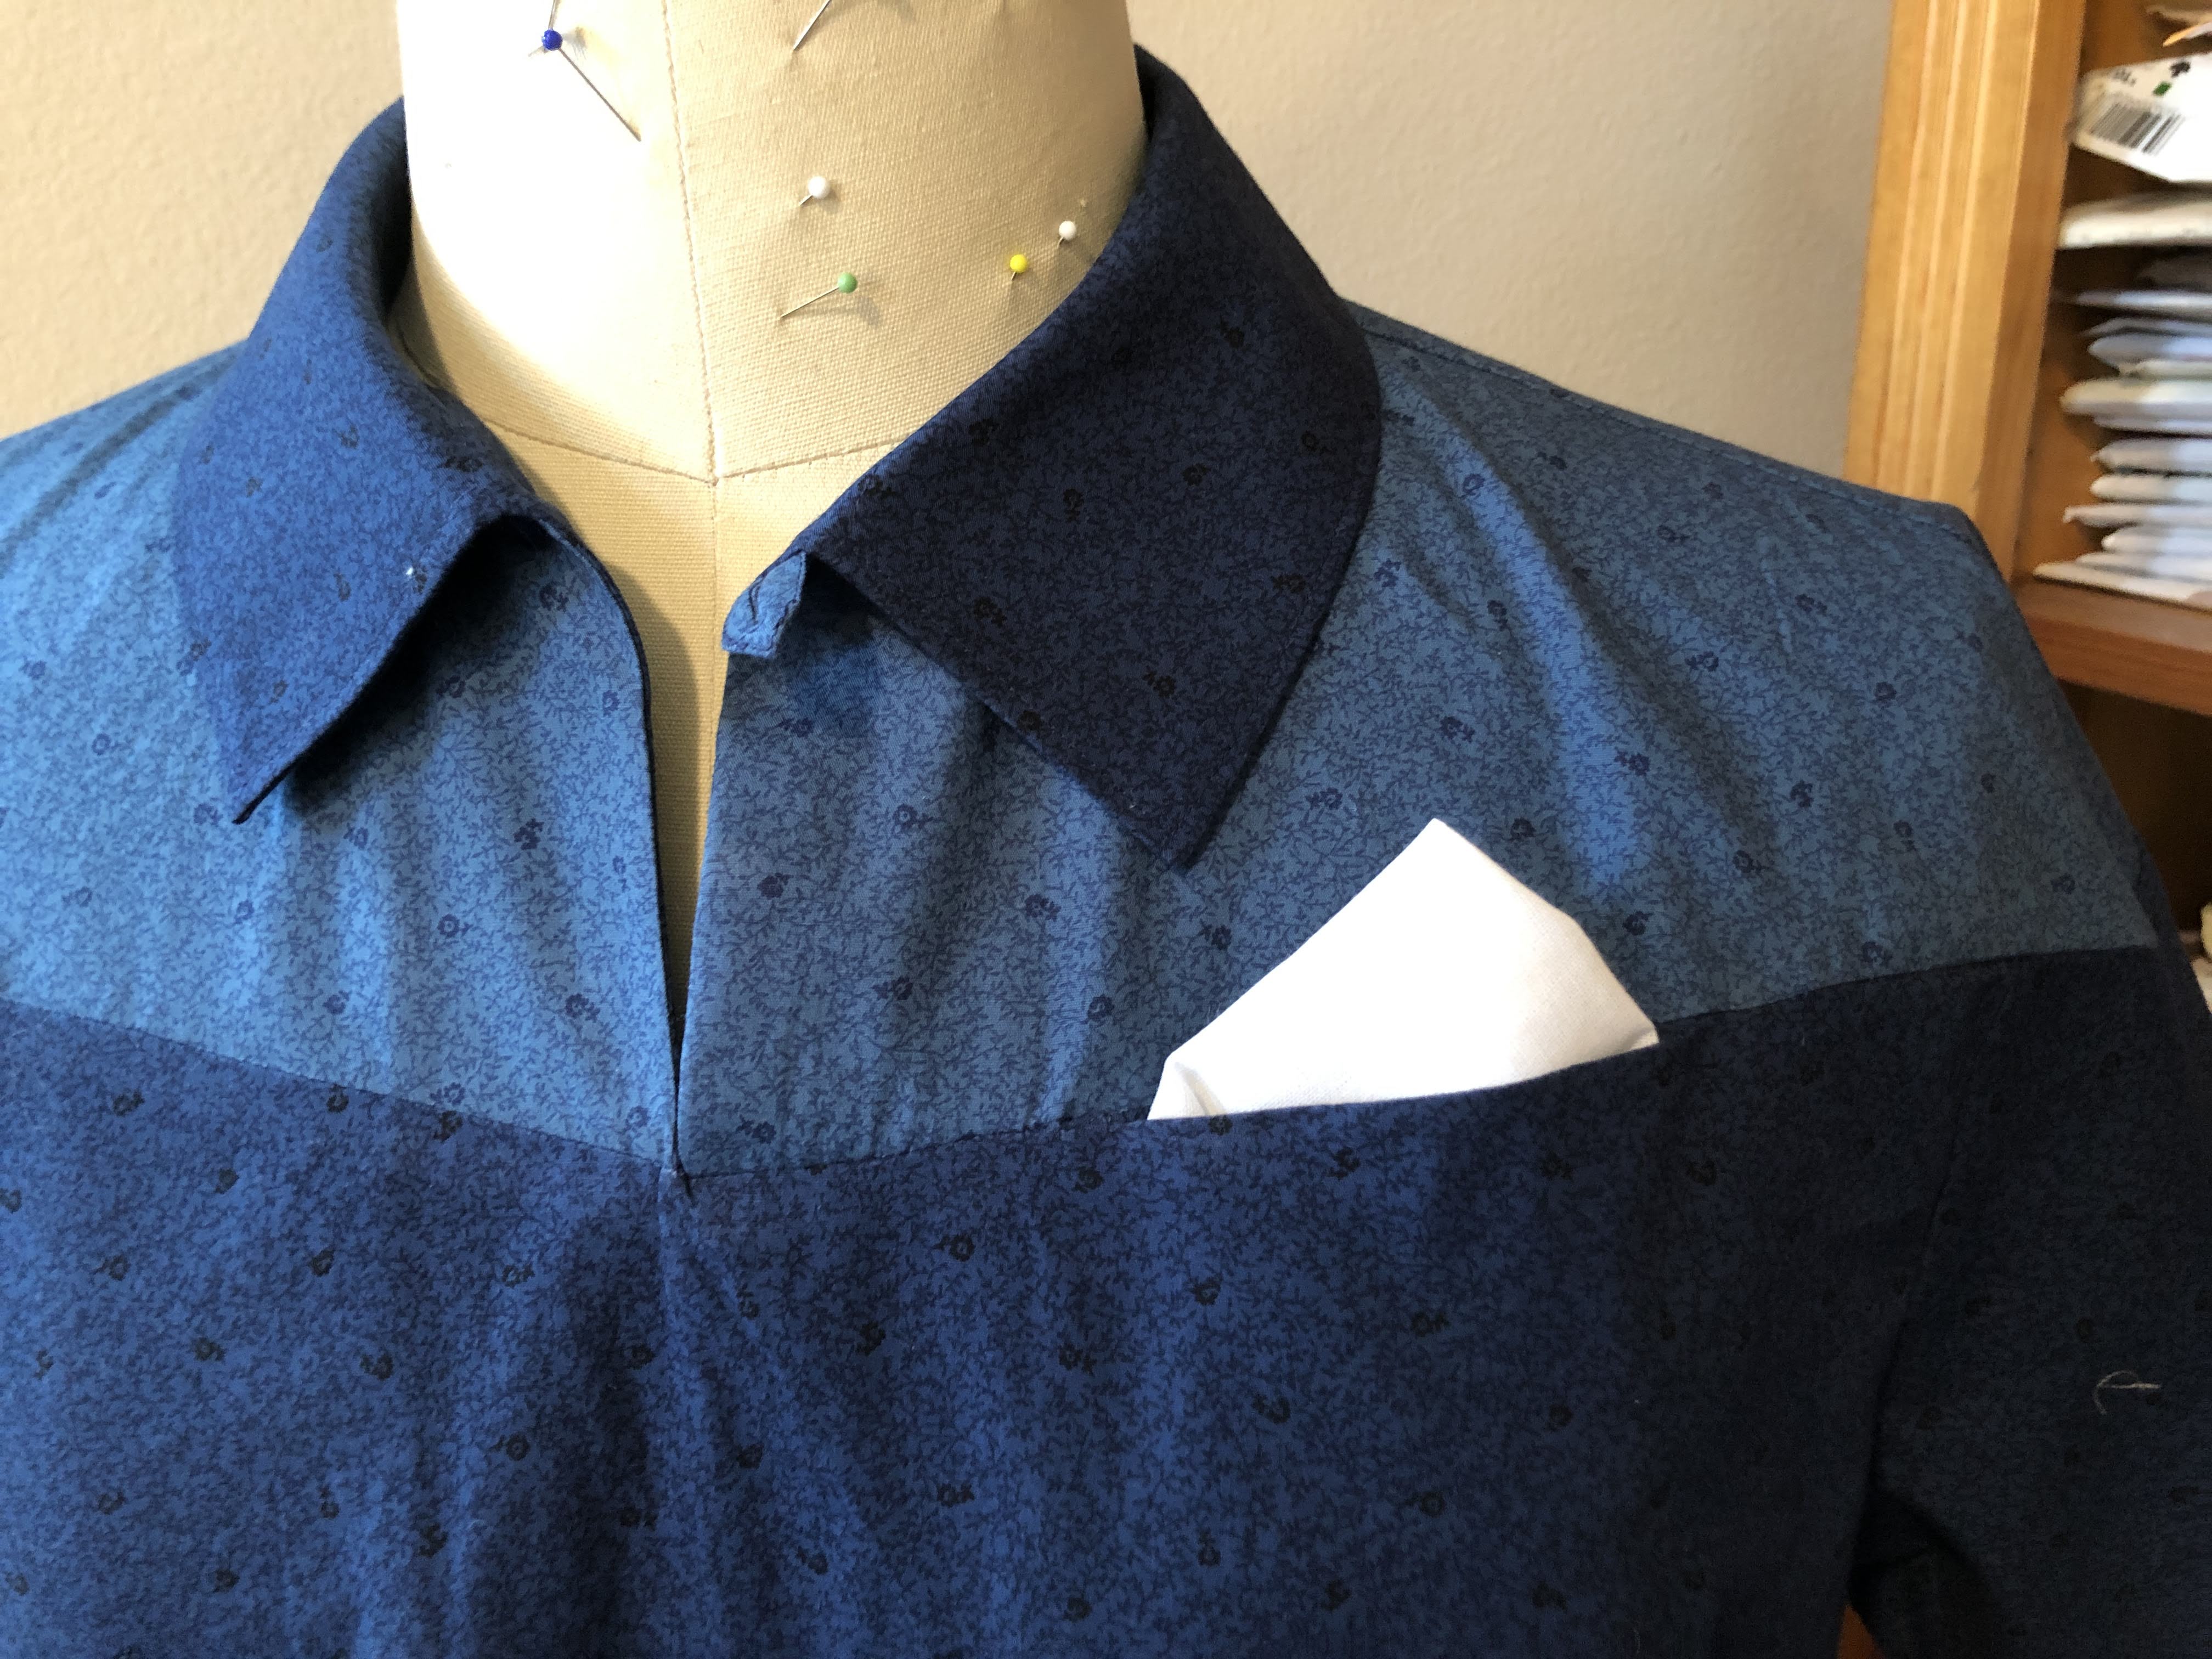
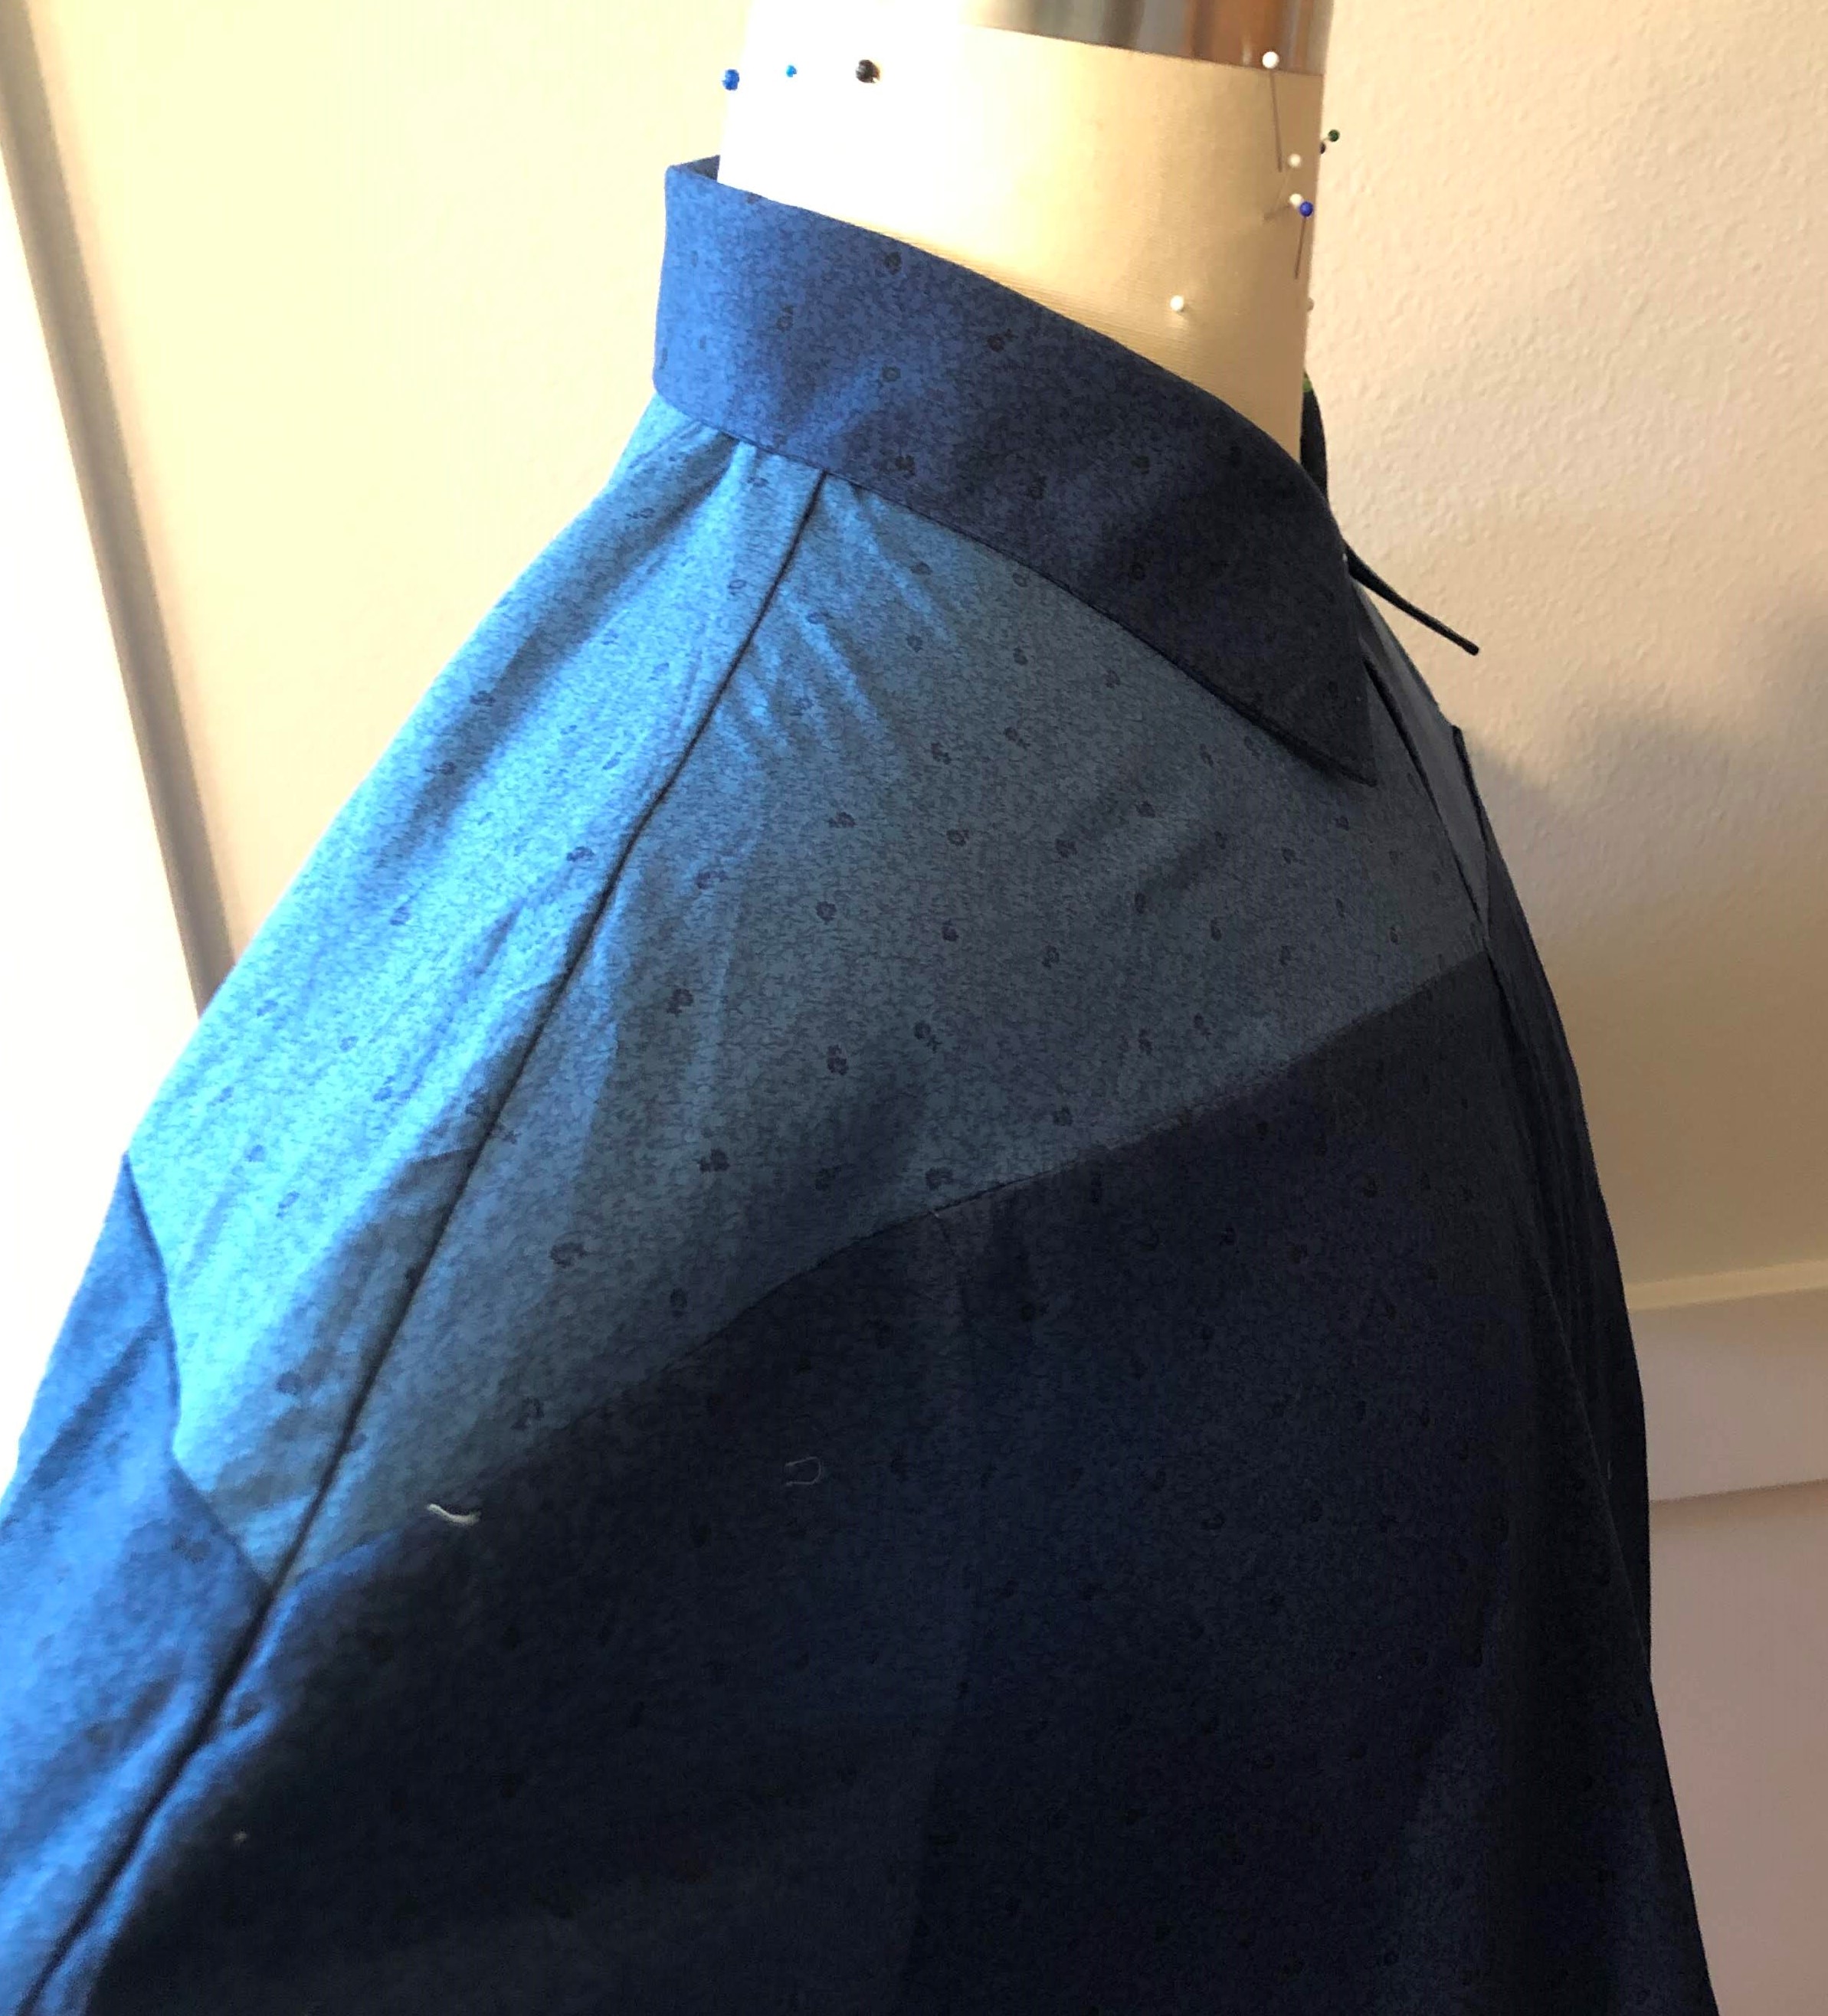
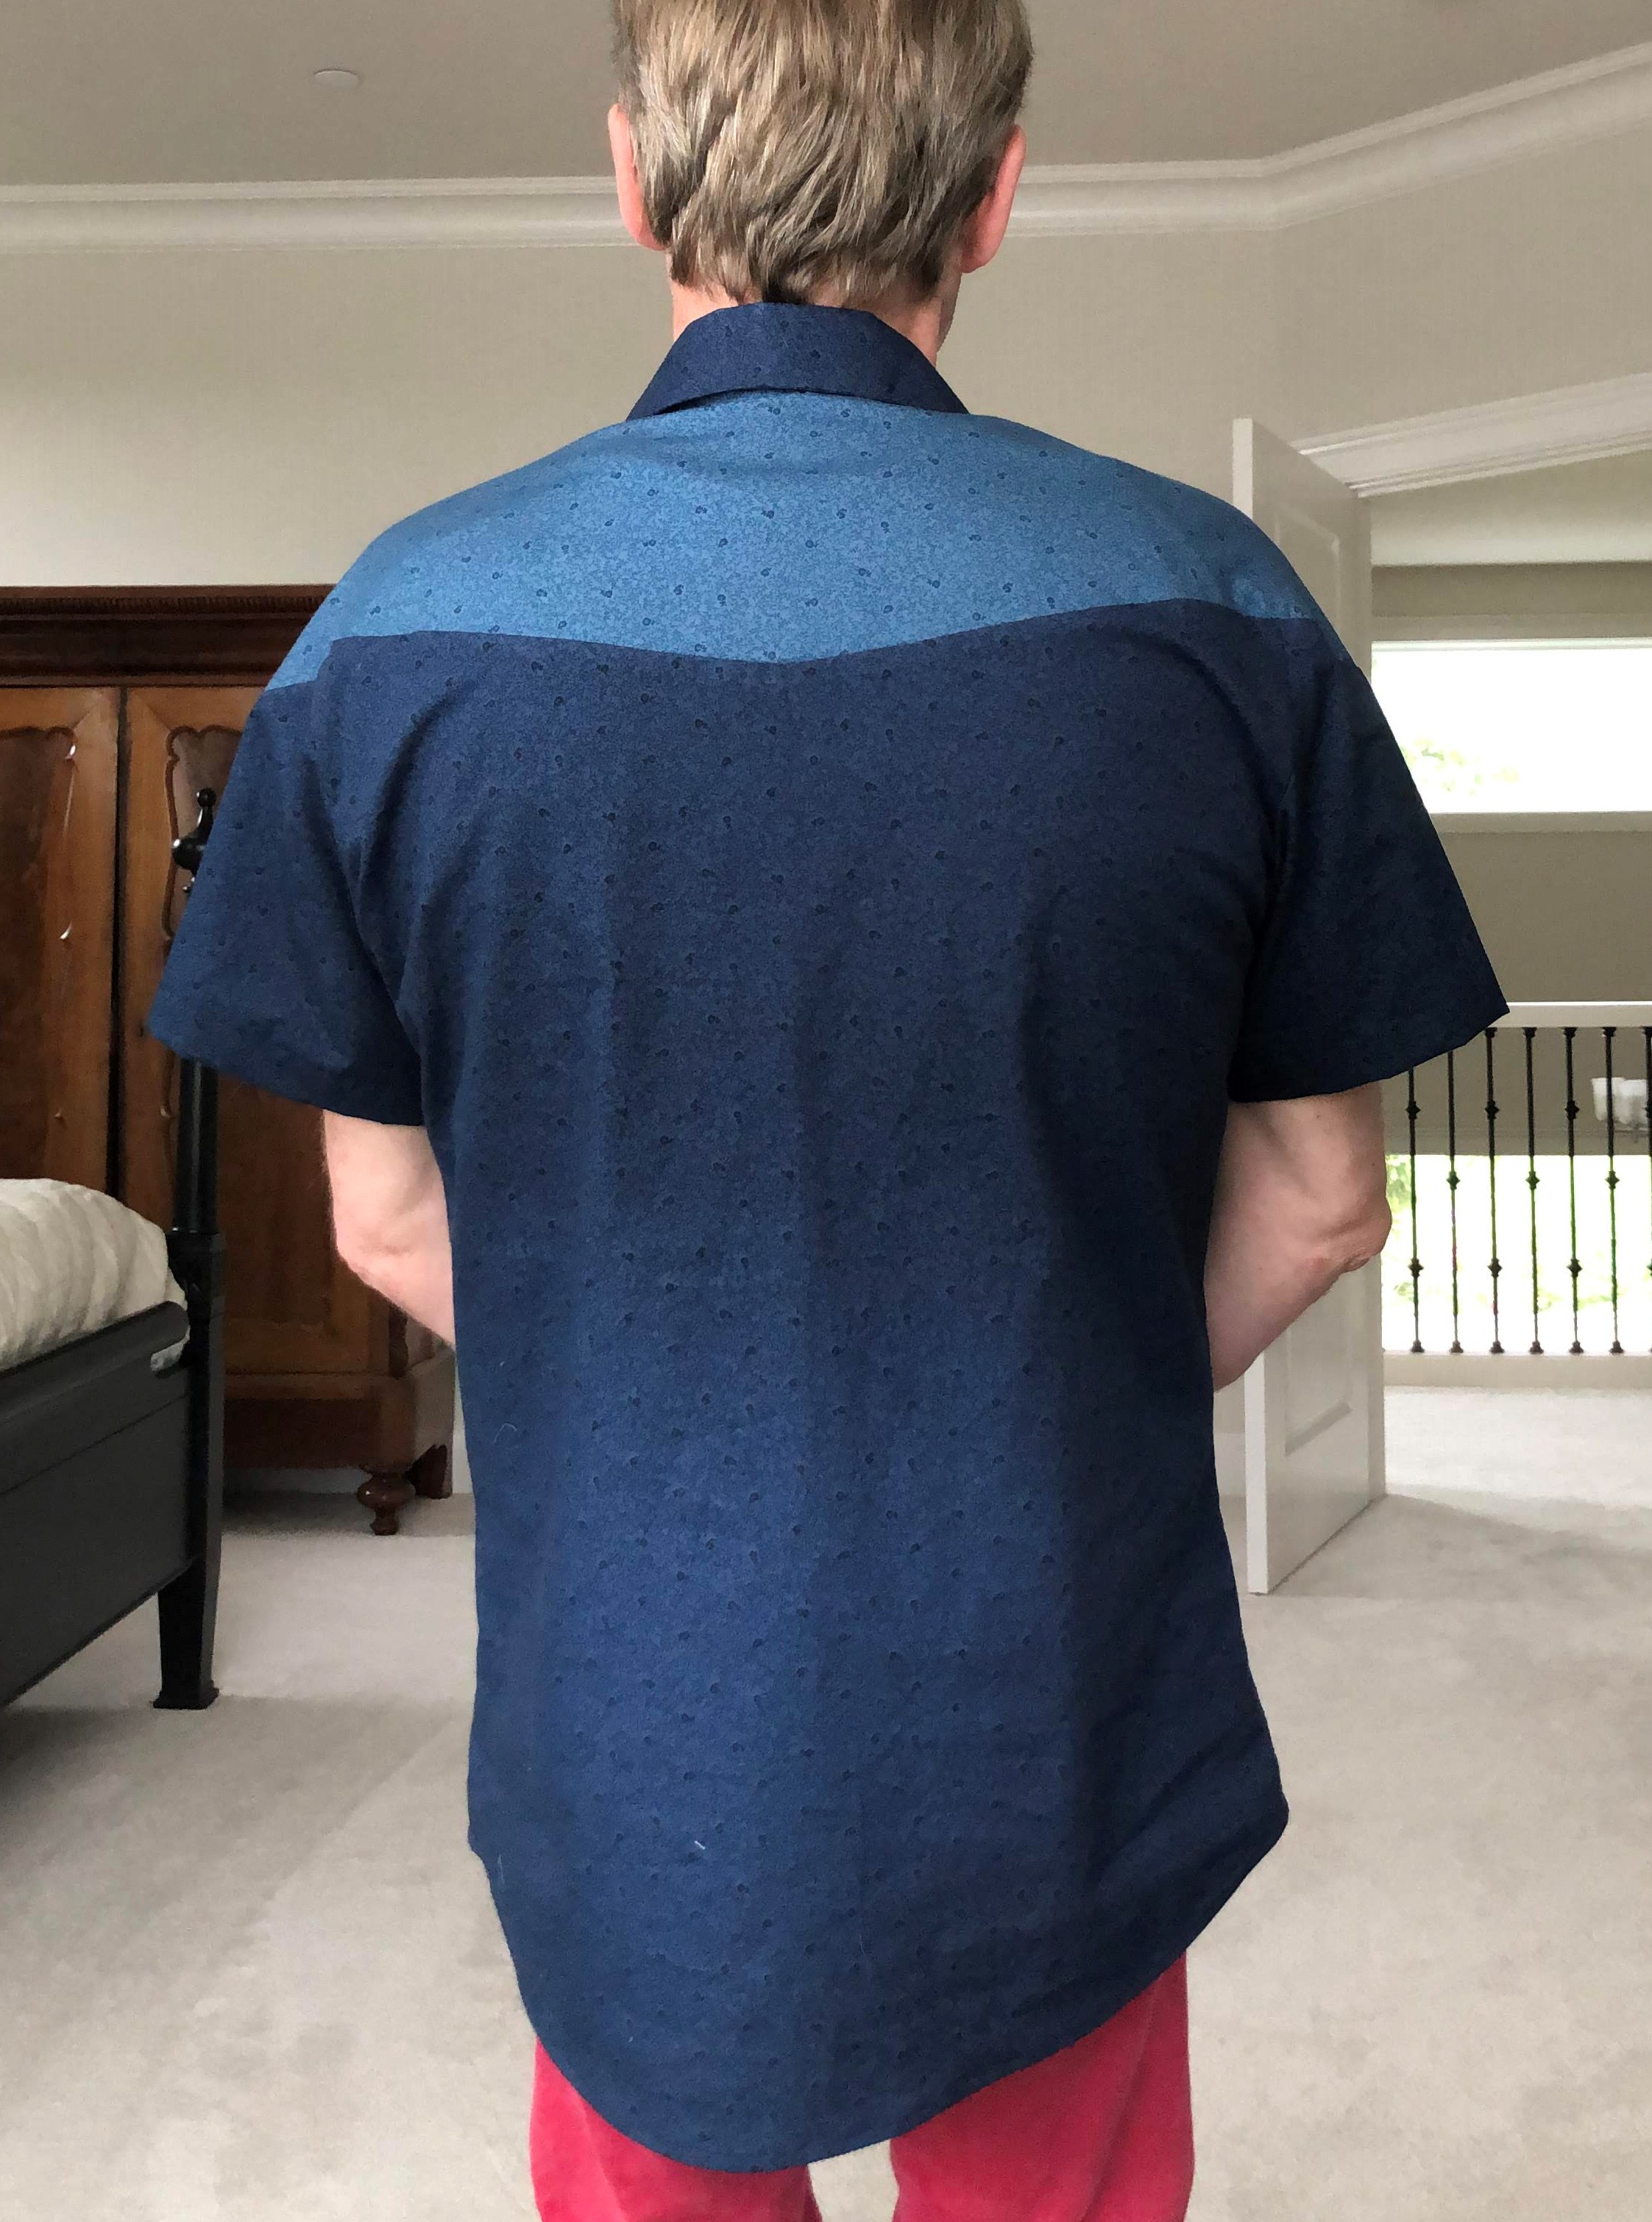
This pattern has a front and a back yoke that extend into the sleeves. Those sleeves themselves are made of two pattern pieces. The front below the yoke is cut on fold. It has a type of a camp collar, without a collar band. The two front yoke pieces come together without overlapping and don’t have any buttons, other than the usual camp collar loop and button at the very top. The yoke in both the front and the back angle down towards the middle. This gives the impression of a diamond shape if you look at it from the top. Specially if you use contrasting fabric, as one of the examples on the pattern sleeve does. And it has a front pocket whose opening is hidden in the seam of the front yoke.

Starting completely from scratch seemed silly, so I pulled out a pattern that had a similar collar. First approach was to just make a muslin and then start drawing on that. The combination of an old bed sheet, unfamiliarity with this pattern, and rushing made for a poor and unusable muslin. So I decided to go with my tried and true shirt pattern, new and good quality muslin fabric, and make a new one.

The first decision was to see how low I should make the yoke in the front come down. This would be dictated by the front opening. I figured that I should be able to wear it with the button undone. For that, the opening should not extend too low. I measured one of my shirts and decided on 4½ inches.
Looking at the pictures, it seemed that the yokes should extend beyond halfway down the sleeve, but not much more. That gave me two points to base all the changes to the pattern on. I used my dress form and some string to draw straight onto the muslin. Then transferred the measurements over to the original pattern pieces, and create new ones based on that.
To create a straight seam across the front for the yoke, I found that a straight line was close enough. But on the back you actually need to make a curve to make the seam look straight.

As you can see, there are a lot of opportunities to make mistakes. With the front piece, I forgot that the original pattern piece had seam allowances included when I transferred the measurements. So you see two sets of new seam lines there. Figuring out how to align the sleeve piece to that back piece so I could draw the new seam is still a mystery to me. I just winged it and it worked.
Now I could take the muslin apart and use it to create some of the new pieces. The body of this first try came together easily enough. Now it was time to address what I had dreaded; the collar.

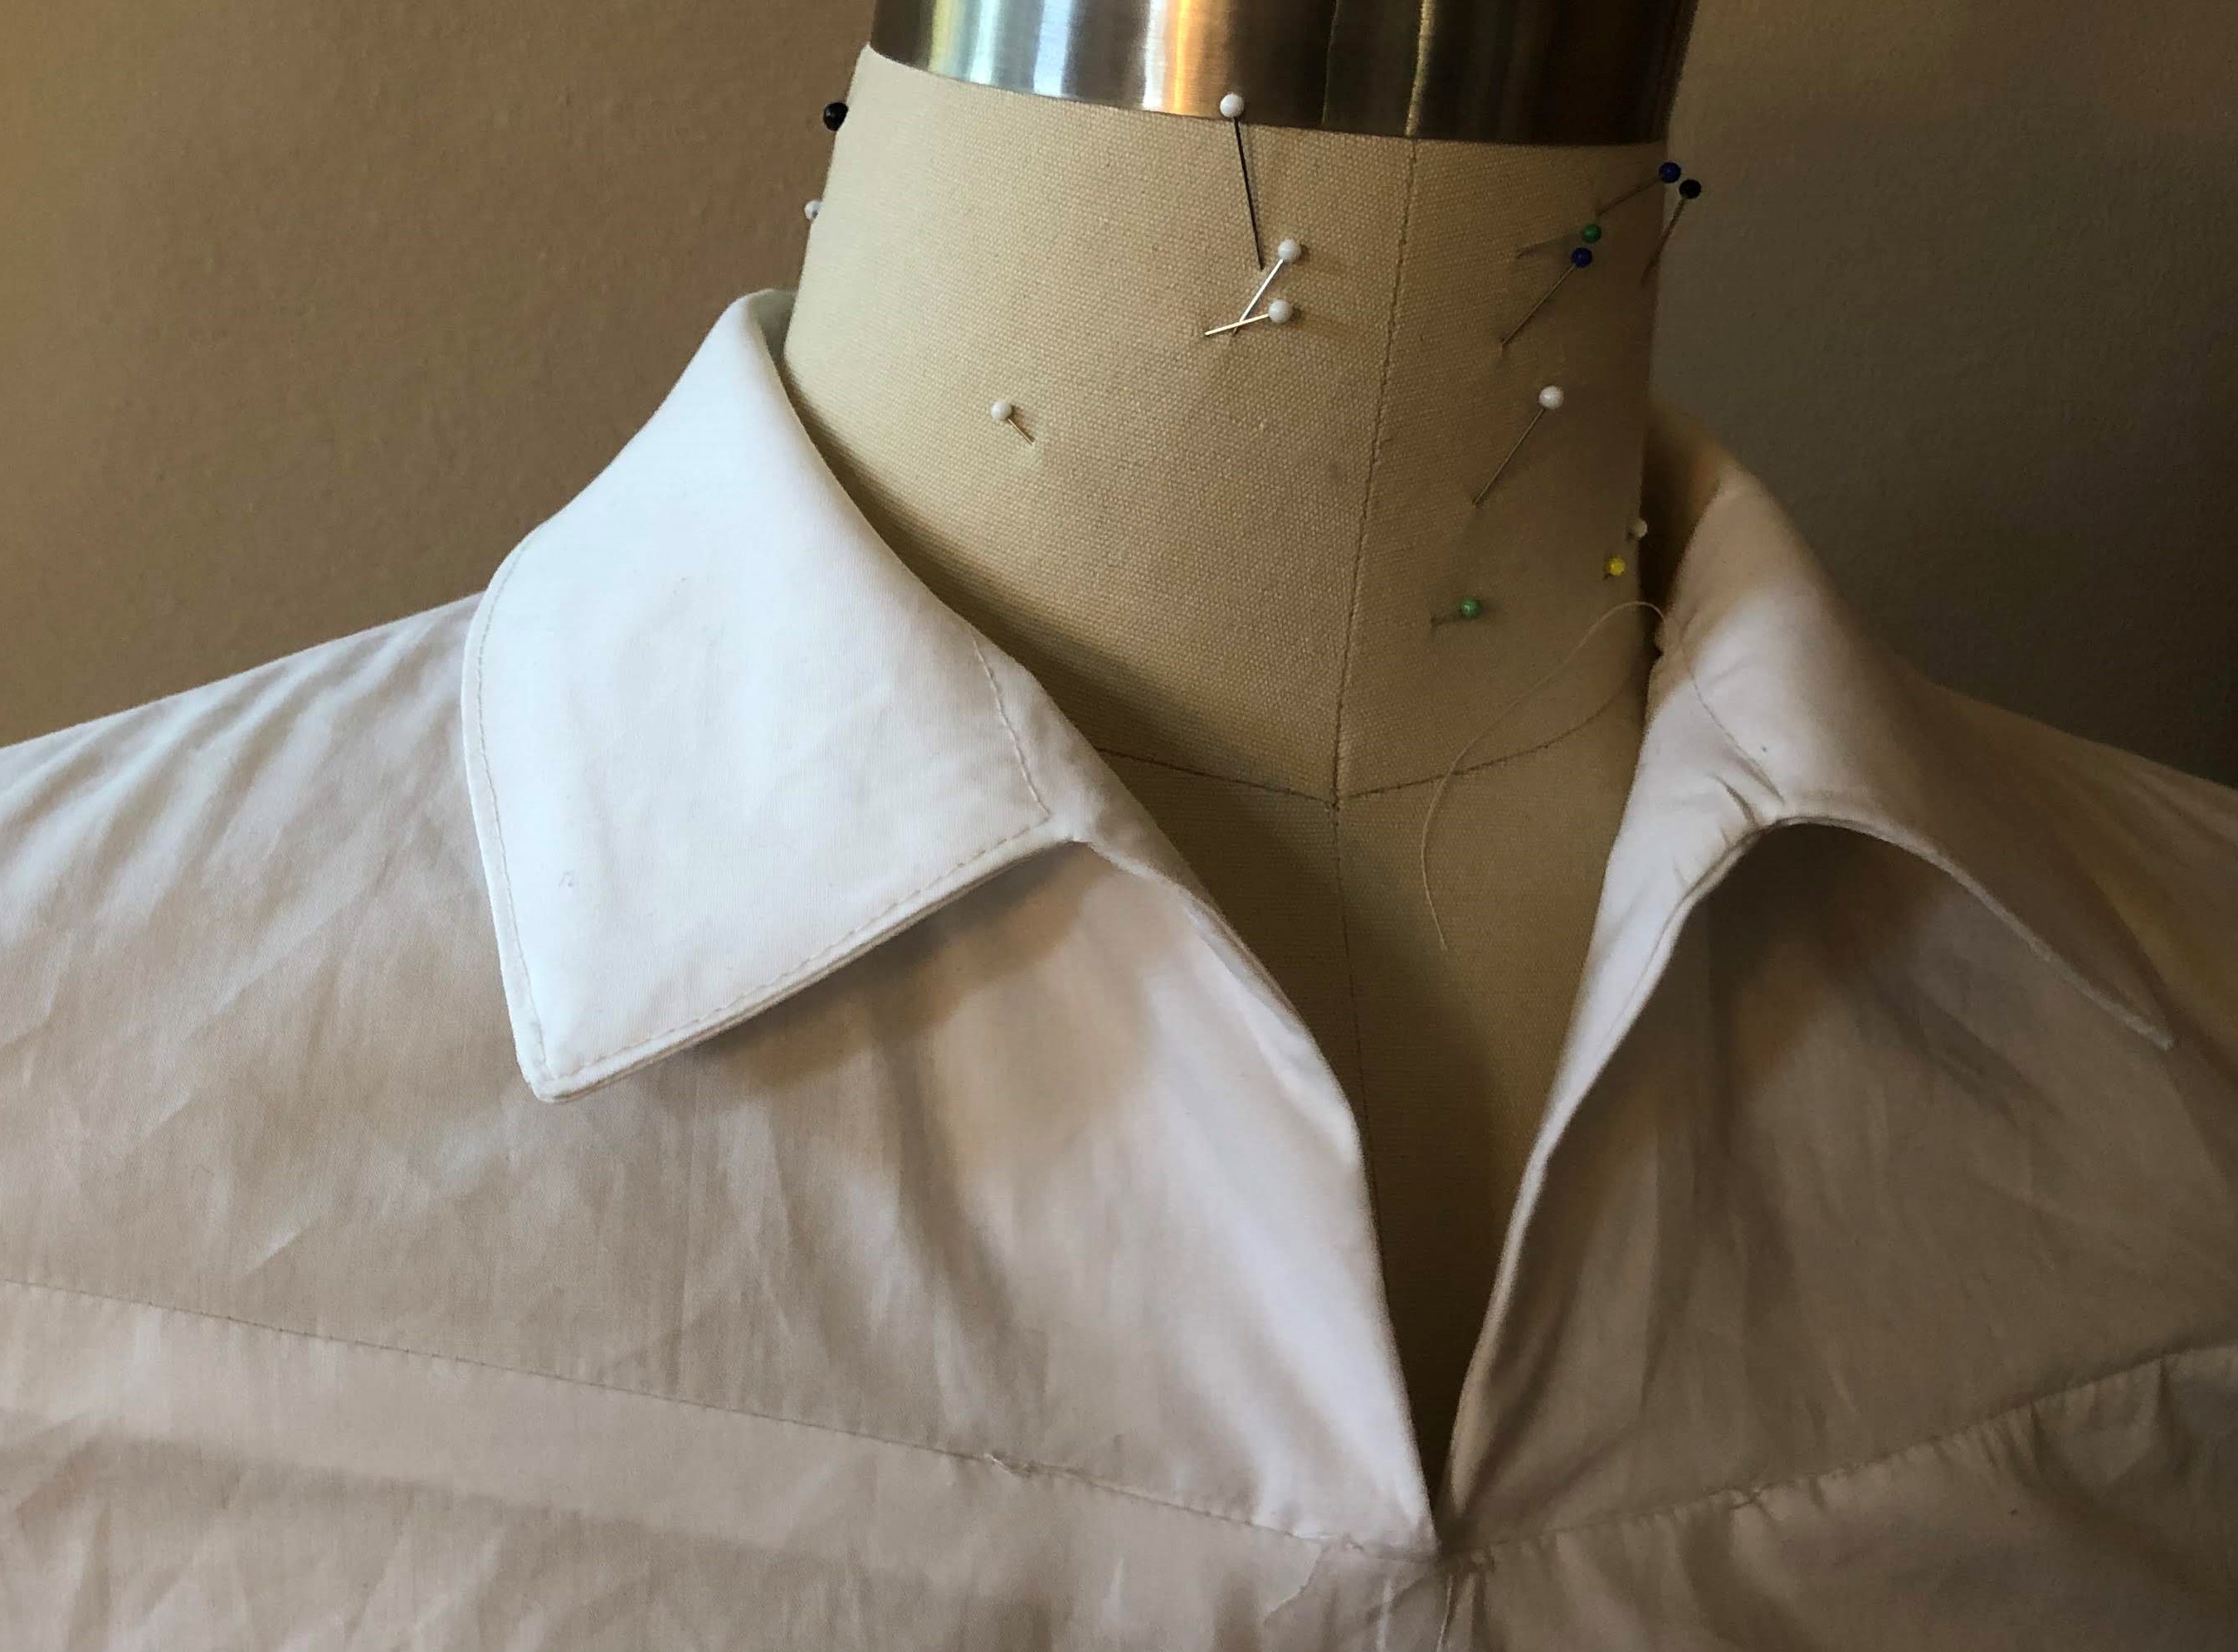
I have drafted new collars and collar bands. Some of my art shirts have quite intricate collars. But I had never created a collar without a collar band. And I’m not as comfortable sewing shirts without collar bands either. Using another shirt as an example to work from wasn’t an option, since this shirt would not have a front button placket, and all my camp collar patterns do have that. I decided on the trail and error method. Just use paper to sculpt something that is close, tweak it a bit, make a new one, and repeat until you’re happy. Then transfer this to fabric, and see if you can figure out how to make the corresponding facing.

I’m not completely happy with the collar, I think the points are a bit too big, but I’m not going back to change them.

Here are all the pieces I ended up with (without the pocket piece, I still had to make that one):

While I was putting the final muslin together, it occurred to me that there’s a lot more to this than just making the pattern pieces. I have no construction instructions, and it is different enough to have the potential for lots of additional mistakes. I didn’t want top stitching, so (faux) French seams everywhere. The hardest part would be the sequence of sewing everything together.

To attach the front and back yokes, I would have to attach the sleeve pieces to the front and back first. I would not be able to sew the front yoke until I sewed the facings to the yoke because of how the facing must be caught in the French seam. But to sew the facings, I would need to have the collar in place. And for that the shoulder seam must be sewn. Since the shoulder seam extends all the way into the sleeves, the yokes must be attached to the front and back. A circular problem.

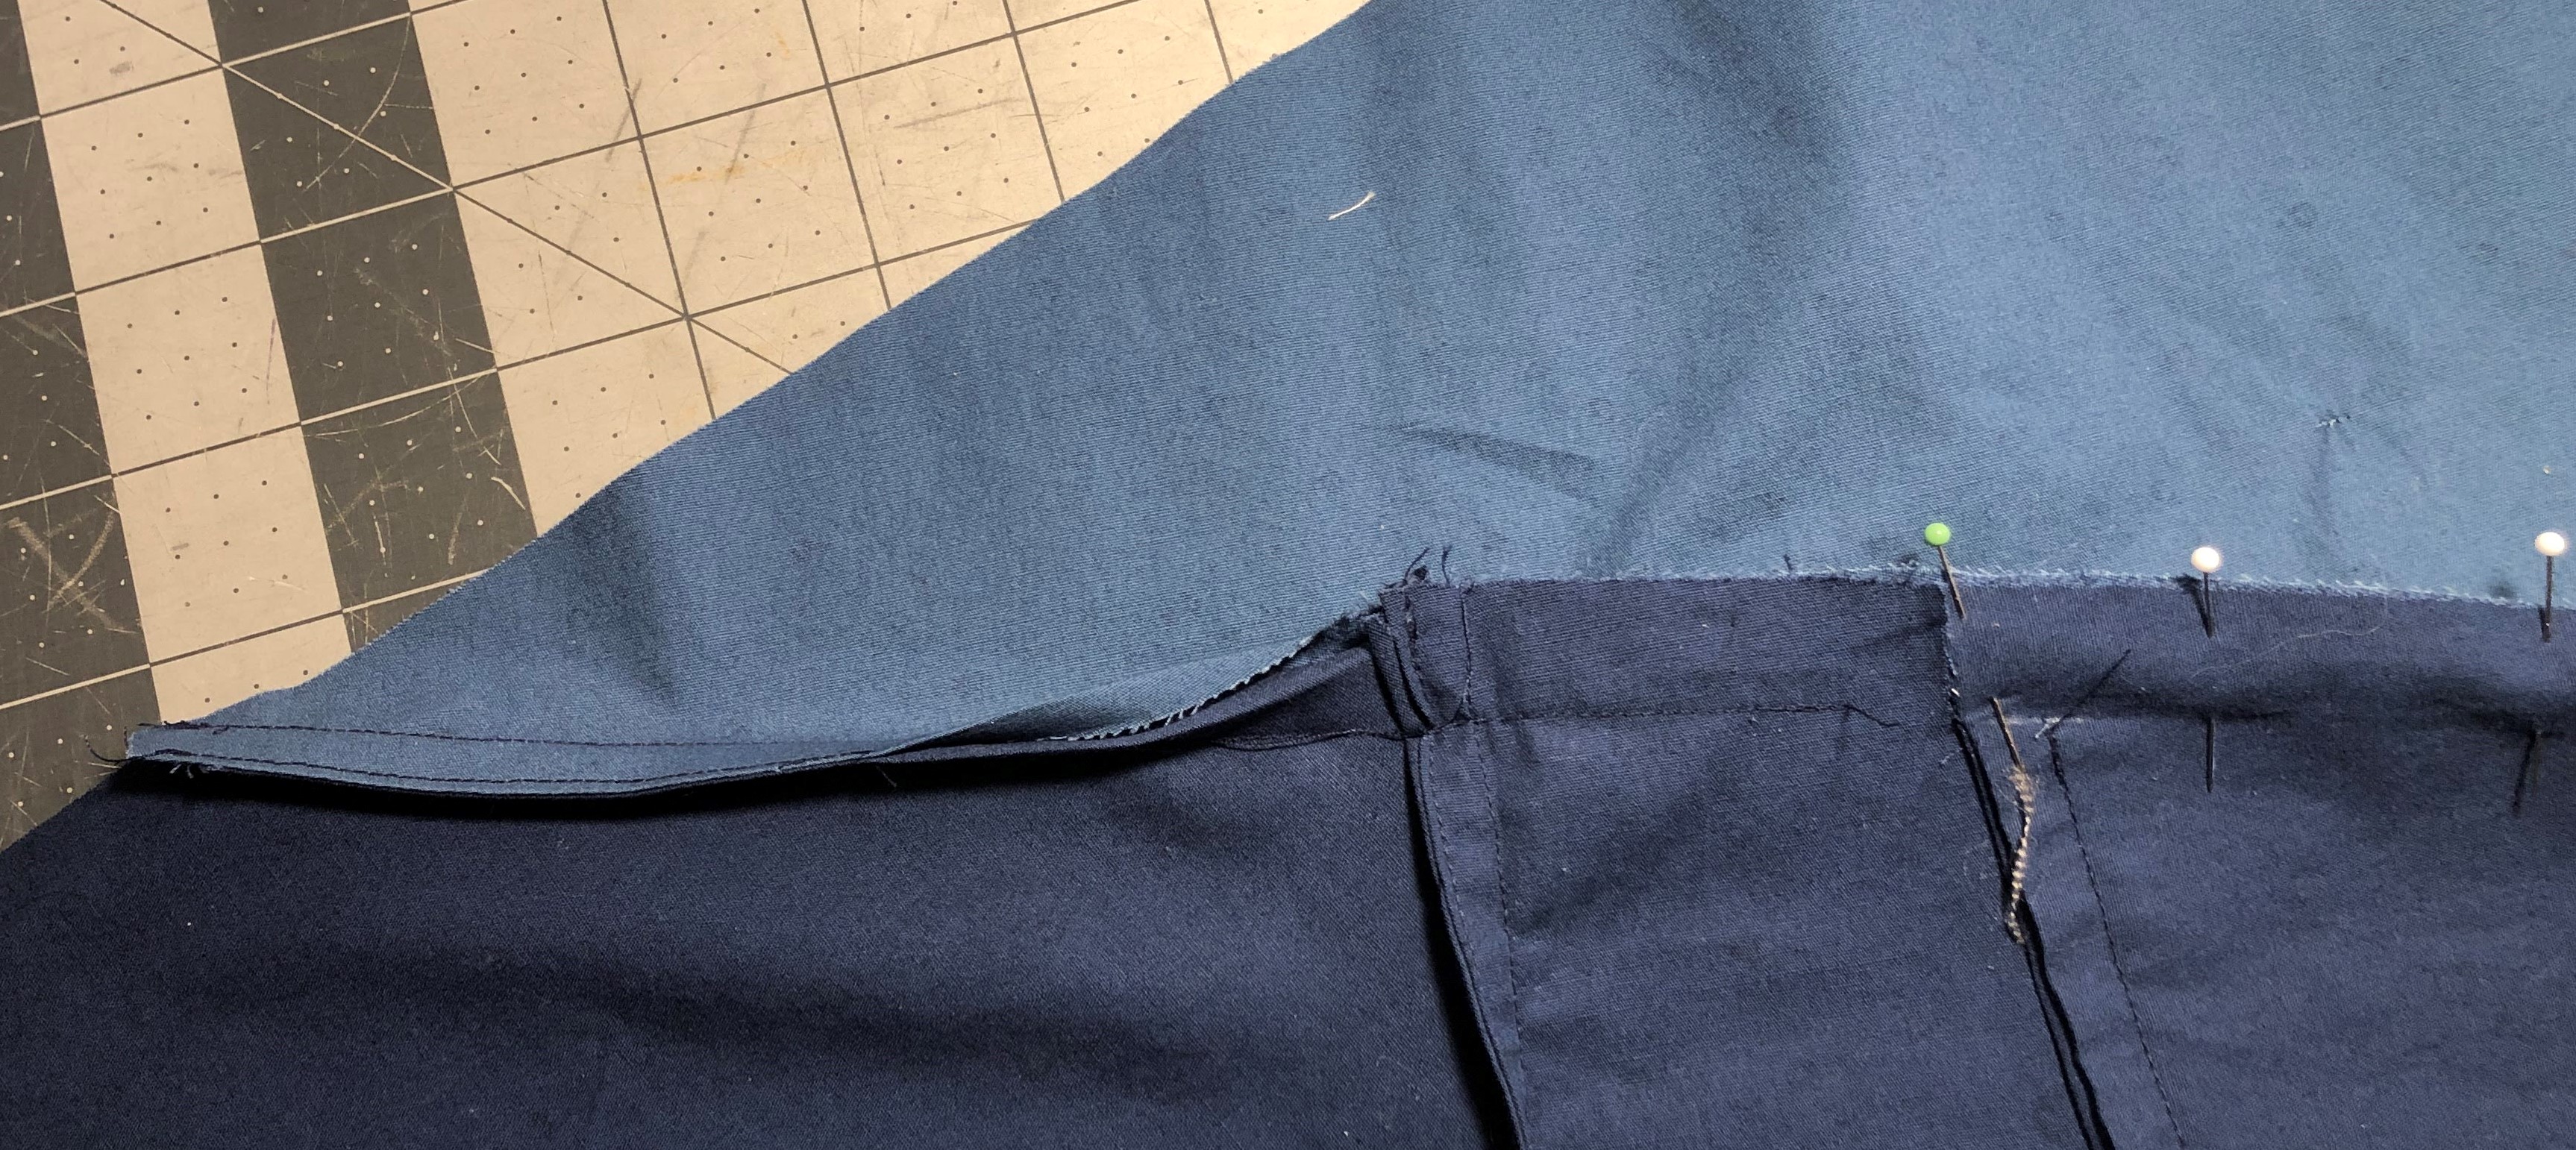
I was glad I was thinking of the construction while I was designing the pieces, so I could actually devise solutions before I needed them. In the end I decided to attach the front yoke half way, and make part of the (faux) French seam. This allowed me to sew the full shoulder seam and attach the collar. Once that was done, the facing could be attached and the final parts of the front yoke seam could be finished. Below you see part of the seam finished, while the rest is still pinned.

For all the headaches that the construction of the shirt itself caused, the one thing that went easily, yet that I thought would be a problem, was the hidden front pocket. Both the design and the construction was straightforward.

I’m rather pleased with the end result. Does it resemble the original McCall’s pattern? I don’t know. All I still have to go by are the two photos of the pattern sleeve. It doesn’t matter all that much though. I set out to make a shirt that looked like that one, and I think I succeeded in that. I (or Duane) challenged me and trying to meet that challenge felt great. And I ended up with another shirt, one I’m wearing now.

PS. Making a muslin is a very good idea. The 4½ inches of front opening was based totally on aesthetics. It also turns out to be just about the minimal opening size that I can still get my head through. Good thing I could test this before cutting into the real fabric. It would have been really funny if I would have made a shirt I could not actually put on.

Thanks for reading!

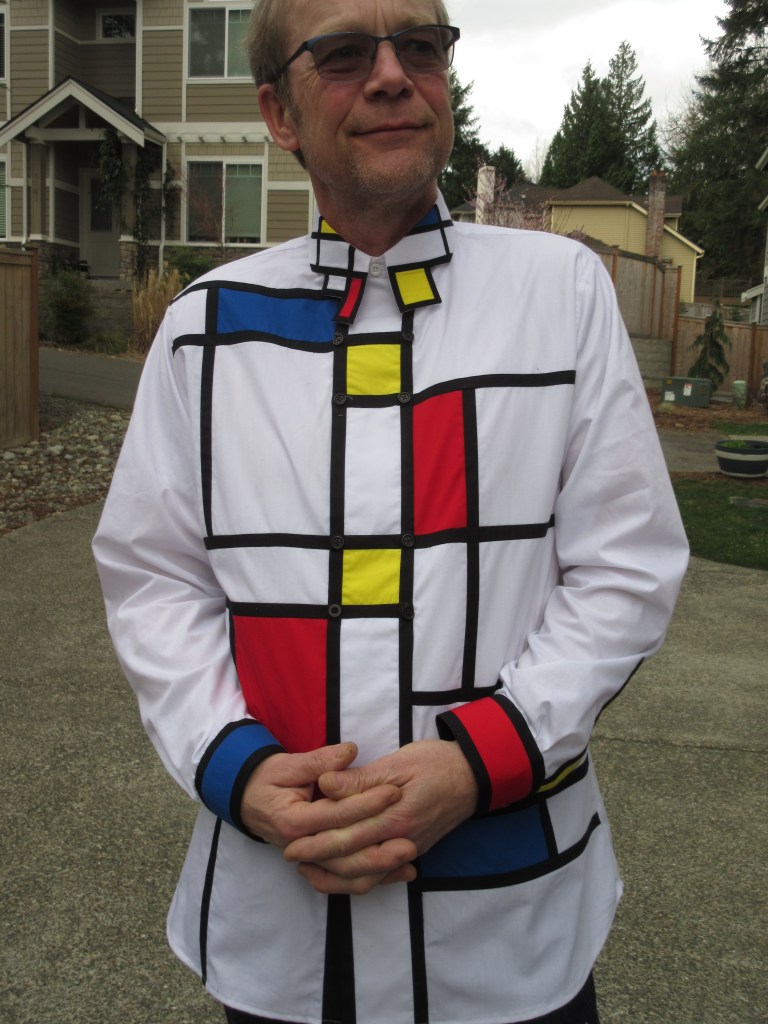
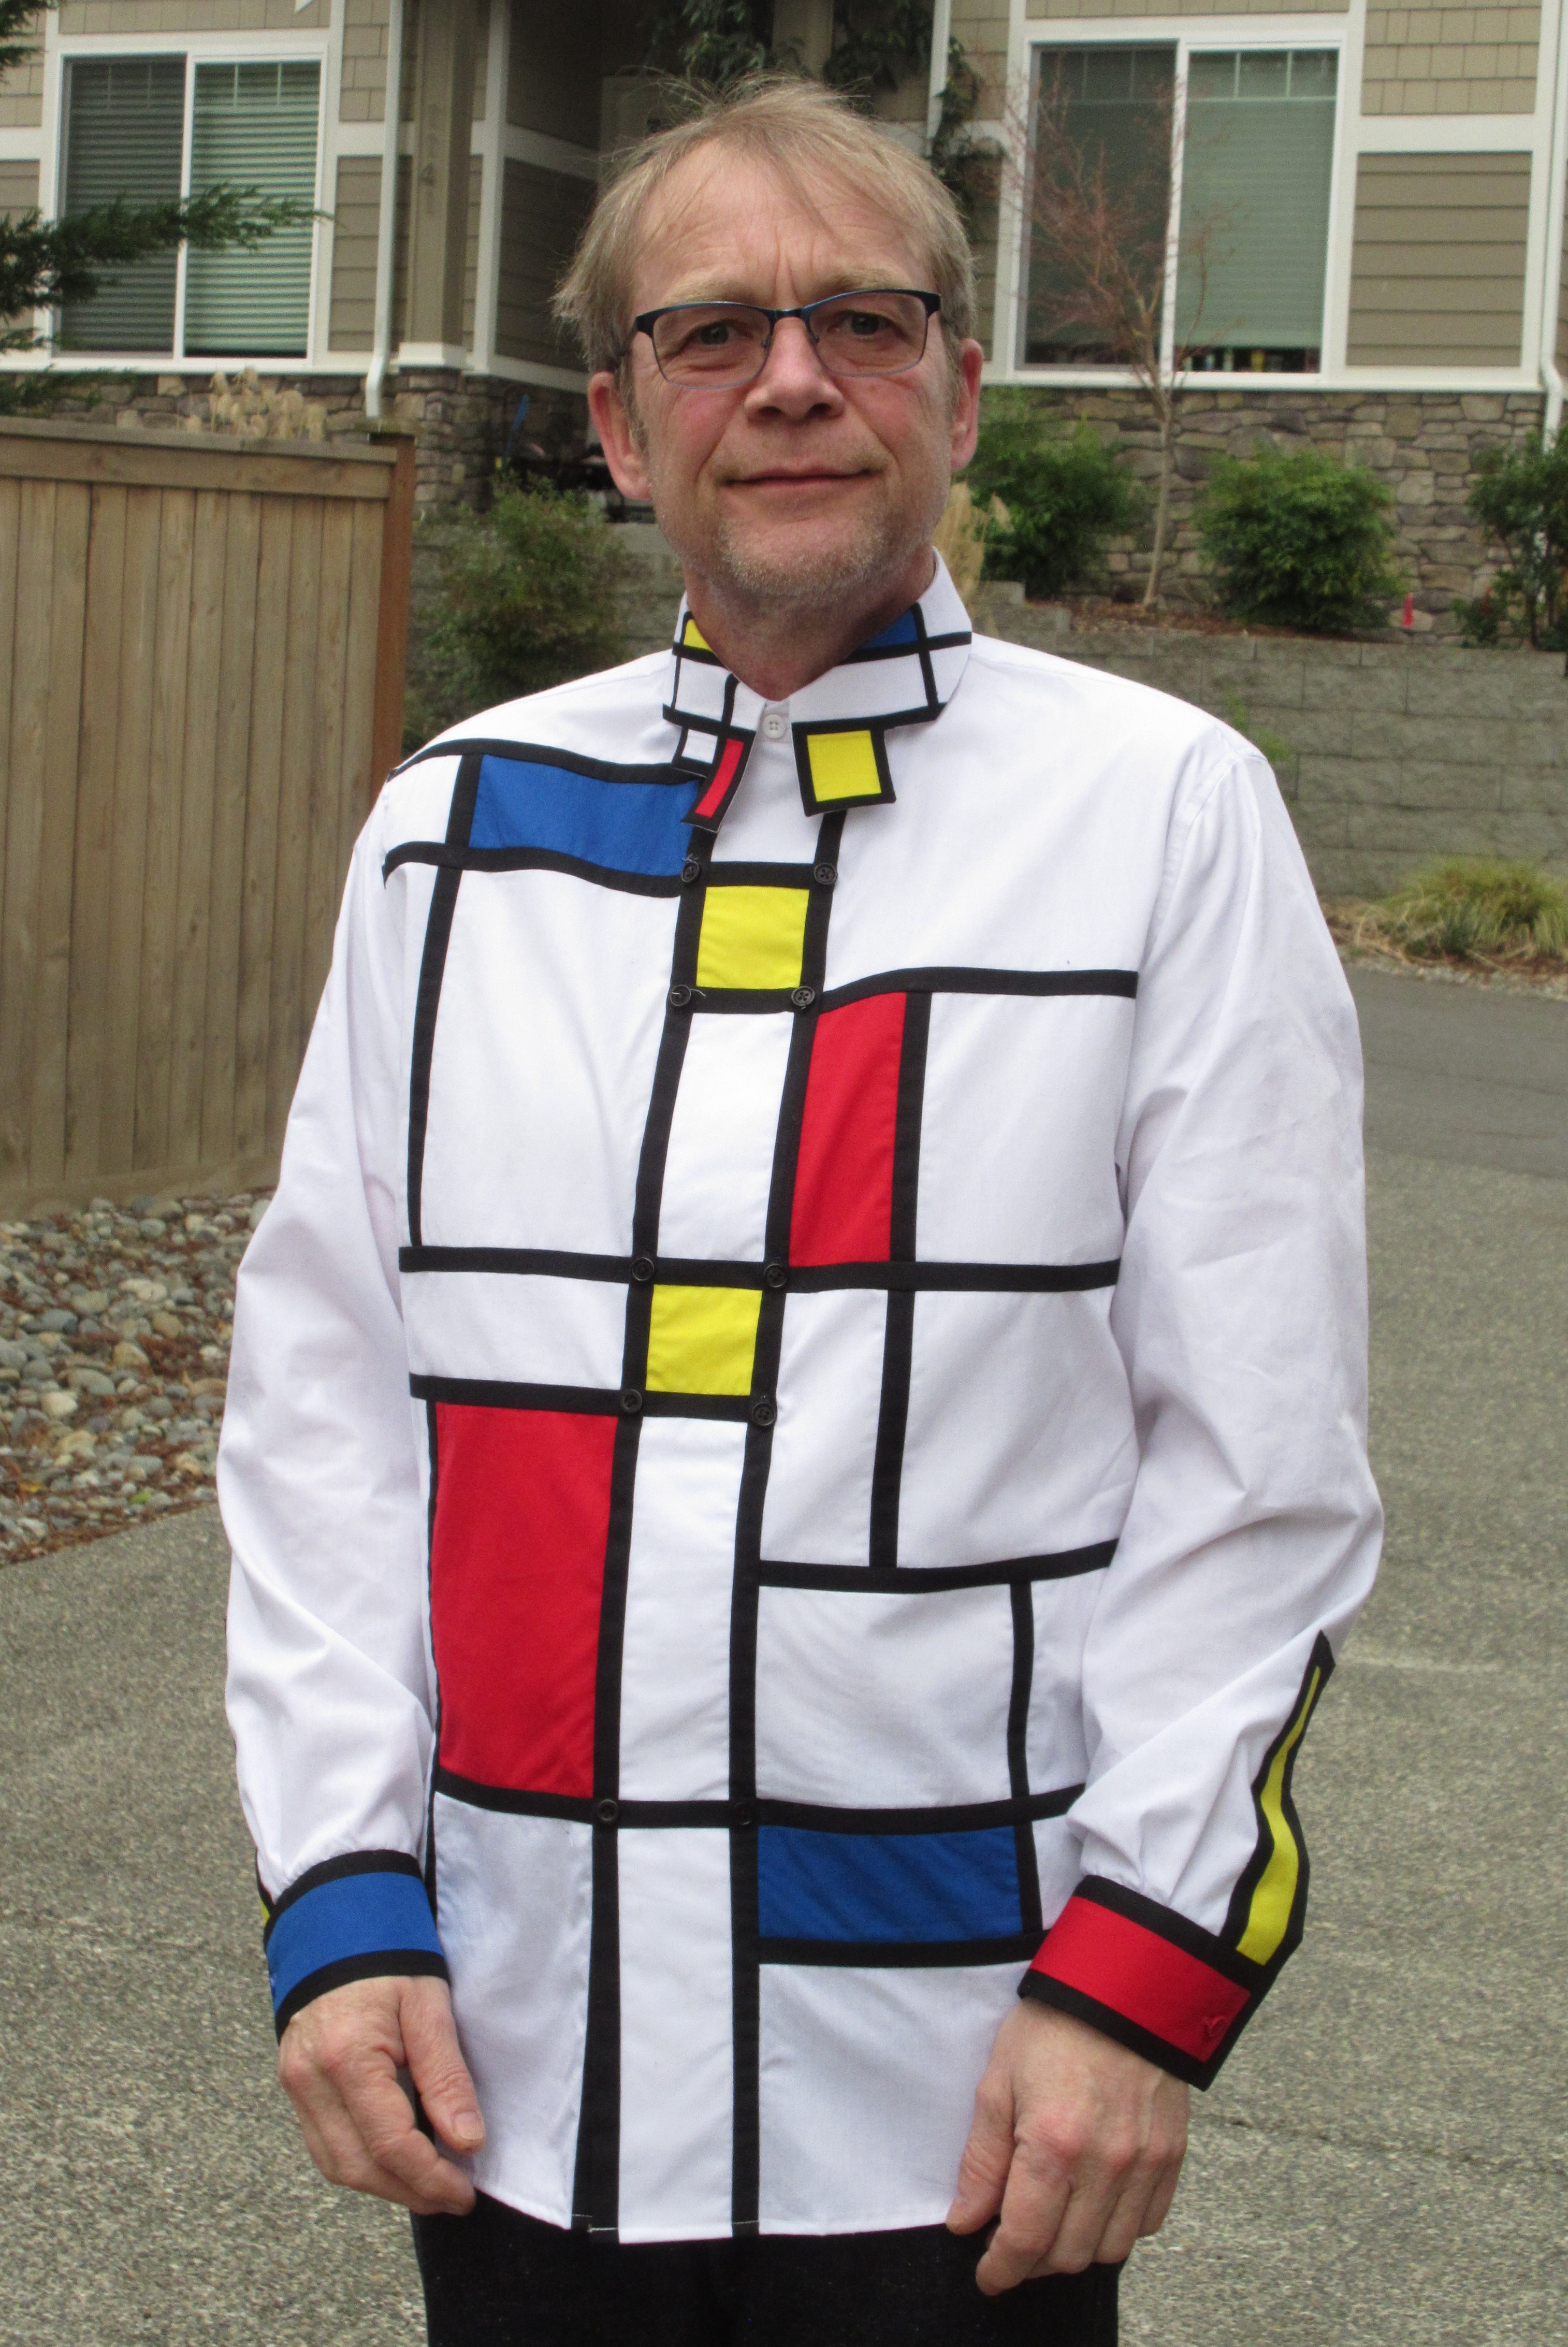
Mondrian shirt – Completion

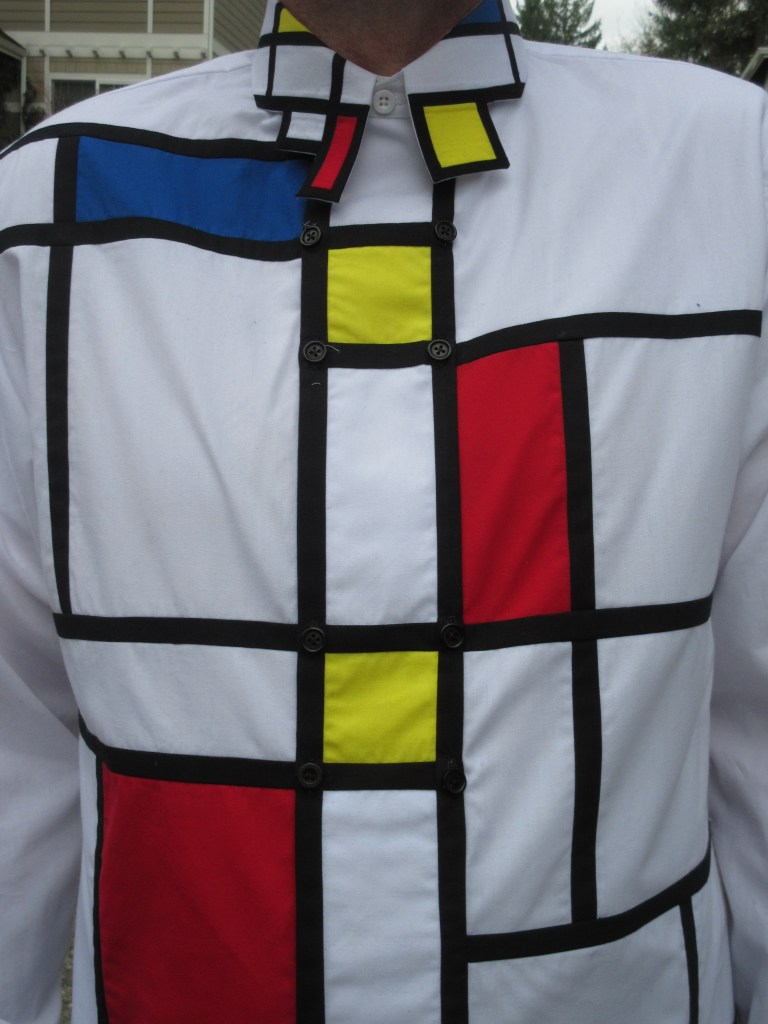
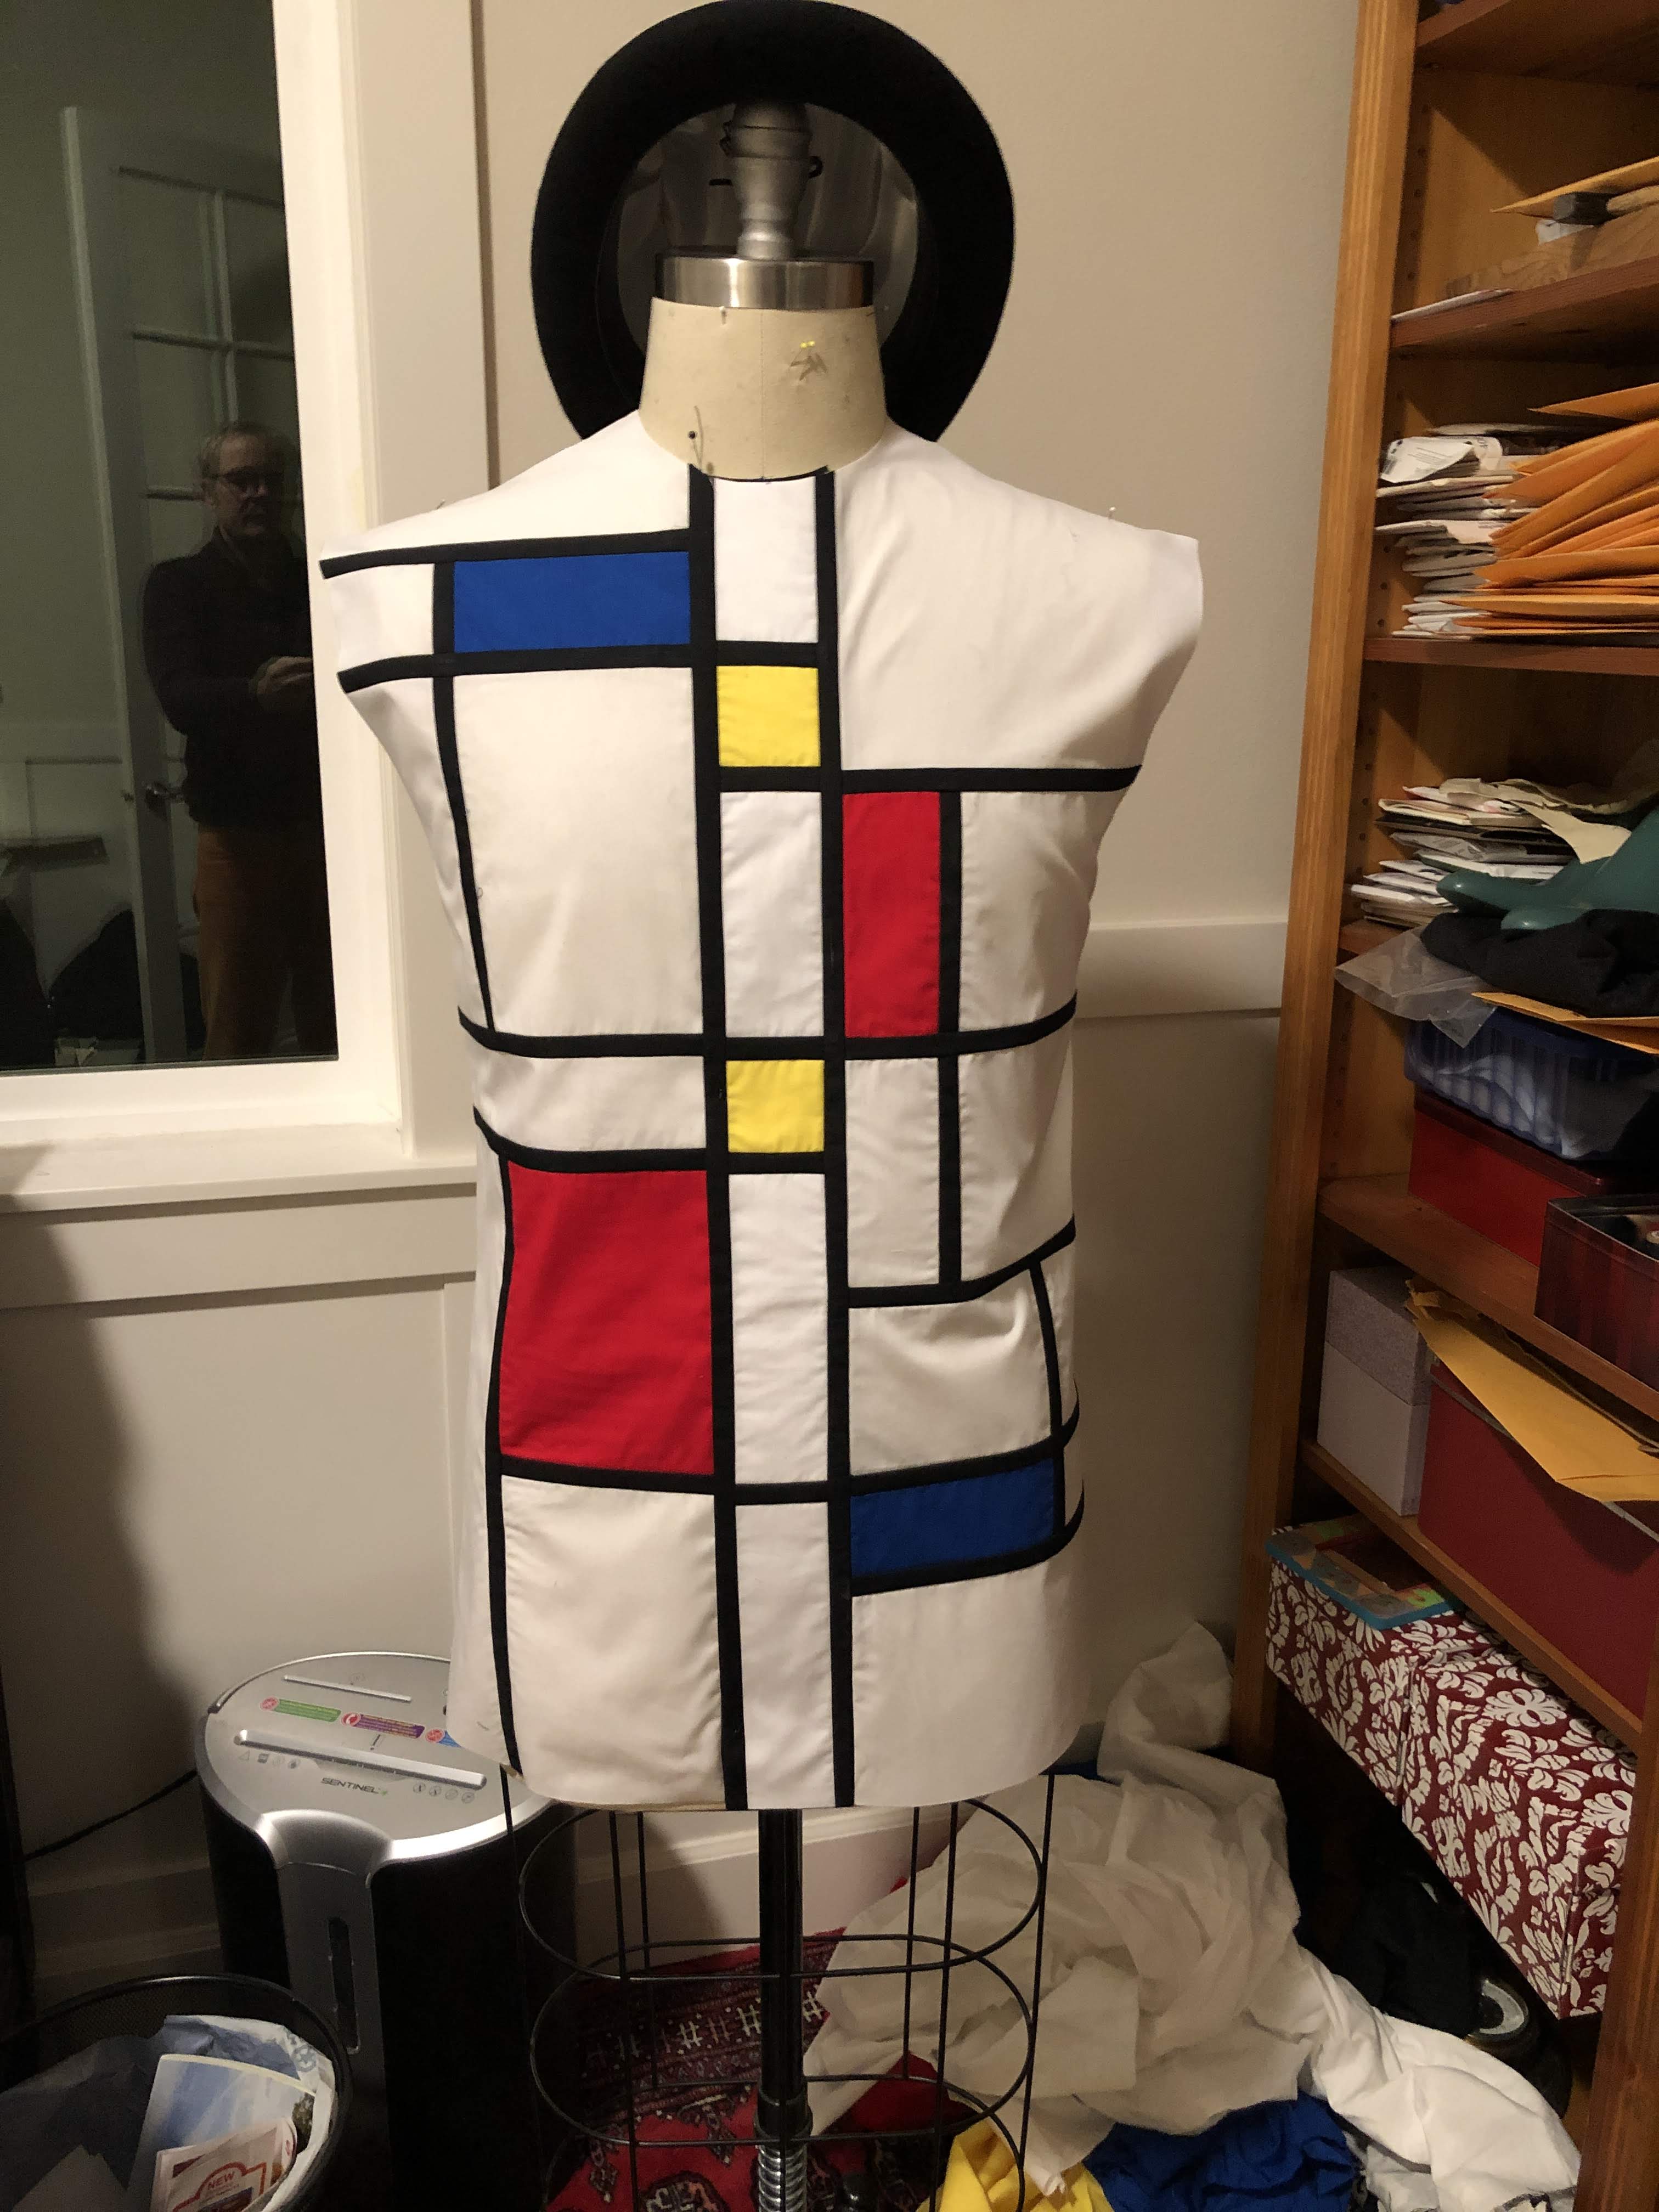
Now that I have the design turned into fabric, it is time to create a shirt.

While I was still making sketches, I considered continuing the design onto the back, and even the sleeves. And the more I thought about it, the less I liked the idea. Since one of the design ideas was that it should be wearable, the sleeves would move, and with it any lines that I’d try to continue onto them. In my mind, this would distract, instead of add to the design. And the pattern that I used for this shirt, a loose-fitted one, has pleats in the back where the yoke meets the rest of the fabric. This is a good feature, since I want the shirt to be wearable. But it also means that those pleats would seriously distort any type of geometric design I could come up with.

So I ditched that idea. And considering how much time it took to create the front, I’m not shedding any tears over that decision. I think I would have given up on the project if I had to do the back and the sleeves too.

To make it not completely boring, I added a strip of black to the bottom of the back yoke. And while I was sewing that together I saw that there was one black line that ran all the way across the front. I couldn’t help myself, I cut the back where this line would match up and inserted another black strip of fabric. At least the back would some decoration.

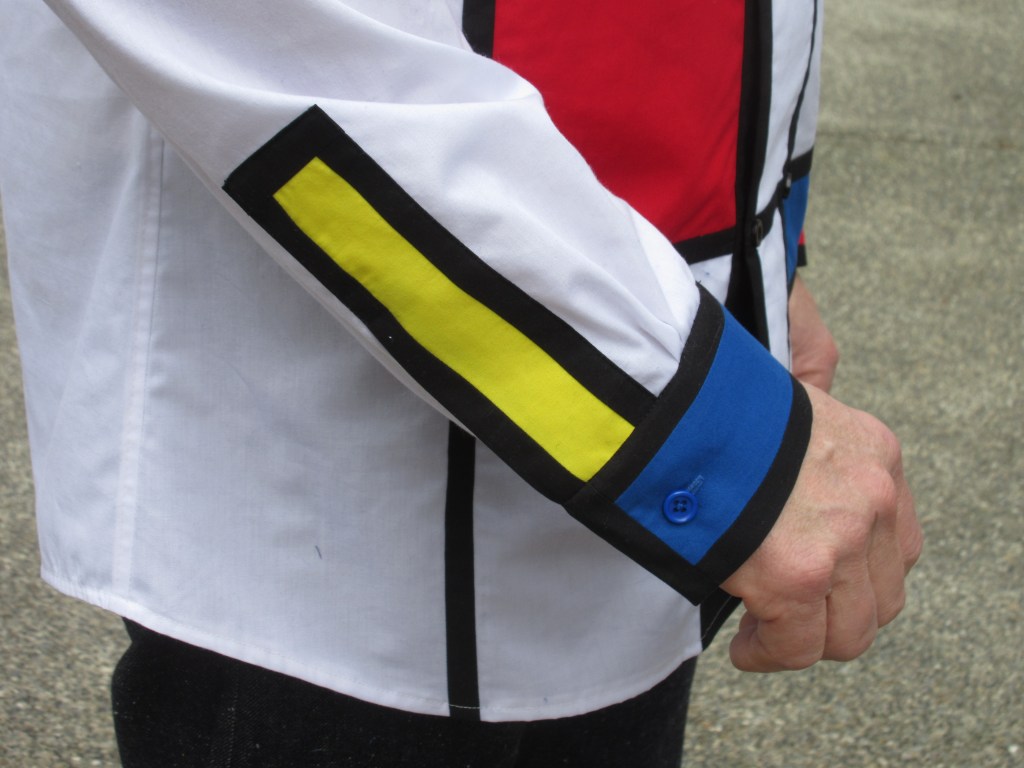
The sleeves were rather easy. Make a cuff that looks like a colour block, and do the same for the placket. The plackets would be yellow blocks with black lines, and the cuffs would be one red, and one blue. And I completely forgot to take any photos of the process.

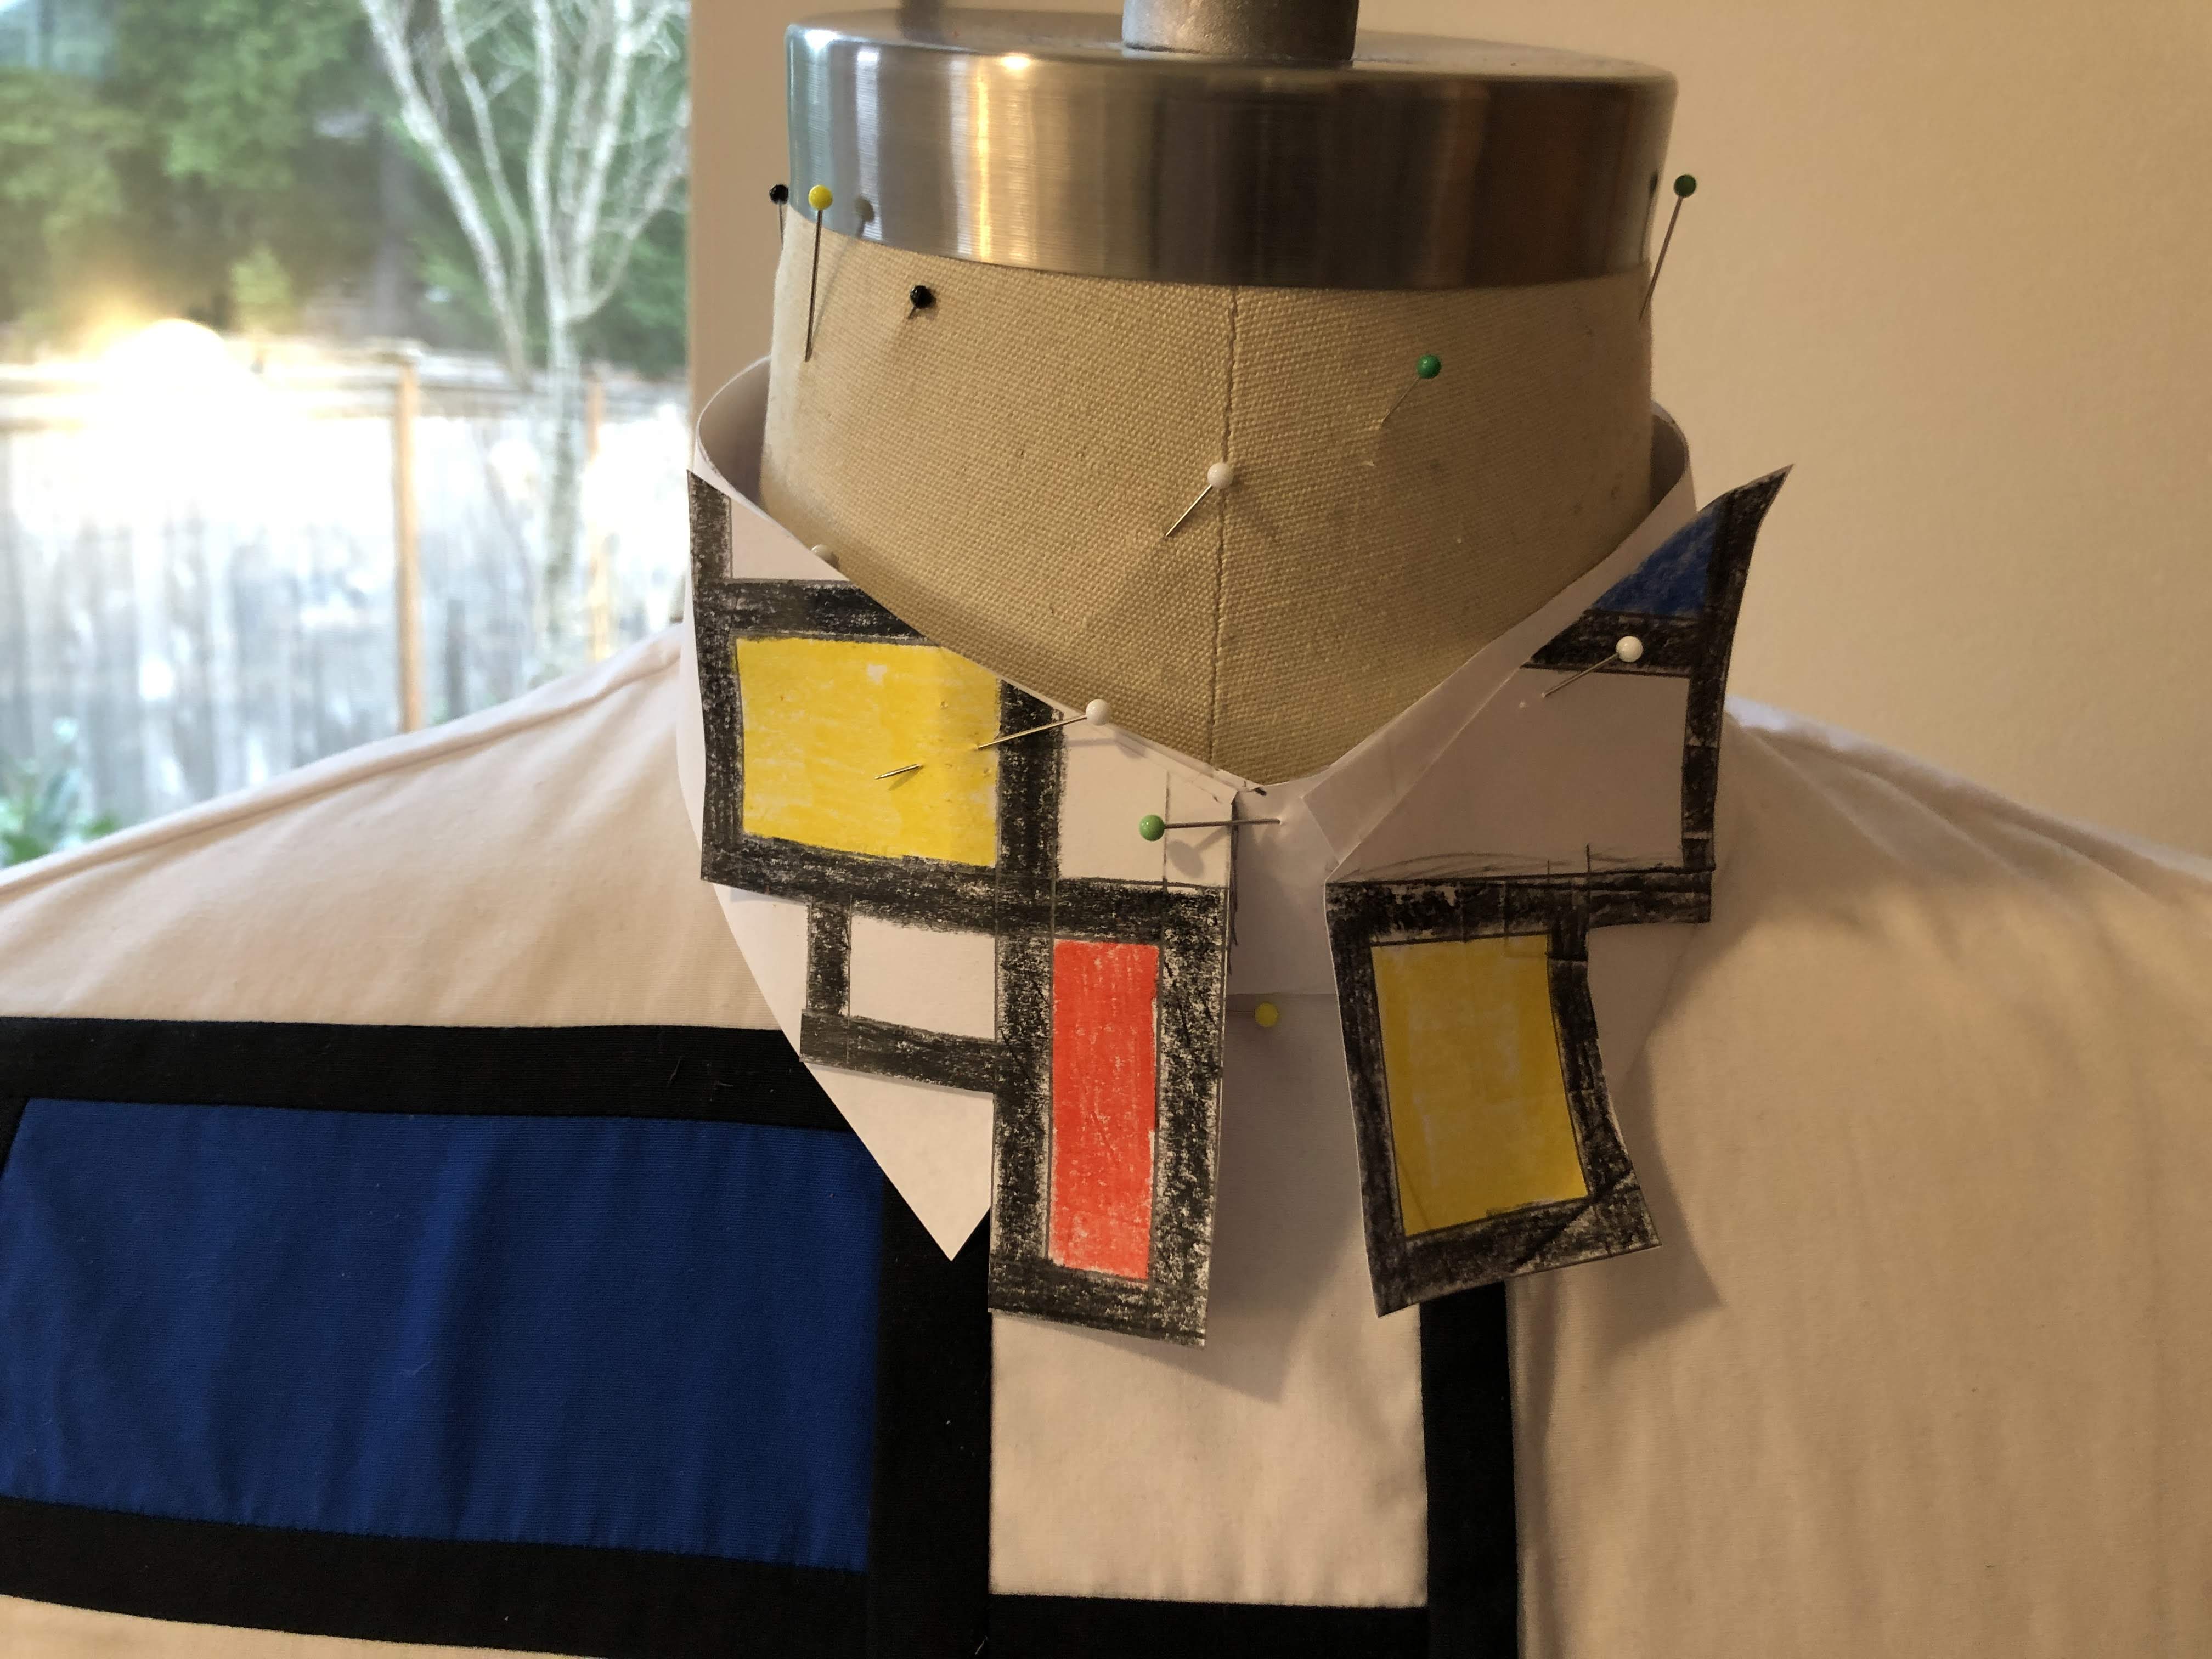
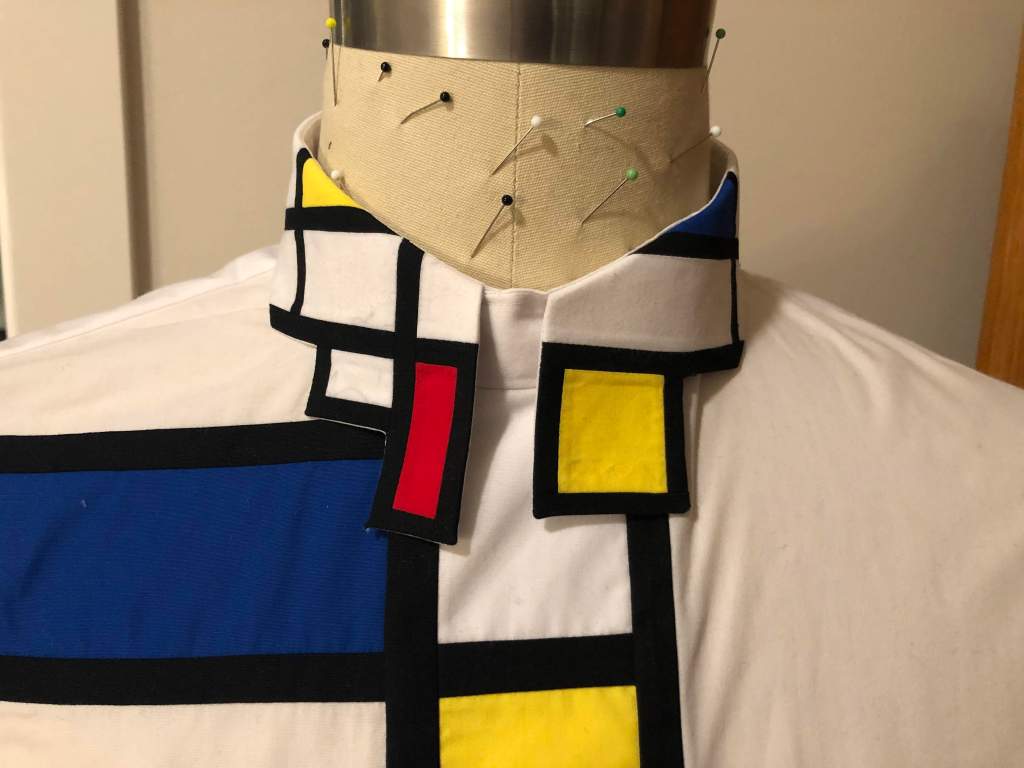
Now only one thing was left; the collar. And if you have been following me on this blog, or Instagram, you know that I have a thing for collars. I couldn’t let myself get away with something simple. So it was literally back to the drawing board.

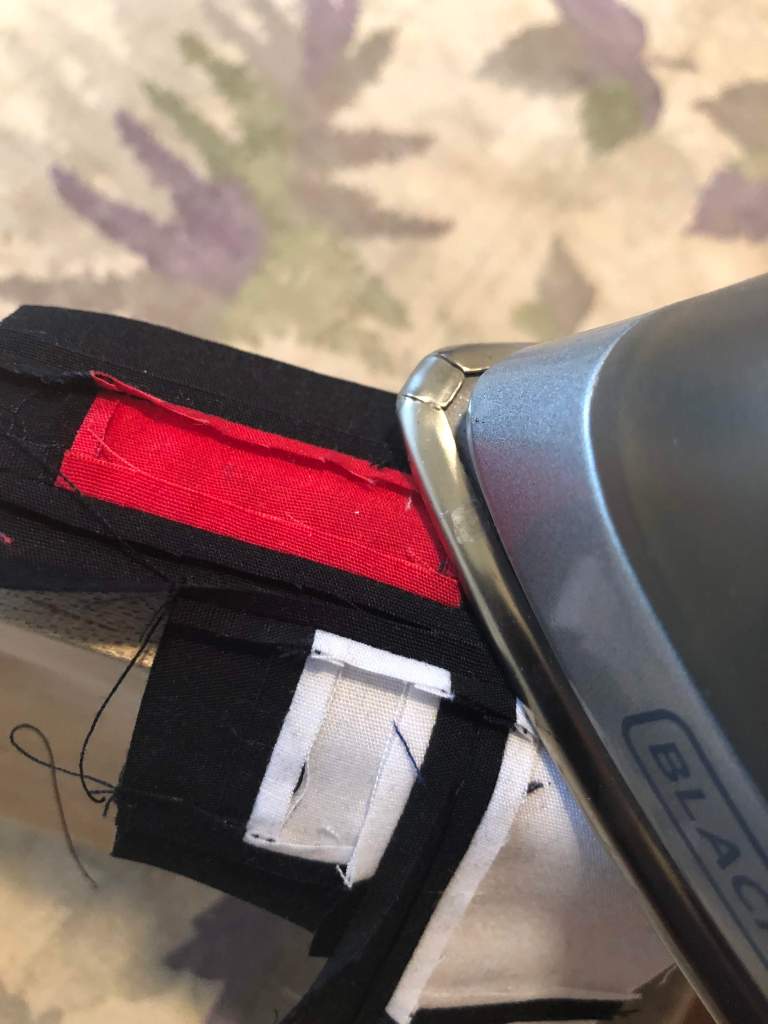
One thing was obvious; even though the black lines weren’t very wide, they were too big for a collar. The simple solution was to just make them half as wide. This would not be as big of an issue as I initially thought. These seams don’t have to be finished; they’re completely hidden inside the collar and only need to be pressed open. I would not have to make faux French seams here.

Initial design

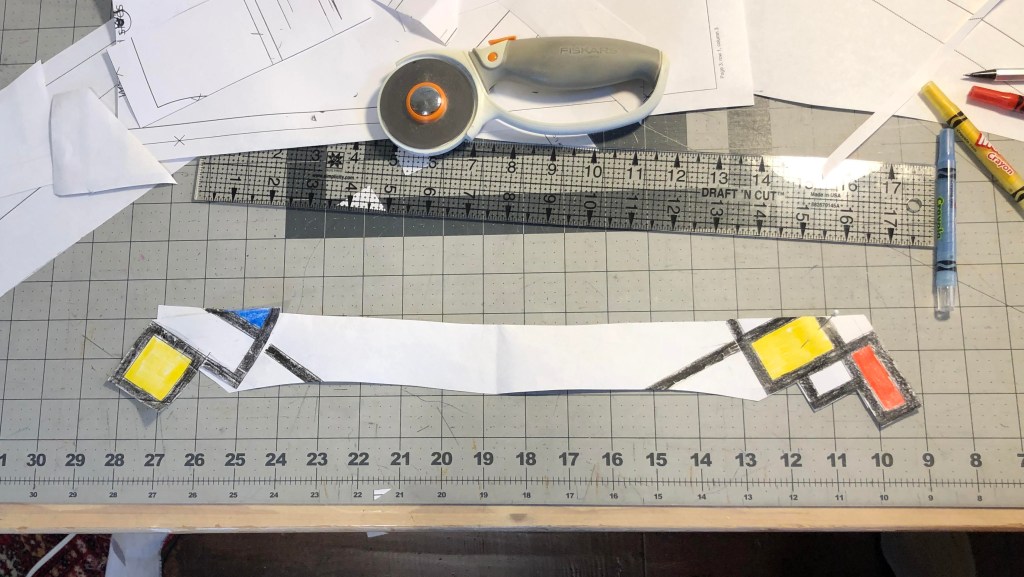
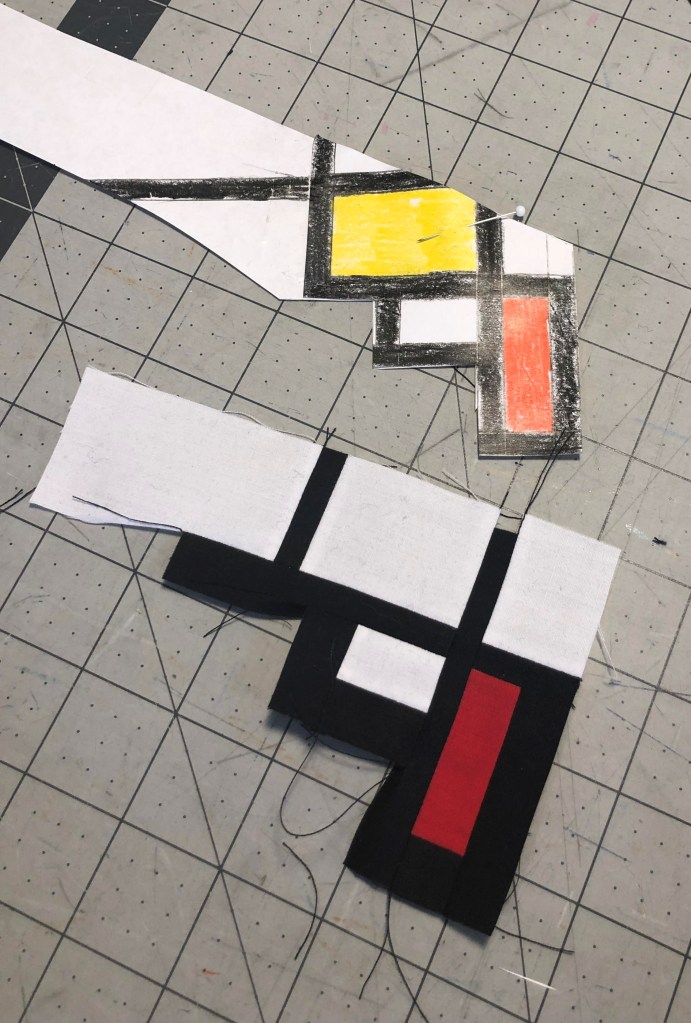
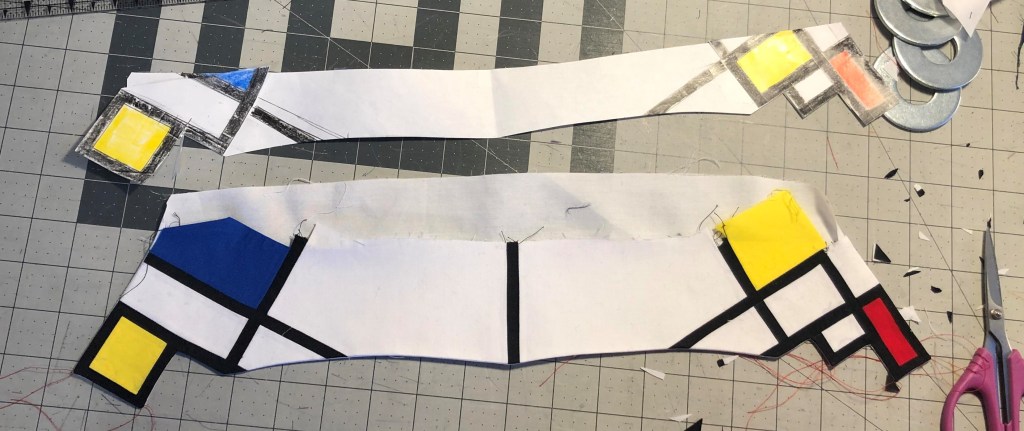
There wasn’t really a method to creating the design. I made a collar stand from paper and made a rough paper collar that I taped onto it. Then drew on that to see what I liked. Matching the lines up with the horizontal and vertical lines on the shirts was the most pleasing. And, of course, it had to be asymmetrical.

Transferring this design onto fabric was finicky. The precision required to make it look nice was even higher than with the front of the shirt. But I didn’t have to do the seams finishes, and there were a lot less seams.

Now the only thing left were the buttons. I chose small black ones, on both sides of the wide placket. This would not disturb the symmetry, while being as unobtrusive as possible.

This was a great project, because it required so many new things of me. I needed to sketch, quilt, draft, and above all, not become frustrated with the tediousness of it all. There are a lot of things I learned, and there are many things I would do differently if I were to make another one. Yet, I’m very happy with it, and it feels good to finally (a year after the thought entered my brain) have it be part of my wardrobe.

Thanks for visiting!

Mondrian shirt – Construction

With the initial design finally done, it still had to be turned into real measurements. The best way to do this would be to make a full-sized front pattern piece from my favourite shirt pattern. This would allow me to see what decisions would look like.

The sketch provided me with the overall layout of the lines and areas. Now I had to decide the exact measurements of all those parts. One of the key dictating parts was the centre front. I figured that this should be a placket of sorts, and could therefore not be too wide. Having the black line be part of the placket seemed best to me. For the first try I used black lines that were 3/4″ wide. That only allowed for a middle section of about one and a half inches, too narrow for the design. So I shrunk the black lines to half an inch and the middle section to 2. This looked more balanced.

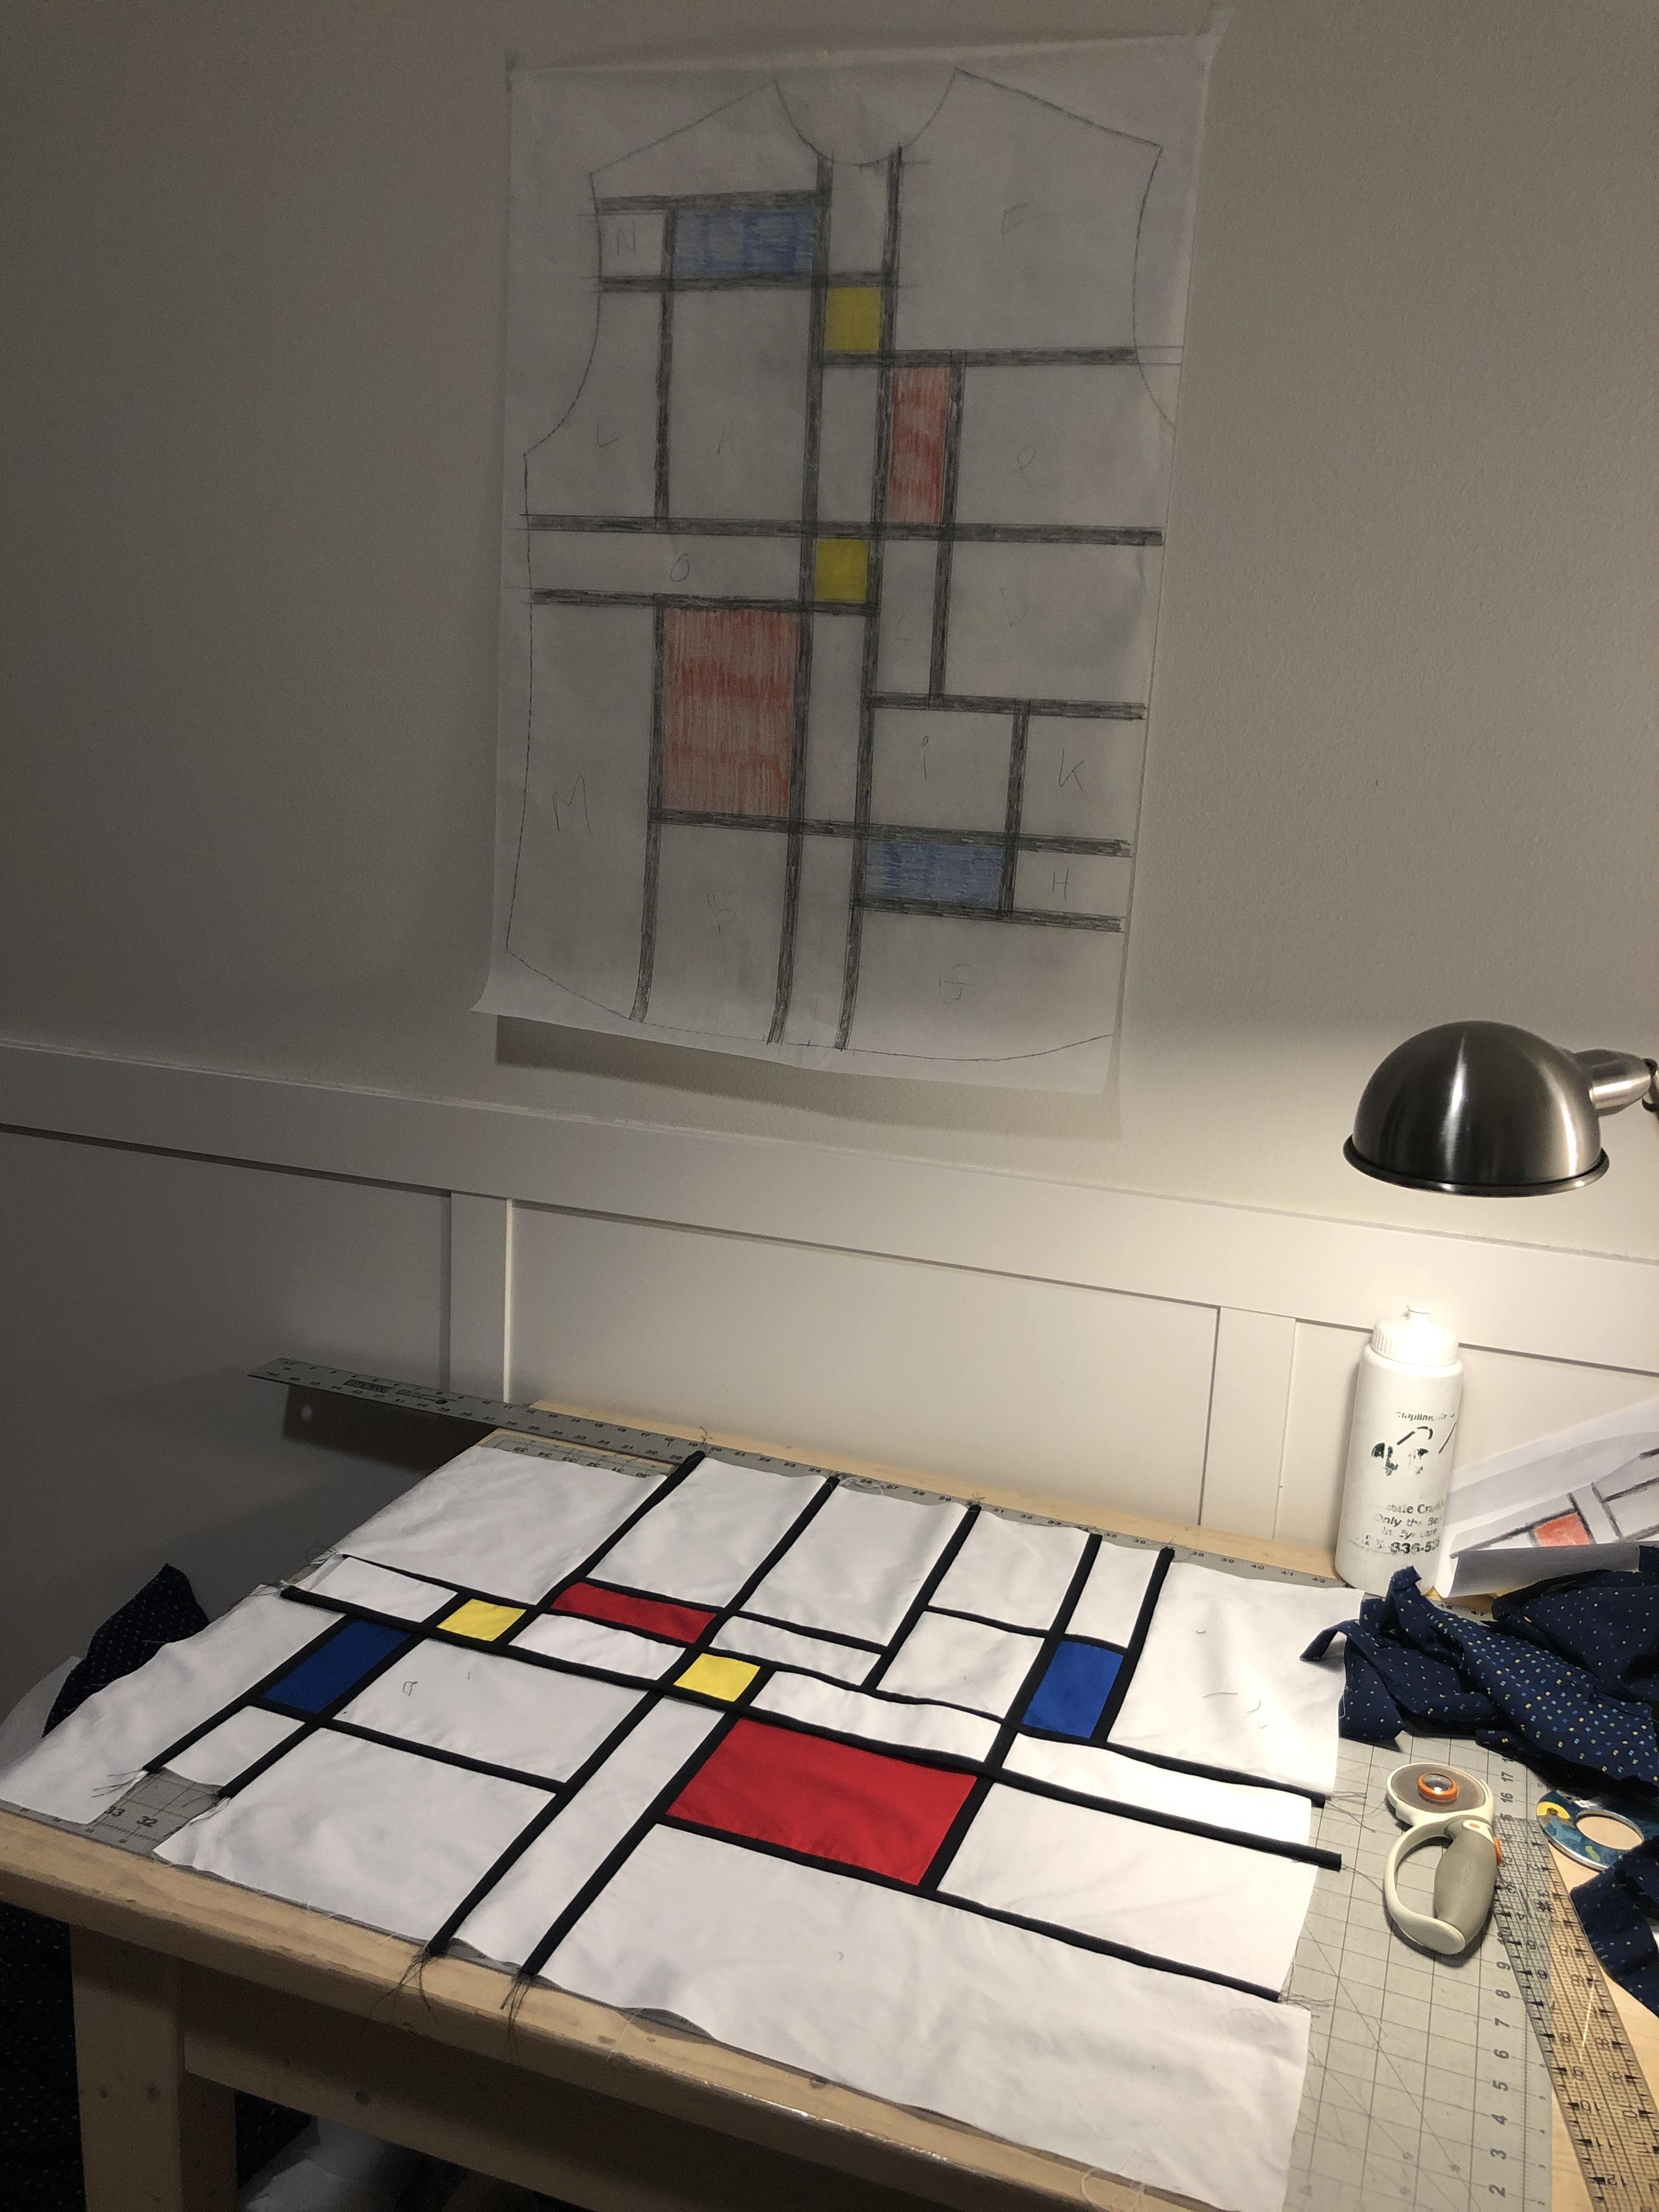
A lot of measuring followed and eventually I got to a representation of the sketch in exact measurements. At the same time I made a couple of small tweaks to the design.

Final design

The next phase would be figuring out the construction of the actual shirt. I had some requirements that had to be incorporated:

  • The design must be made of fabric. No printed patterns.
  • The shirt must be wearable.
  • All seams need to be finished.
  • No stitches on the right-side.

I quickly realised that although the colours of my fabric are very vibrant, the white, and the other colours to a lesser extend, are somewhat translucent. This is not an issue in and of itself, yet at the seams it may be. I would not want a darker colour to be shown through the lighter colour. So all seams would have to be pressed open, or towards the darker colour.

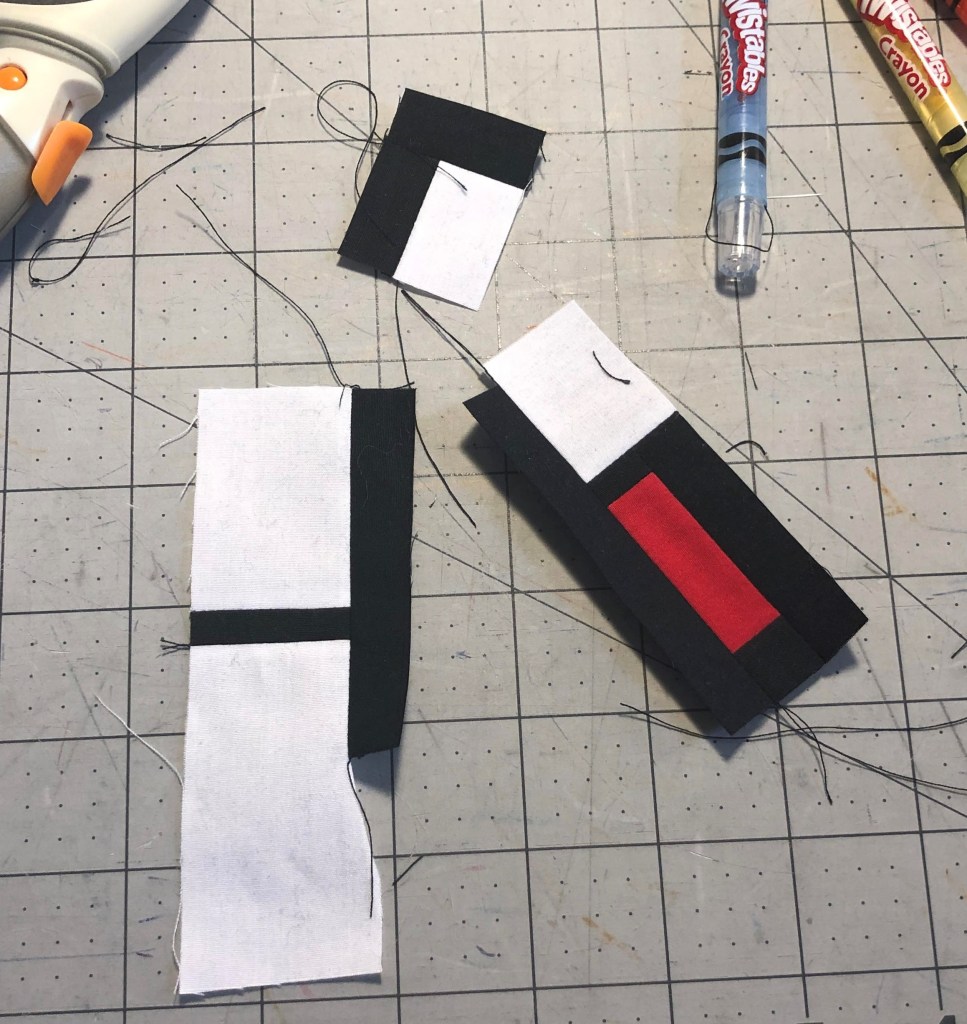
With my self-imposed limitation of not having any stitches or unfinished seams, it would have to be constructed with French seams. But I didn’t think I could be as precise with those as I would need for this project. And some experimentation proved me right, I couldn’t make those seams with a precision of less than 1/16″. I would have to sew the seam first, and then do the finish to get an acceptable result. No other solution would give me the precise parallel seams that something this geometrical requires. So the solution would have to be a mock French seam. Sew the seam first, iron both seam allowances into the seam, and then stitch them together. It would be just like a French seam, but with the stitches showing on the wrong side. Initial testing showed that this would be doable.

Going back to the final design, and the width of the black lines, I realised I did not have much space for the seam finishes. Two mock french seams would have to be pressed towards each other and fit inside the half an inch the black lines are wide. Seam allowances of 3/8″ would give me finished seams of 3/16″, and that would fit. It would be small and finicky, but it would fit.

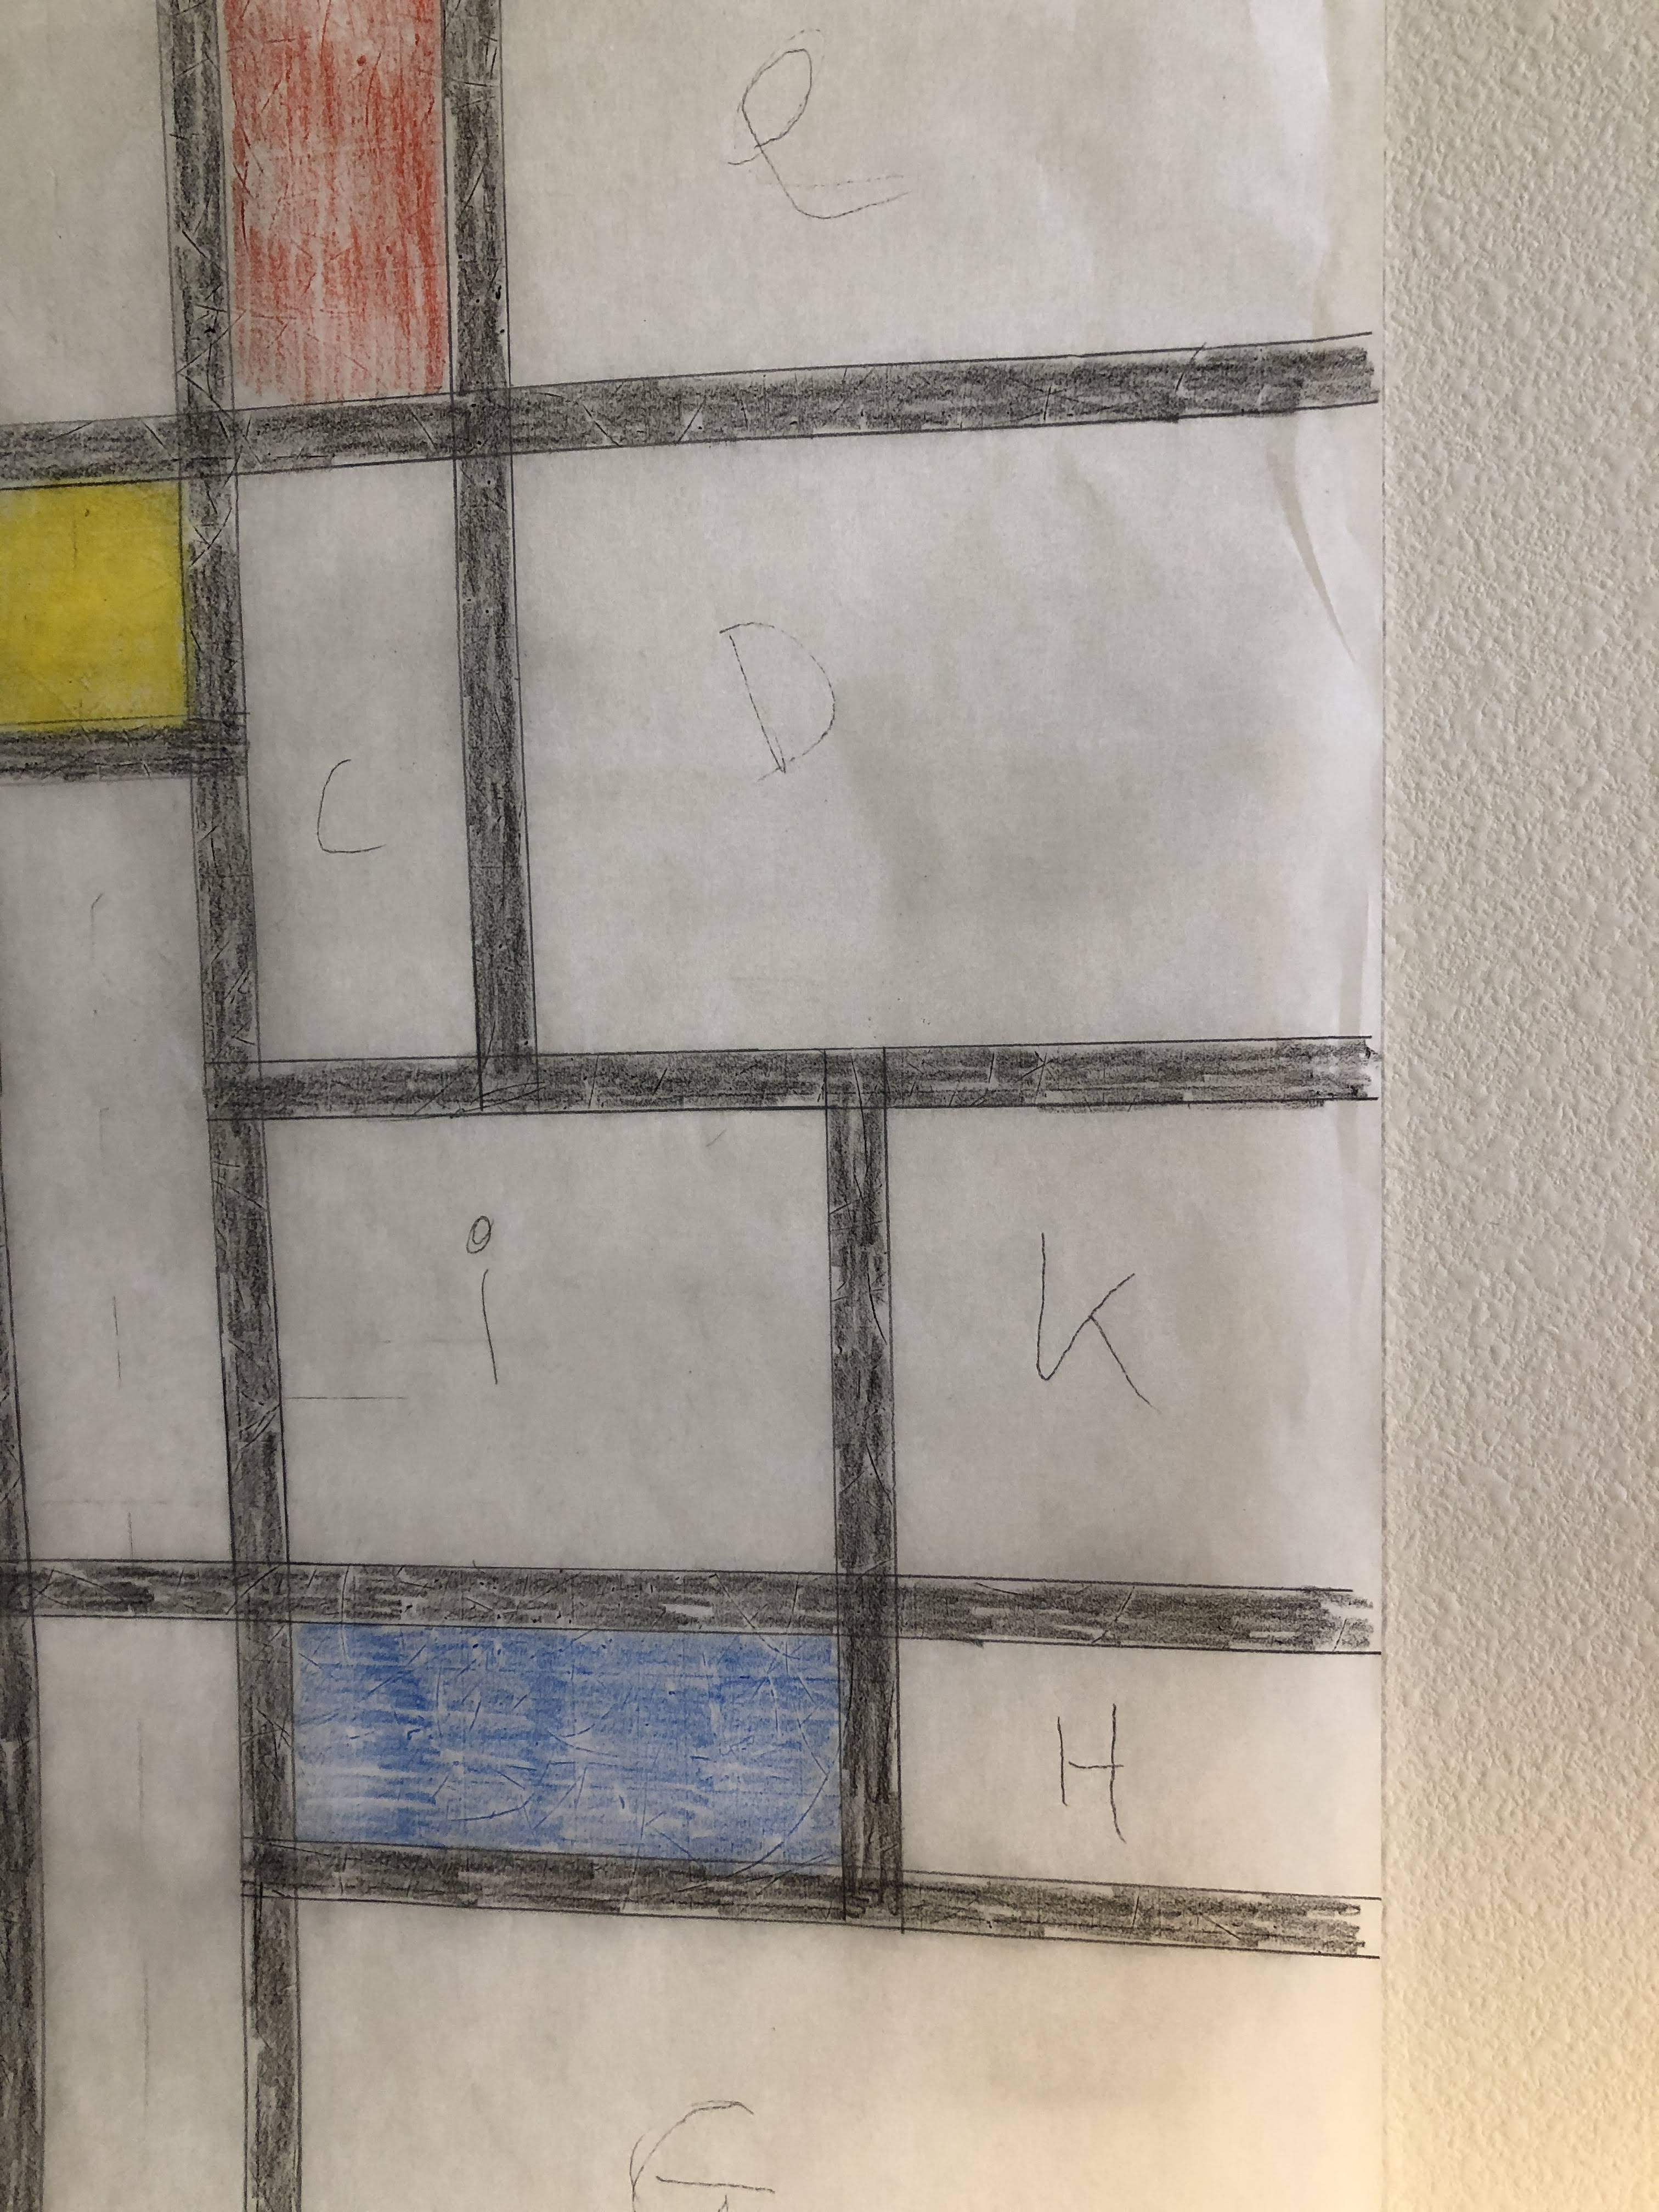
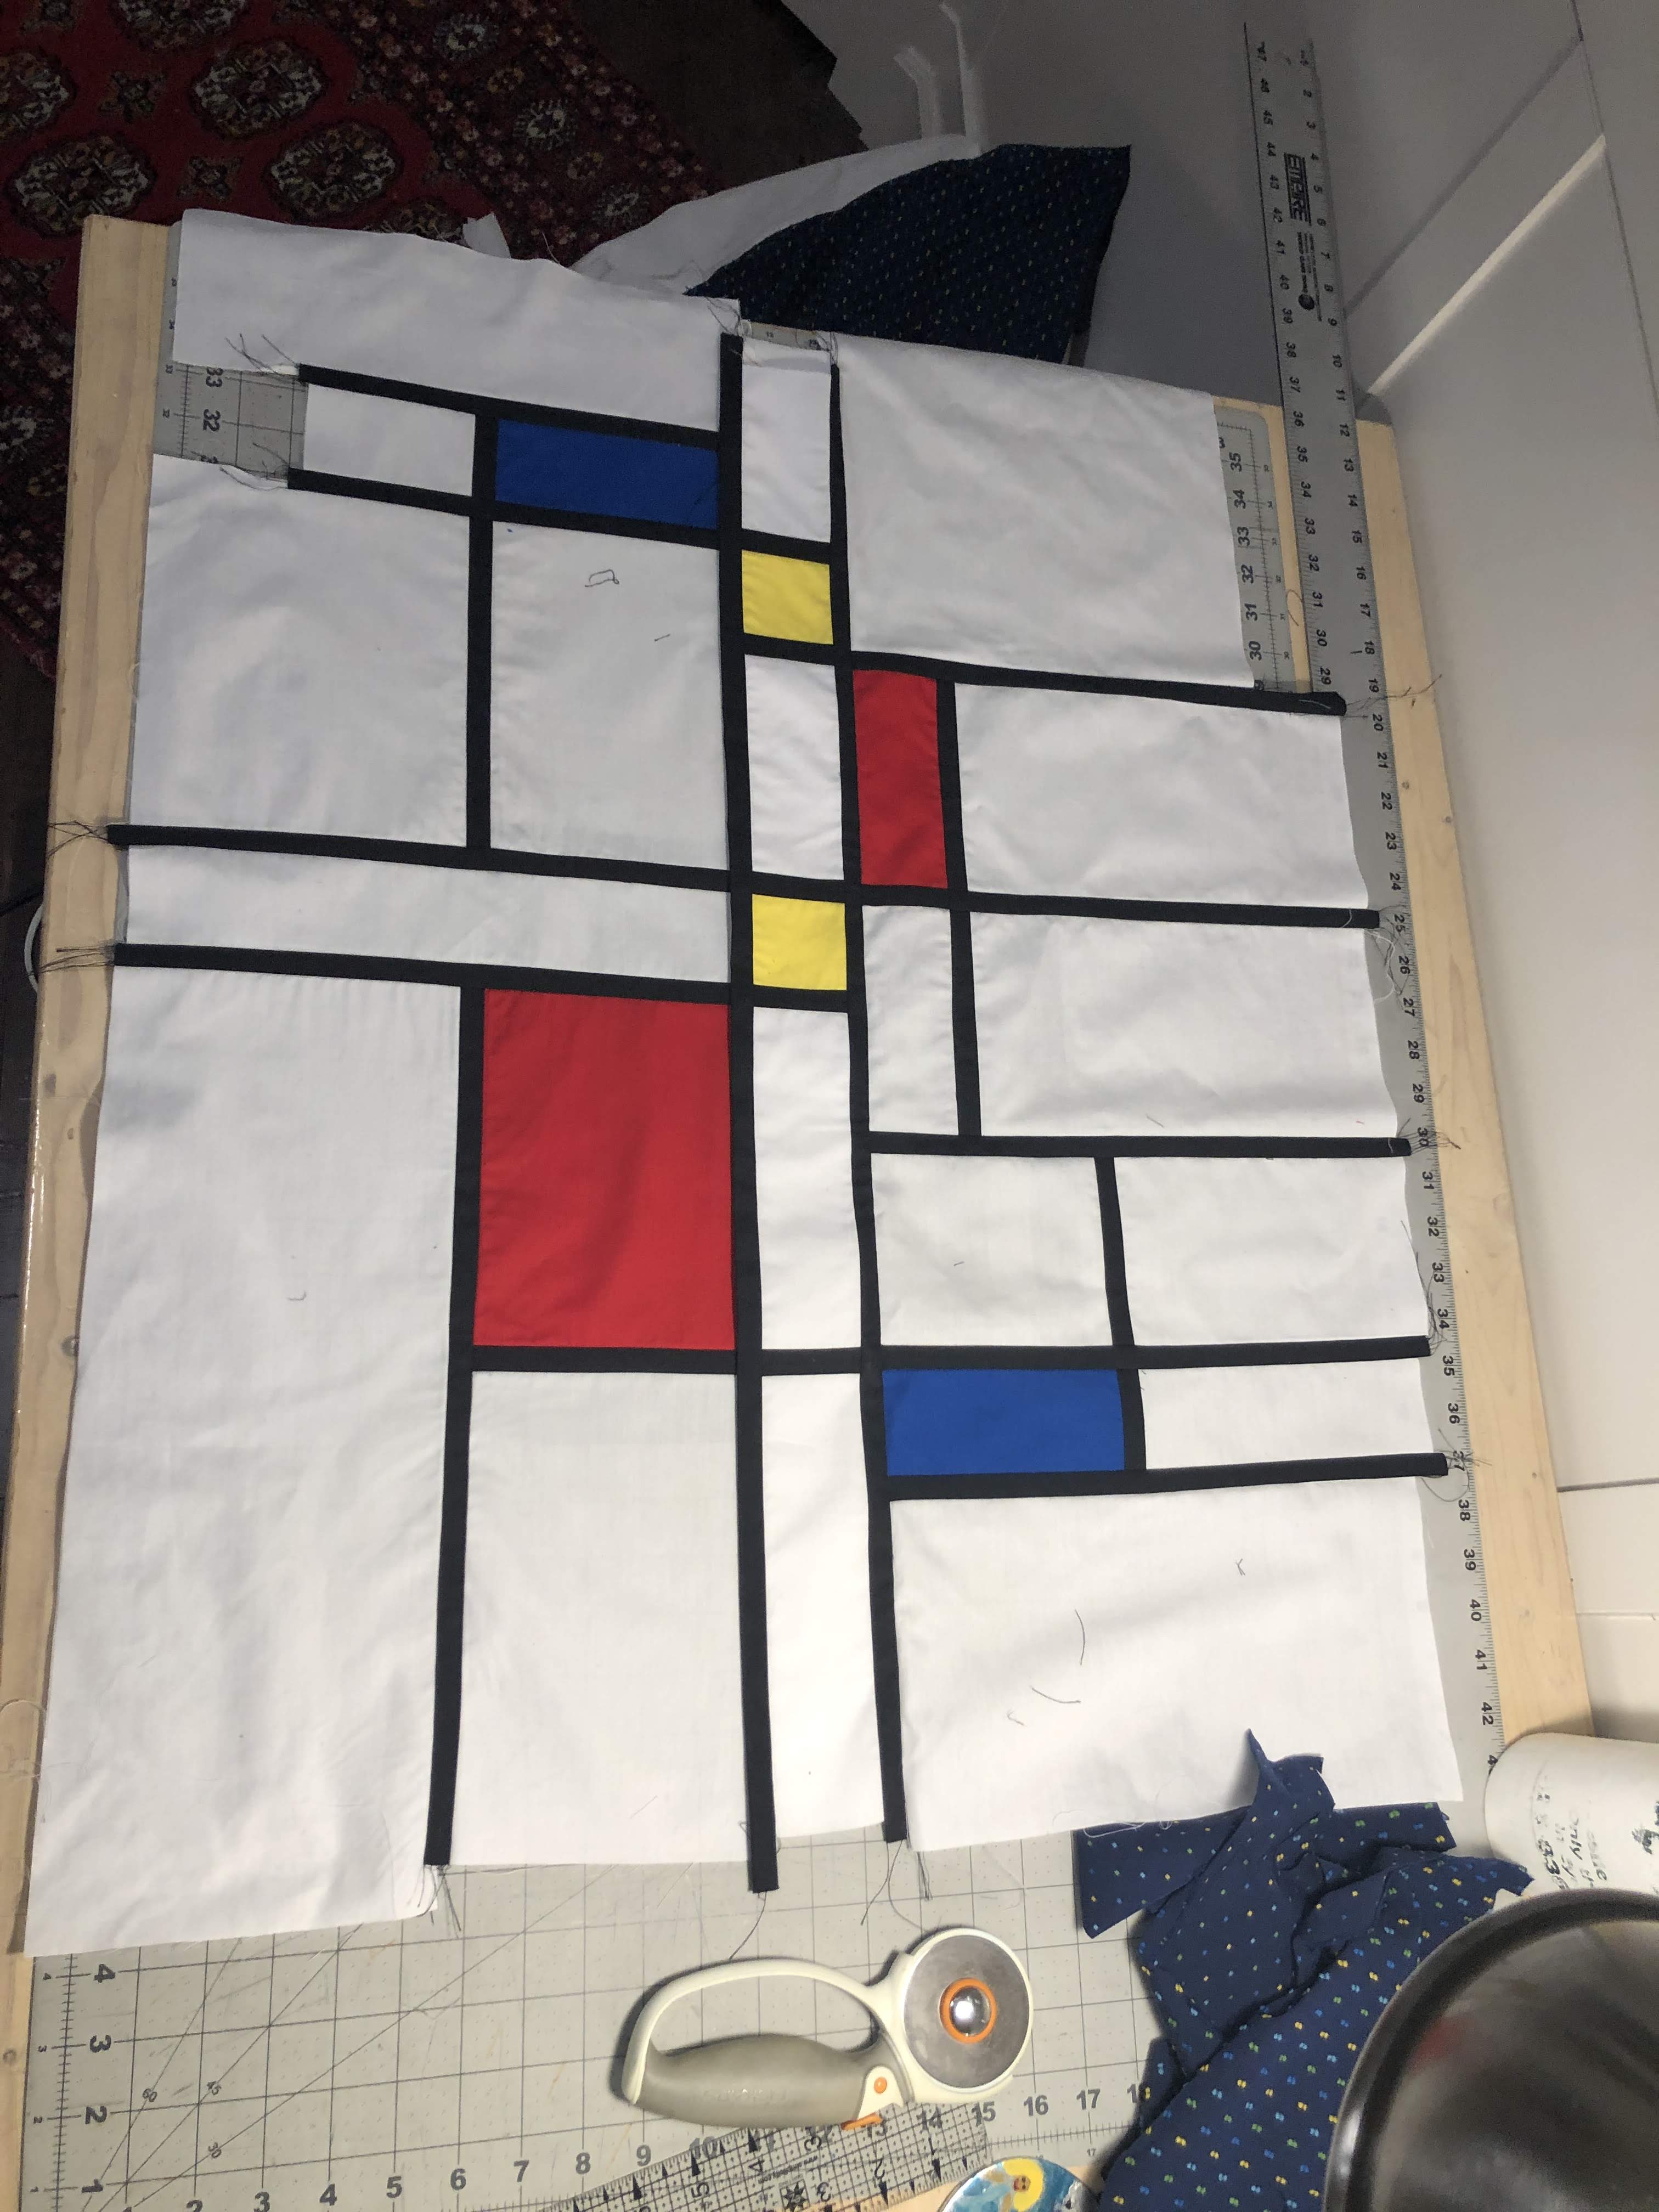
With all of these decisions made, I could finally start cutting the pieces out. First a whole lot of long black strips, both vertically and horizontally cut, to keep the grain correctly. Then the coloured squares and rectangles. And then the white ones. I quickly figured out that I would have to keep track of each white piece, and where it is supposed to go. I wrote letters on the final design and attached pieces of paper to the white fabric as I cut them out. A whole stack of fabric pieces appeared that somehow had to become a shirt.

Now it just became an exercise of joining all the pieces together in the right sequence. I figured out before getting really into it that I had to join certain pieces before others. Basically try to do short seams before long ones.

I never dreamed it would be this much finicky work. Almost constant concentration for long periods of time. In the end I decided that I would only do half an hour to an hour at a time. Then do something easy – a different shirt – for the rest of the evening.

Slowly but surely the mosaic started to take shape. And after over 430 inches – almost 9 yards! – of mock French seams, I had the two front panels done.

Now all the was left for the fronts was to cut them out according to the pattern. That took quite a bit of courage. And measuring twice before cutting. Or maybe three times? I probably measured a dozen times before I dared to cut into it.

Thanks for reading.

Mondrian Shirt – The beginning

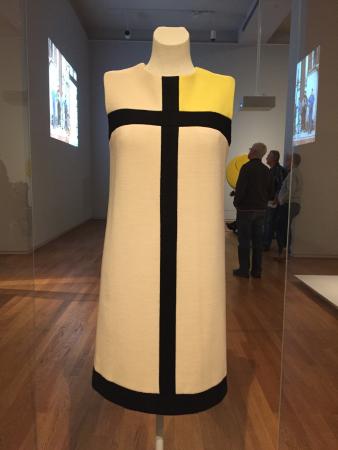
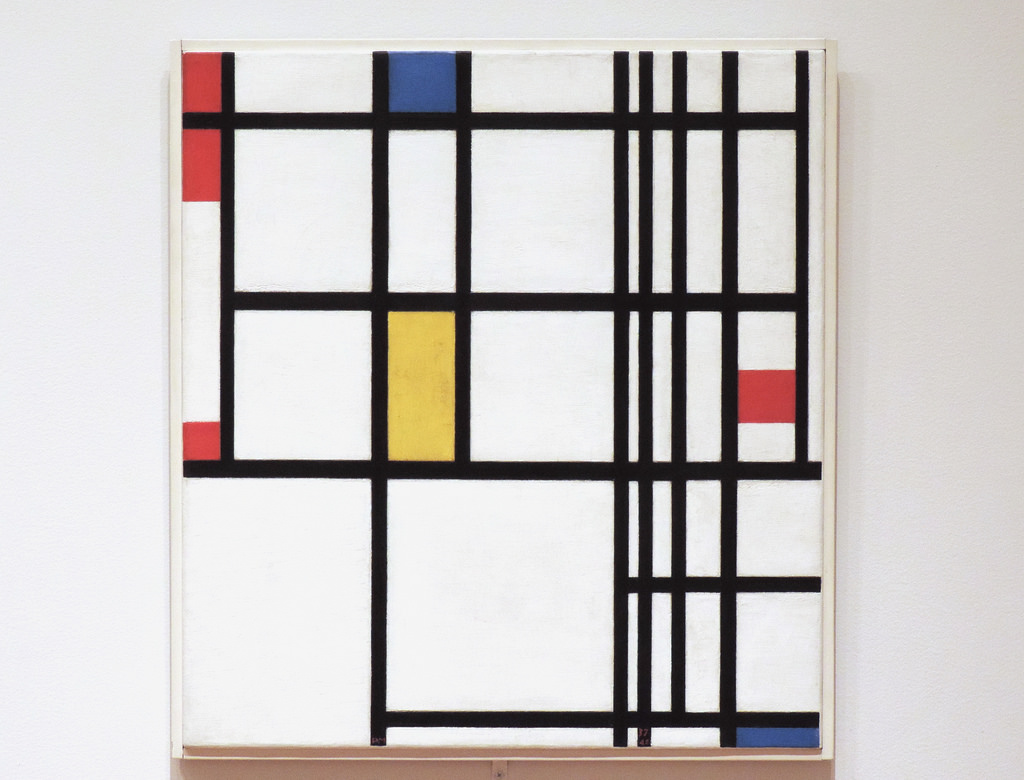
Almost a year ago I travelled to The Netherlands to visit my mom. I had a lot of time by myself while I was there and decided to play tourist in my own (former) country. In 2013, the Rijksmuseum opened its doors again after 10 years of renovation. I had been there since, and seen all the famous pieces that draw in all the tourists. But the museum is big, and there are a lot of things you will miss. So this time I decided to go there, skip all the usual, and find all the hidden gems. In the brochures online I had seen that there was a dress by Yves Saint Laurent, inspired by Piet Mondrian, a Dutch painter. This seemed like something I should not miss.

It is displayed all the way at the top of the building, in a far-away room. Unless you know what you’re looking for, are dedicated to see everything in the museum, or you’re lost, you would never find it.

This dress is part of a collection that YSL made in 1965 and became very popular after being on the cover of Vogue.

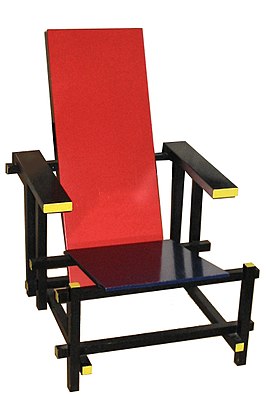
But to be honest, I wasn’t impressed. When I think of Piet Mondian, I think of more complex works. And the chair Rietveld made. This dress just left me wanting.

I spend quite some time looking at it from all angles. And I kept getting back at the same thought; I can do this better, with a shirt.

Weird, thinking you can improve on a famous designer. Although I wasn’t going to set out to create a new fashion trend, like YSL had done, it did seem rather arrogant. Yet the seed had been sown, and there was no turning back.

As with any bold adventure, it is very difficult to take the first step. I just let it play through my mind every now and then. The easy way would be to take one of his paintings, distribute it across some pattern piece templates on my computer, have it printed by Spoonflower onto fabric, and make a shirt. I have done that a couple of times with different art shirts. This seemed like the easy way out. And I didn’t think this would produce the vibrant colours that Mondrian used.

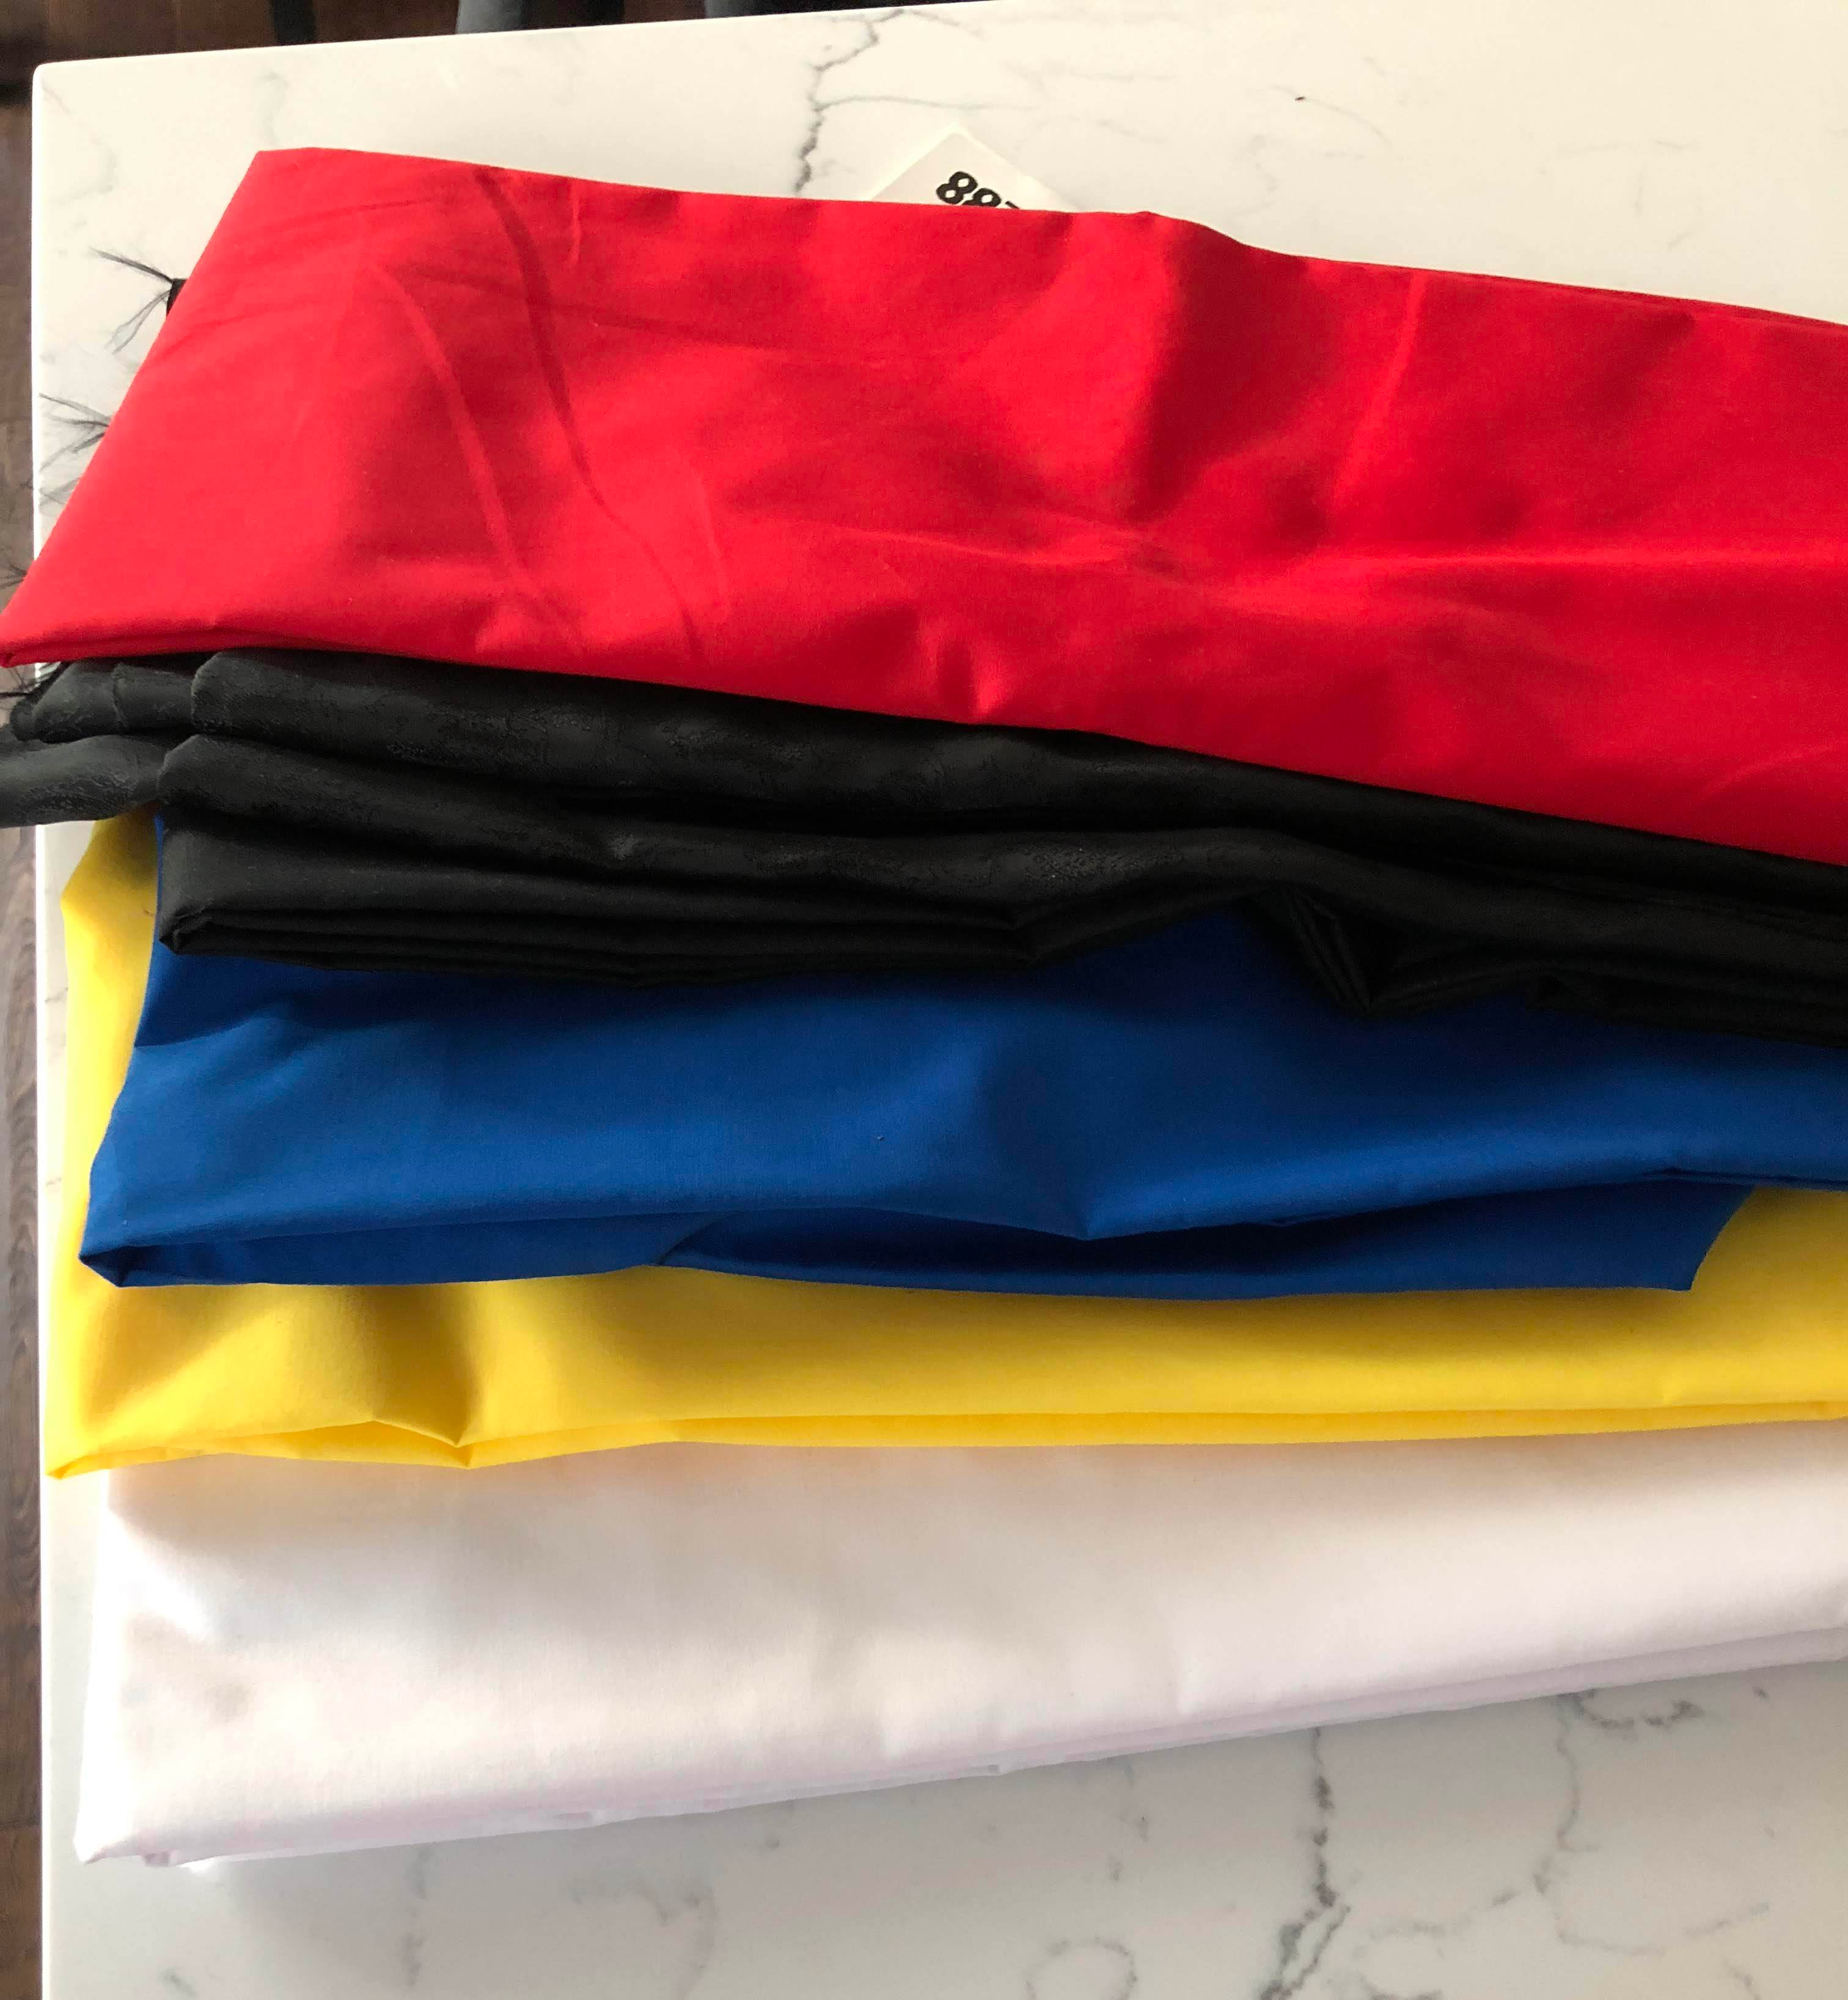
The alternative would be to create the cloth myself out of individual pieces of fabric. For that I would need to find the five colours – white, black, red, blue, yellow – in the same fabric. Looking at a couple of quilt shops did not provide me with what I wanted. The online store where I normally buy my trousers fabric, SellFabric.com, did.

The right weight, nice drape, nice colours, good price. The later was especially nice, considering I would need a yard of each colour and two or so of white. The only issue I found was that it bleeds like crazy. I must have washed each piece at least 6 times separately, adding Retayne to two of the washes. Eventually it stopped turning the water the same colour as the fabric. I’m not sure I trust it enough to actually wash the shirt once I’m finished.

With this hurdle completed, it was time to make the design. What an opportunity to procrastinate! “Let’s think about this for a while.
Of course, you can only tell yourself that for so long before you get cross with yourself.
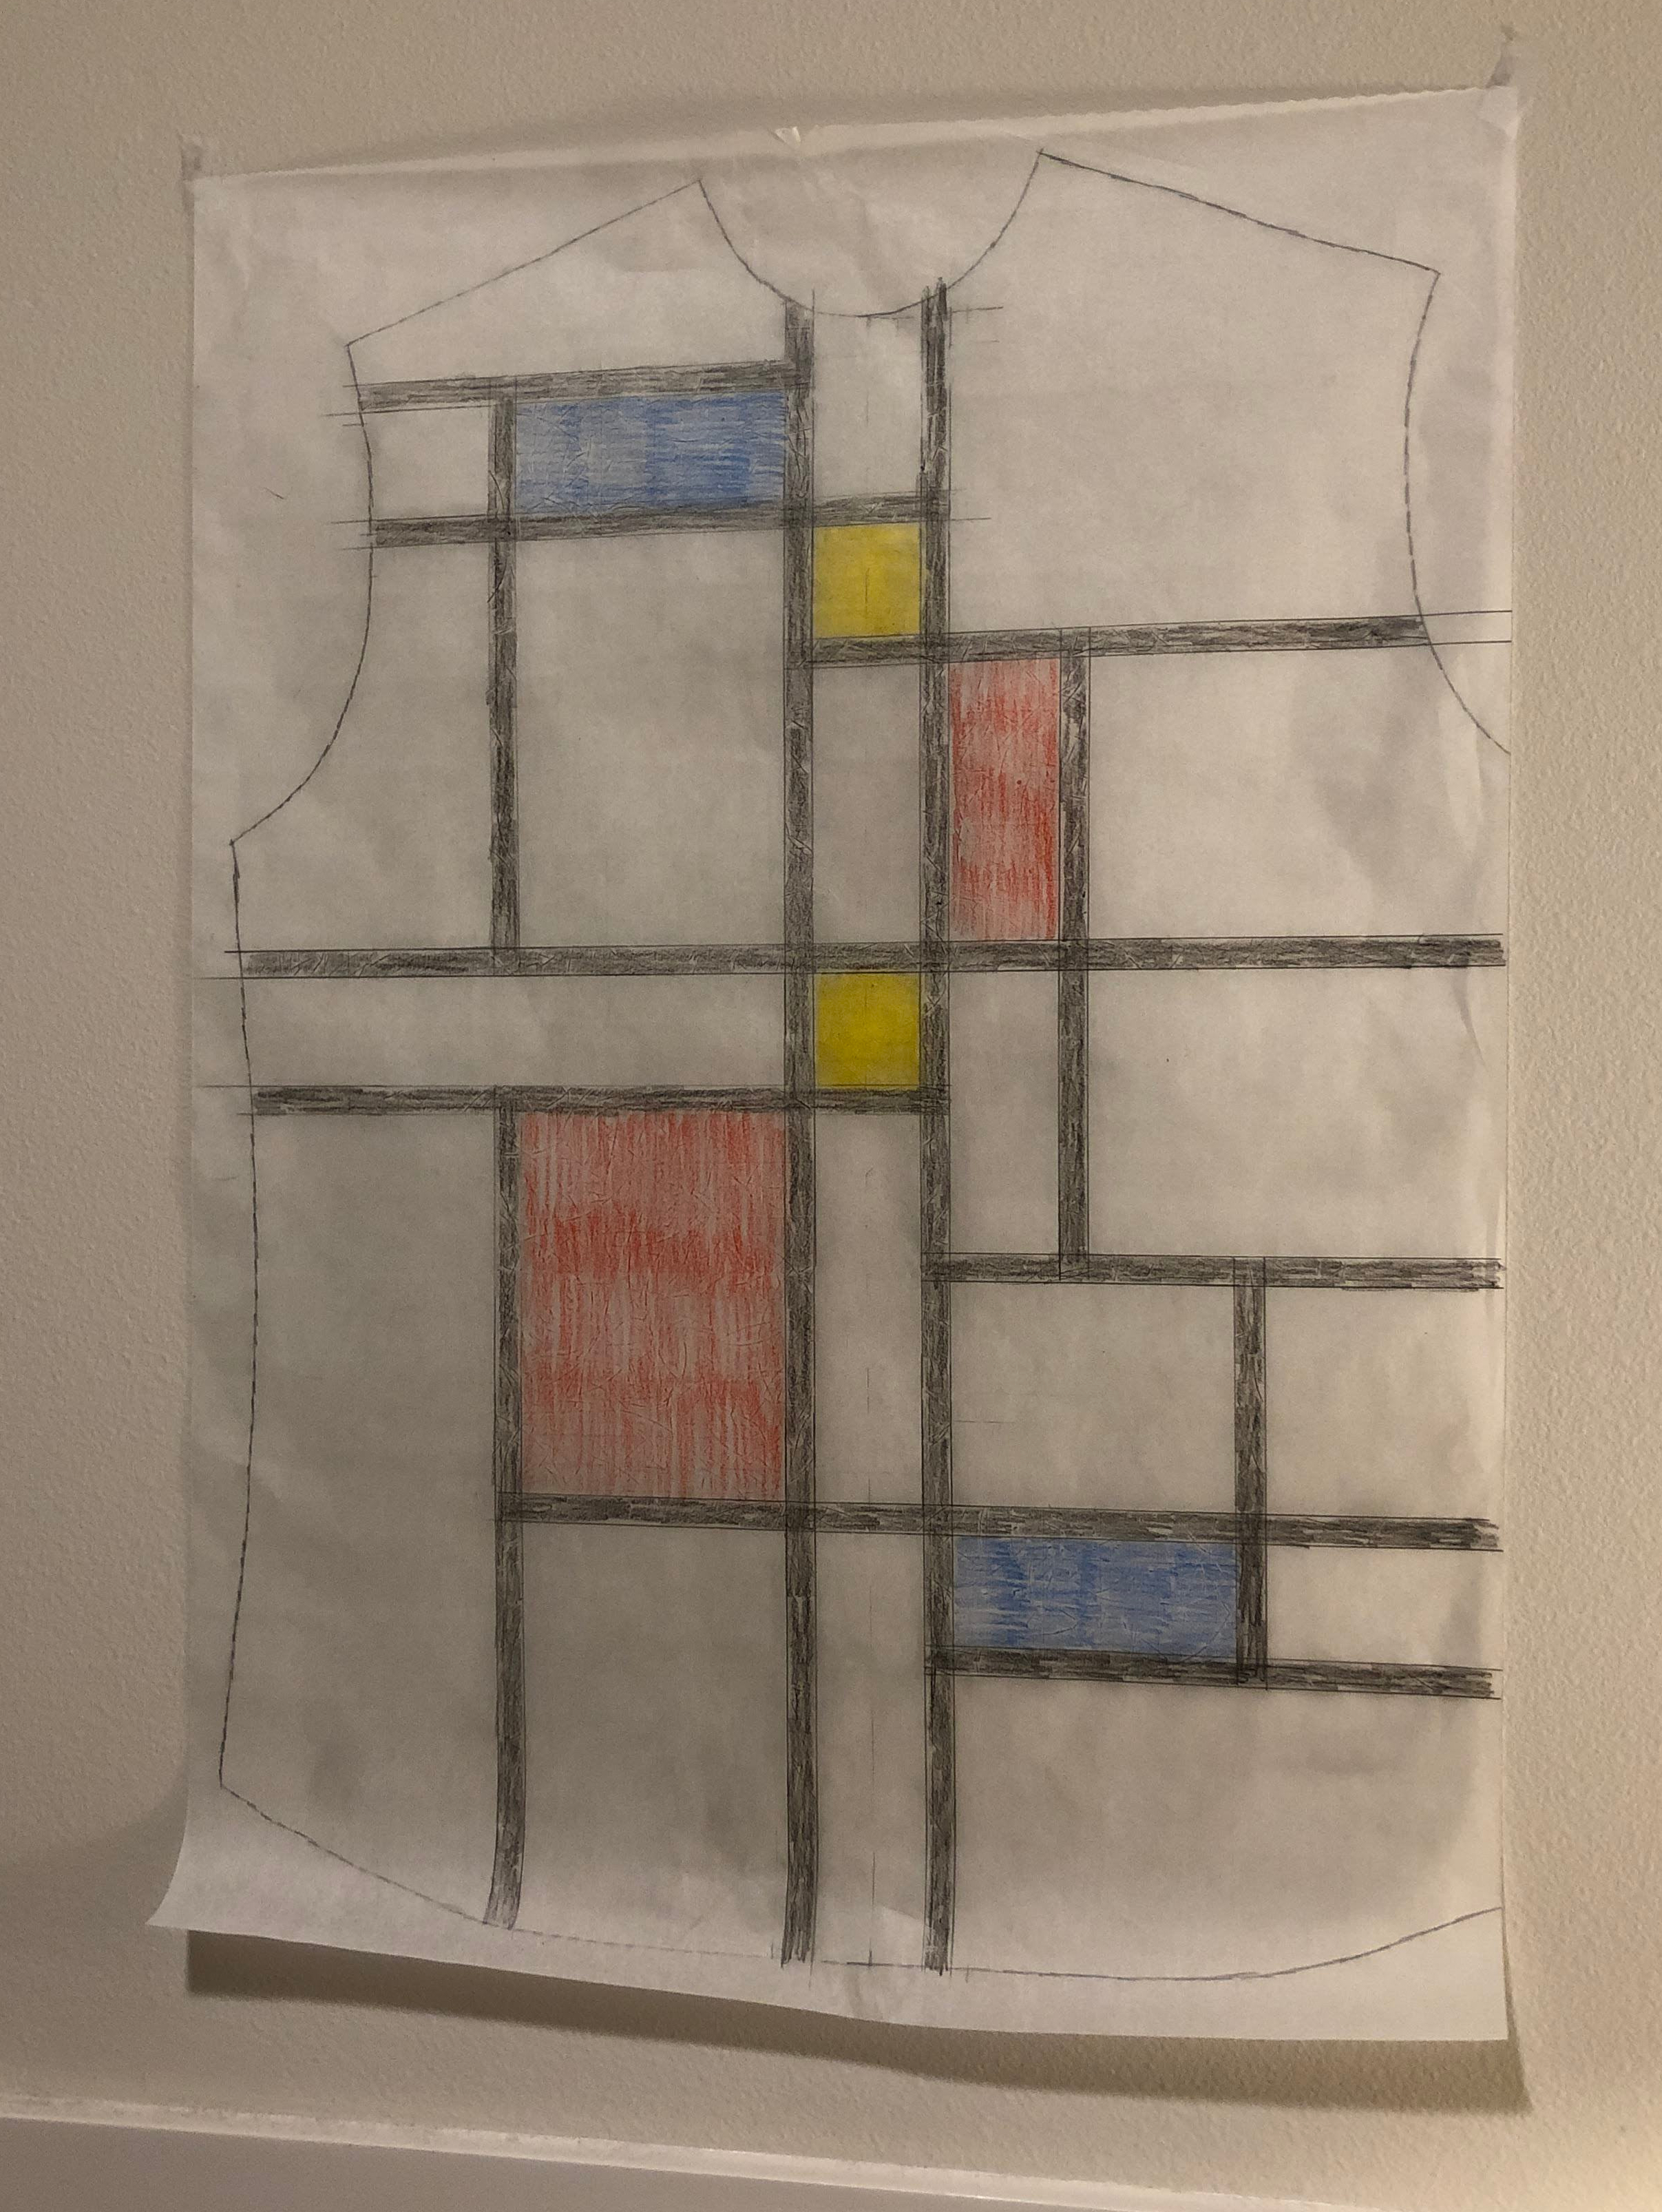
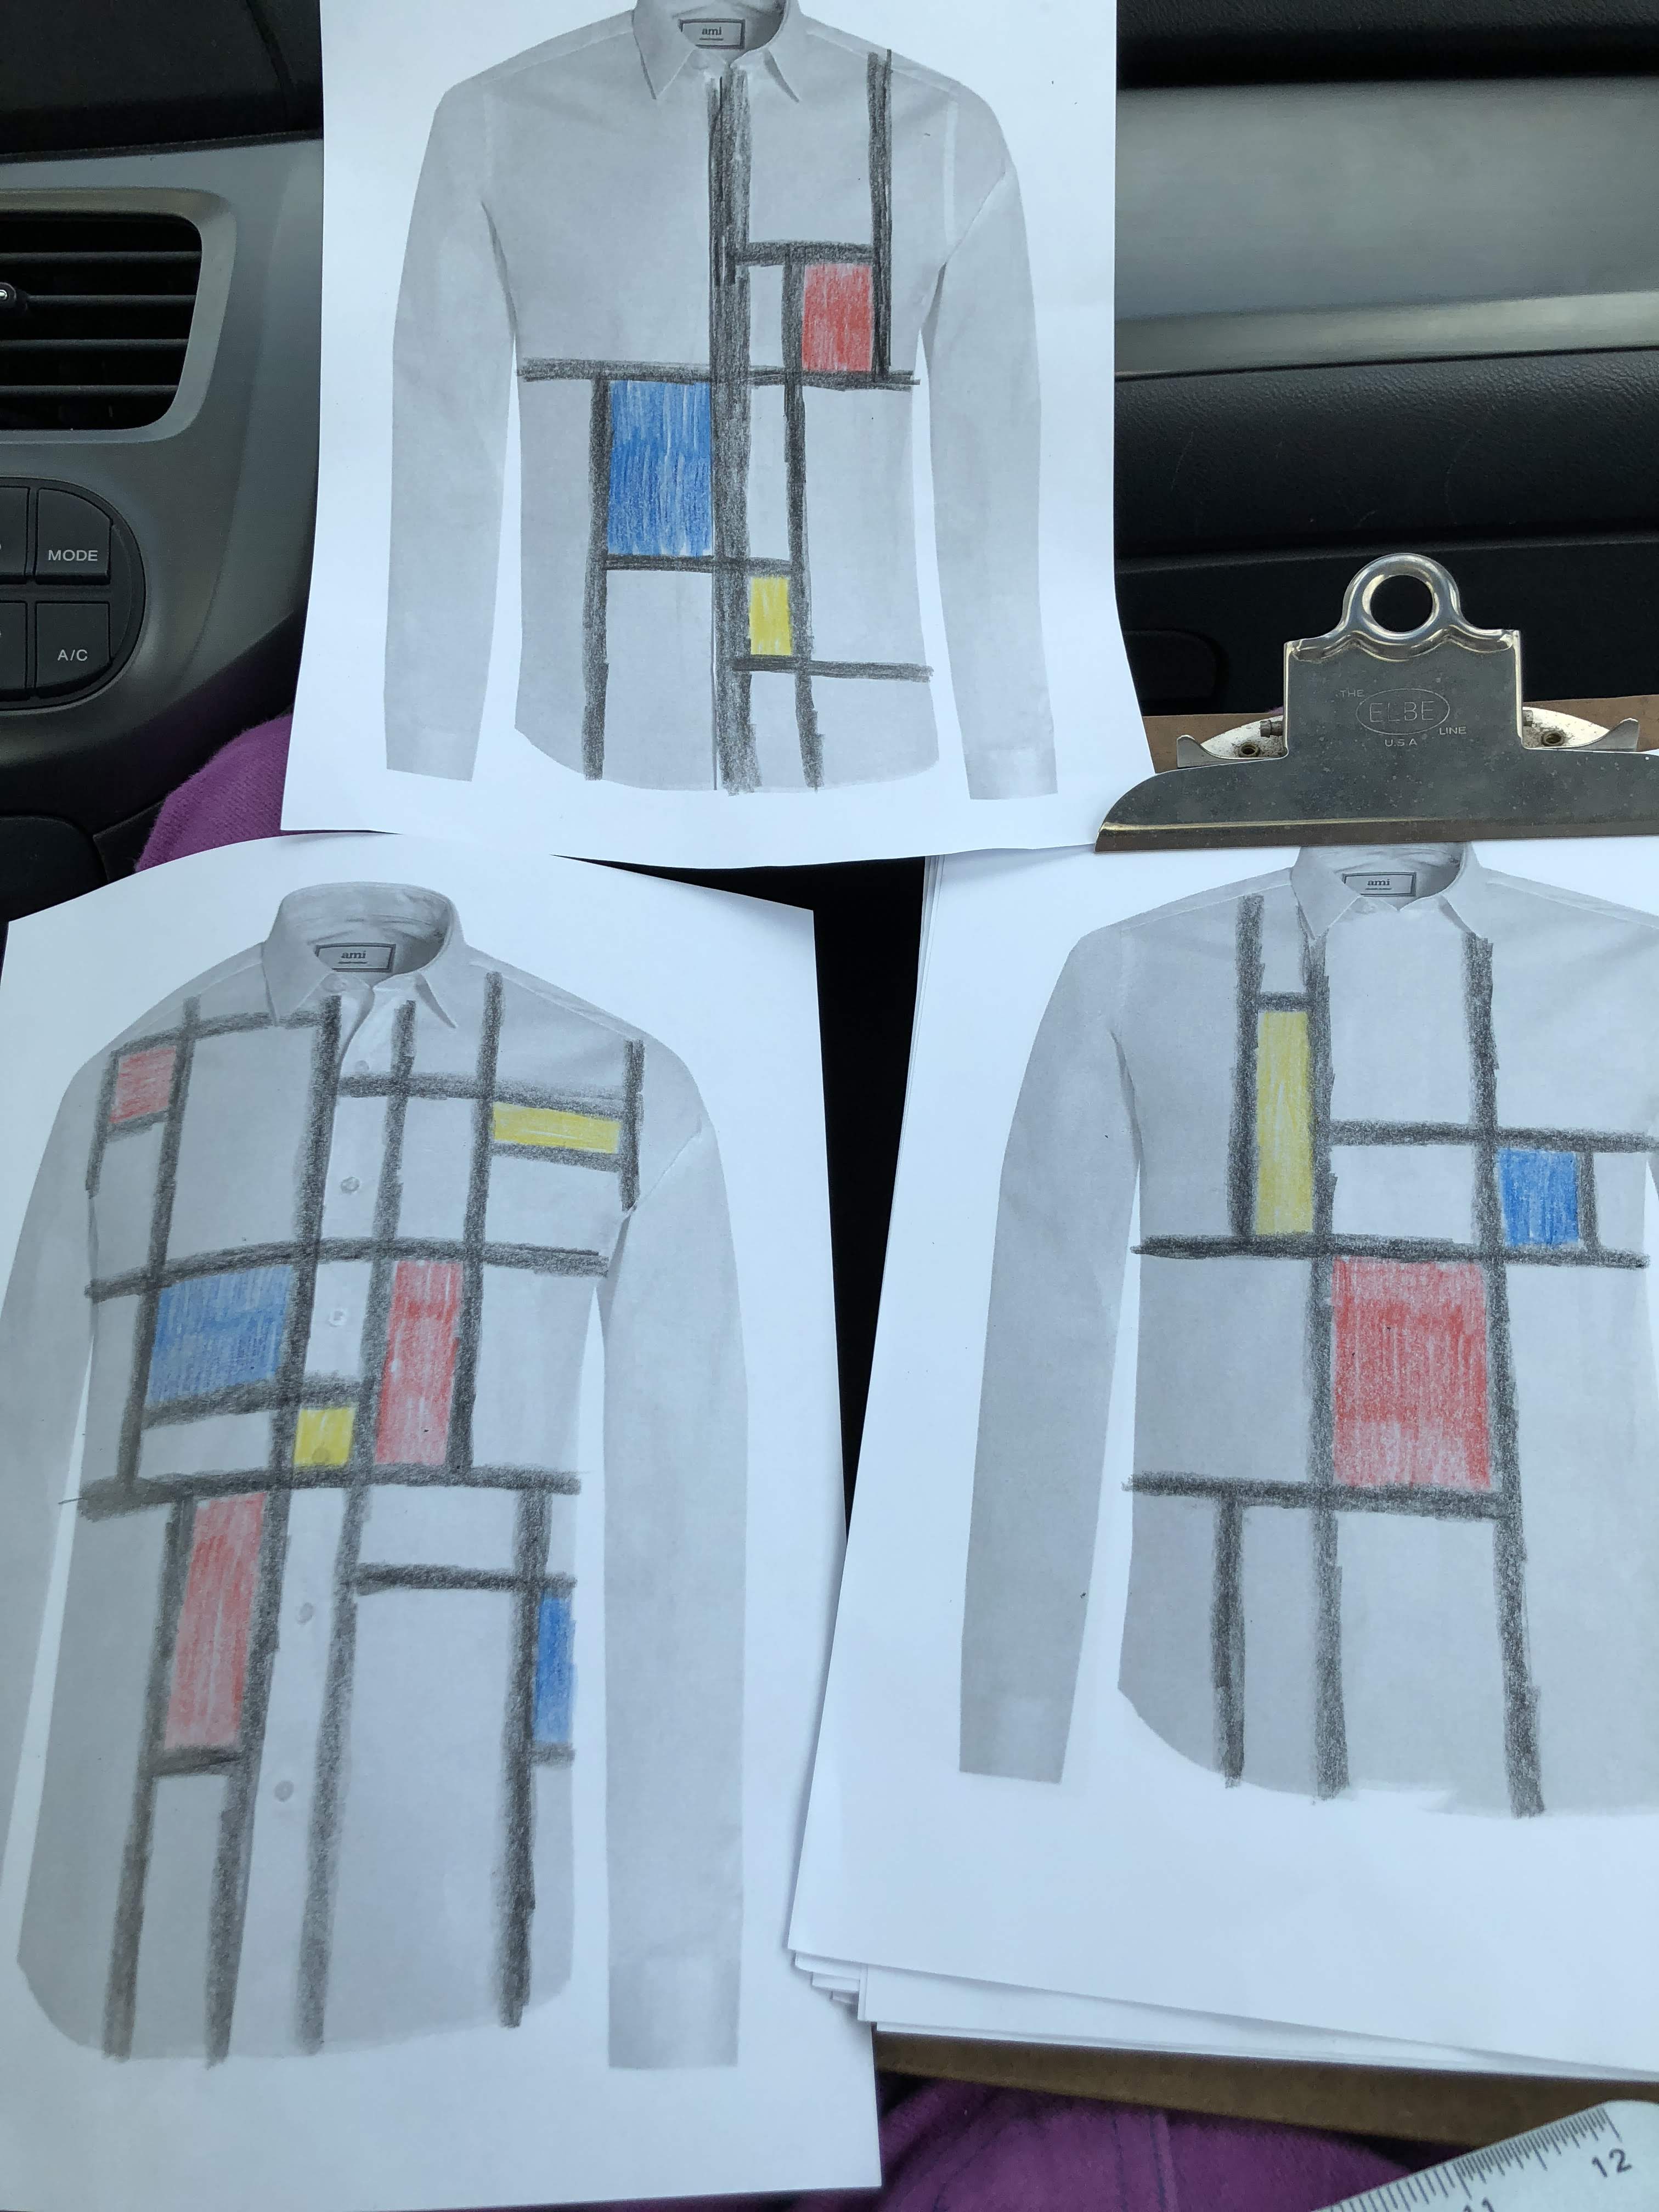
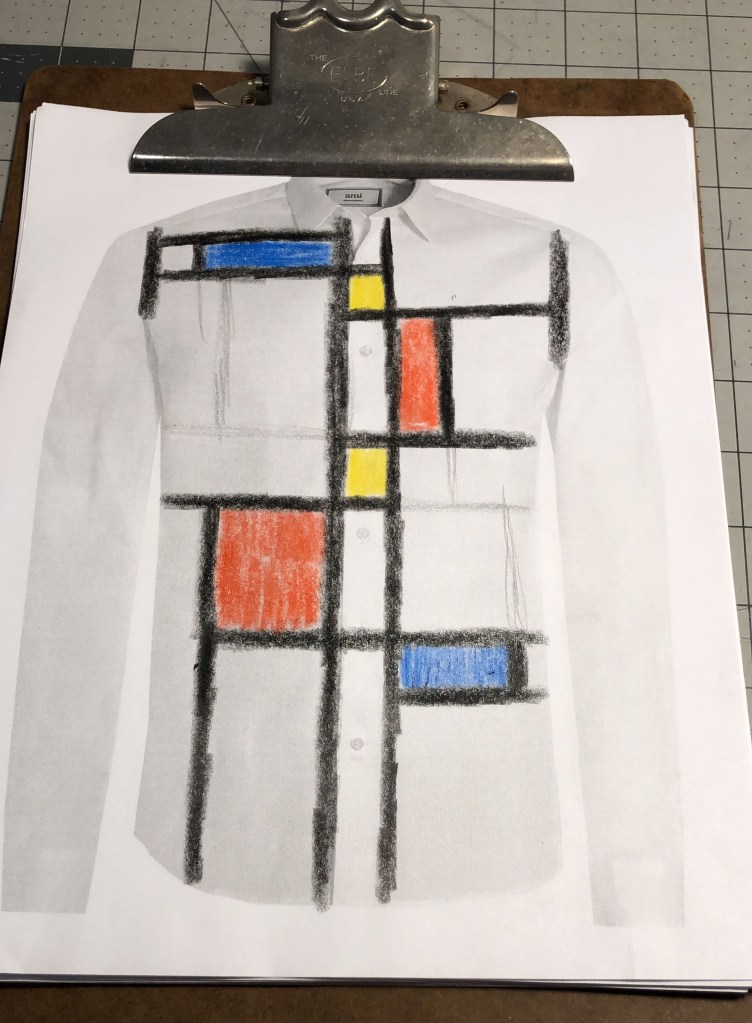
I took an image of a dress shirt, removed as much detail as possible, and made a bunch of copies. This would let me design straight onto the ‘canvas’ and see what it would look like. One of my daughters provided crayons in red,blue, yellow, and black. Perfect!

This is a lot harder than I thought. The right combination of coloured areas, and the distribution of them and the black lines on the shirt, turned out to be anything but easy. All the while allowing for construction of the shirt.
I wanted the shirt to have a normal opening in the front. That basically gave me three options; a narrow placket the size of a black line, a normal sized placket, or a wide placket the size of the neck opening (like a double-breasted shirt). Using a narrow placket seemed to be problematic. The black lines should be really narrow, and that would allow the front to open between the buttons and show your chest. So I considered only a normal sized placket, and a wide one.

These to the left were my first three attempts. None of them I liked at all. Now, I’m not an artist, so that should not really have been a surprise to me.

Although I didn’t really know what was wrong with each of them, they did help me to sort of intuitively improve with each iteration. I would make one new attempt every couple of days to a week. The wide placket variation, which you see on the right in the photo, was voted out pretty soon in the process. I just didn’t really like how that looked. The numerous tries after that decision resulted in a table full of attempts and one I was finally happy with.

By now I was 8 months into the project, and needed another (procrastination) break.

Faces

When I’m busy with a difficult project, I sometimes take a little break to make something easy and familiar. This was the case with my winter coat project too. I felt that I had done enough pad stitching and basting, and needed to finish something. With plenty of fabric in my stash, it’s easy to just start a quick shirt.

img_1830.jpg

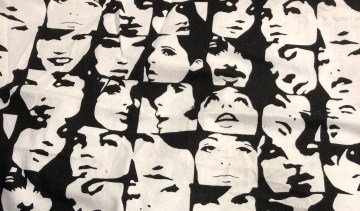
I’ve had this fabric for a while now, and even found some contrasting versions of it too. So I figured I’d make a quick shirt, with a contrasting collar. Maybe a contrasting front placket too.

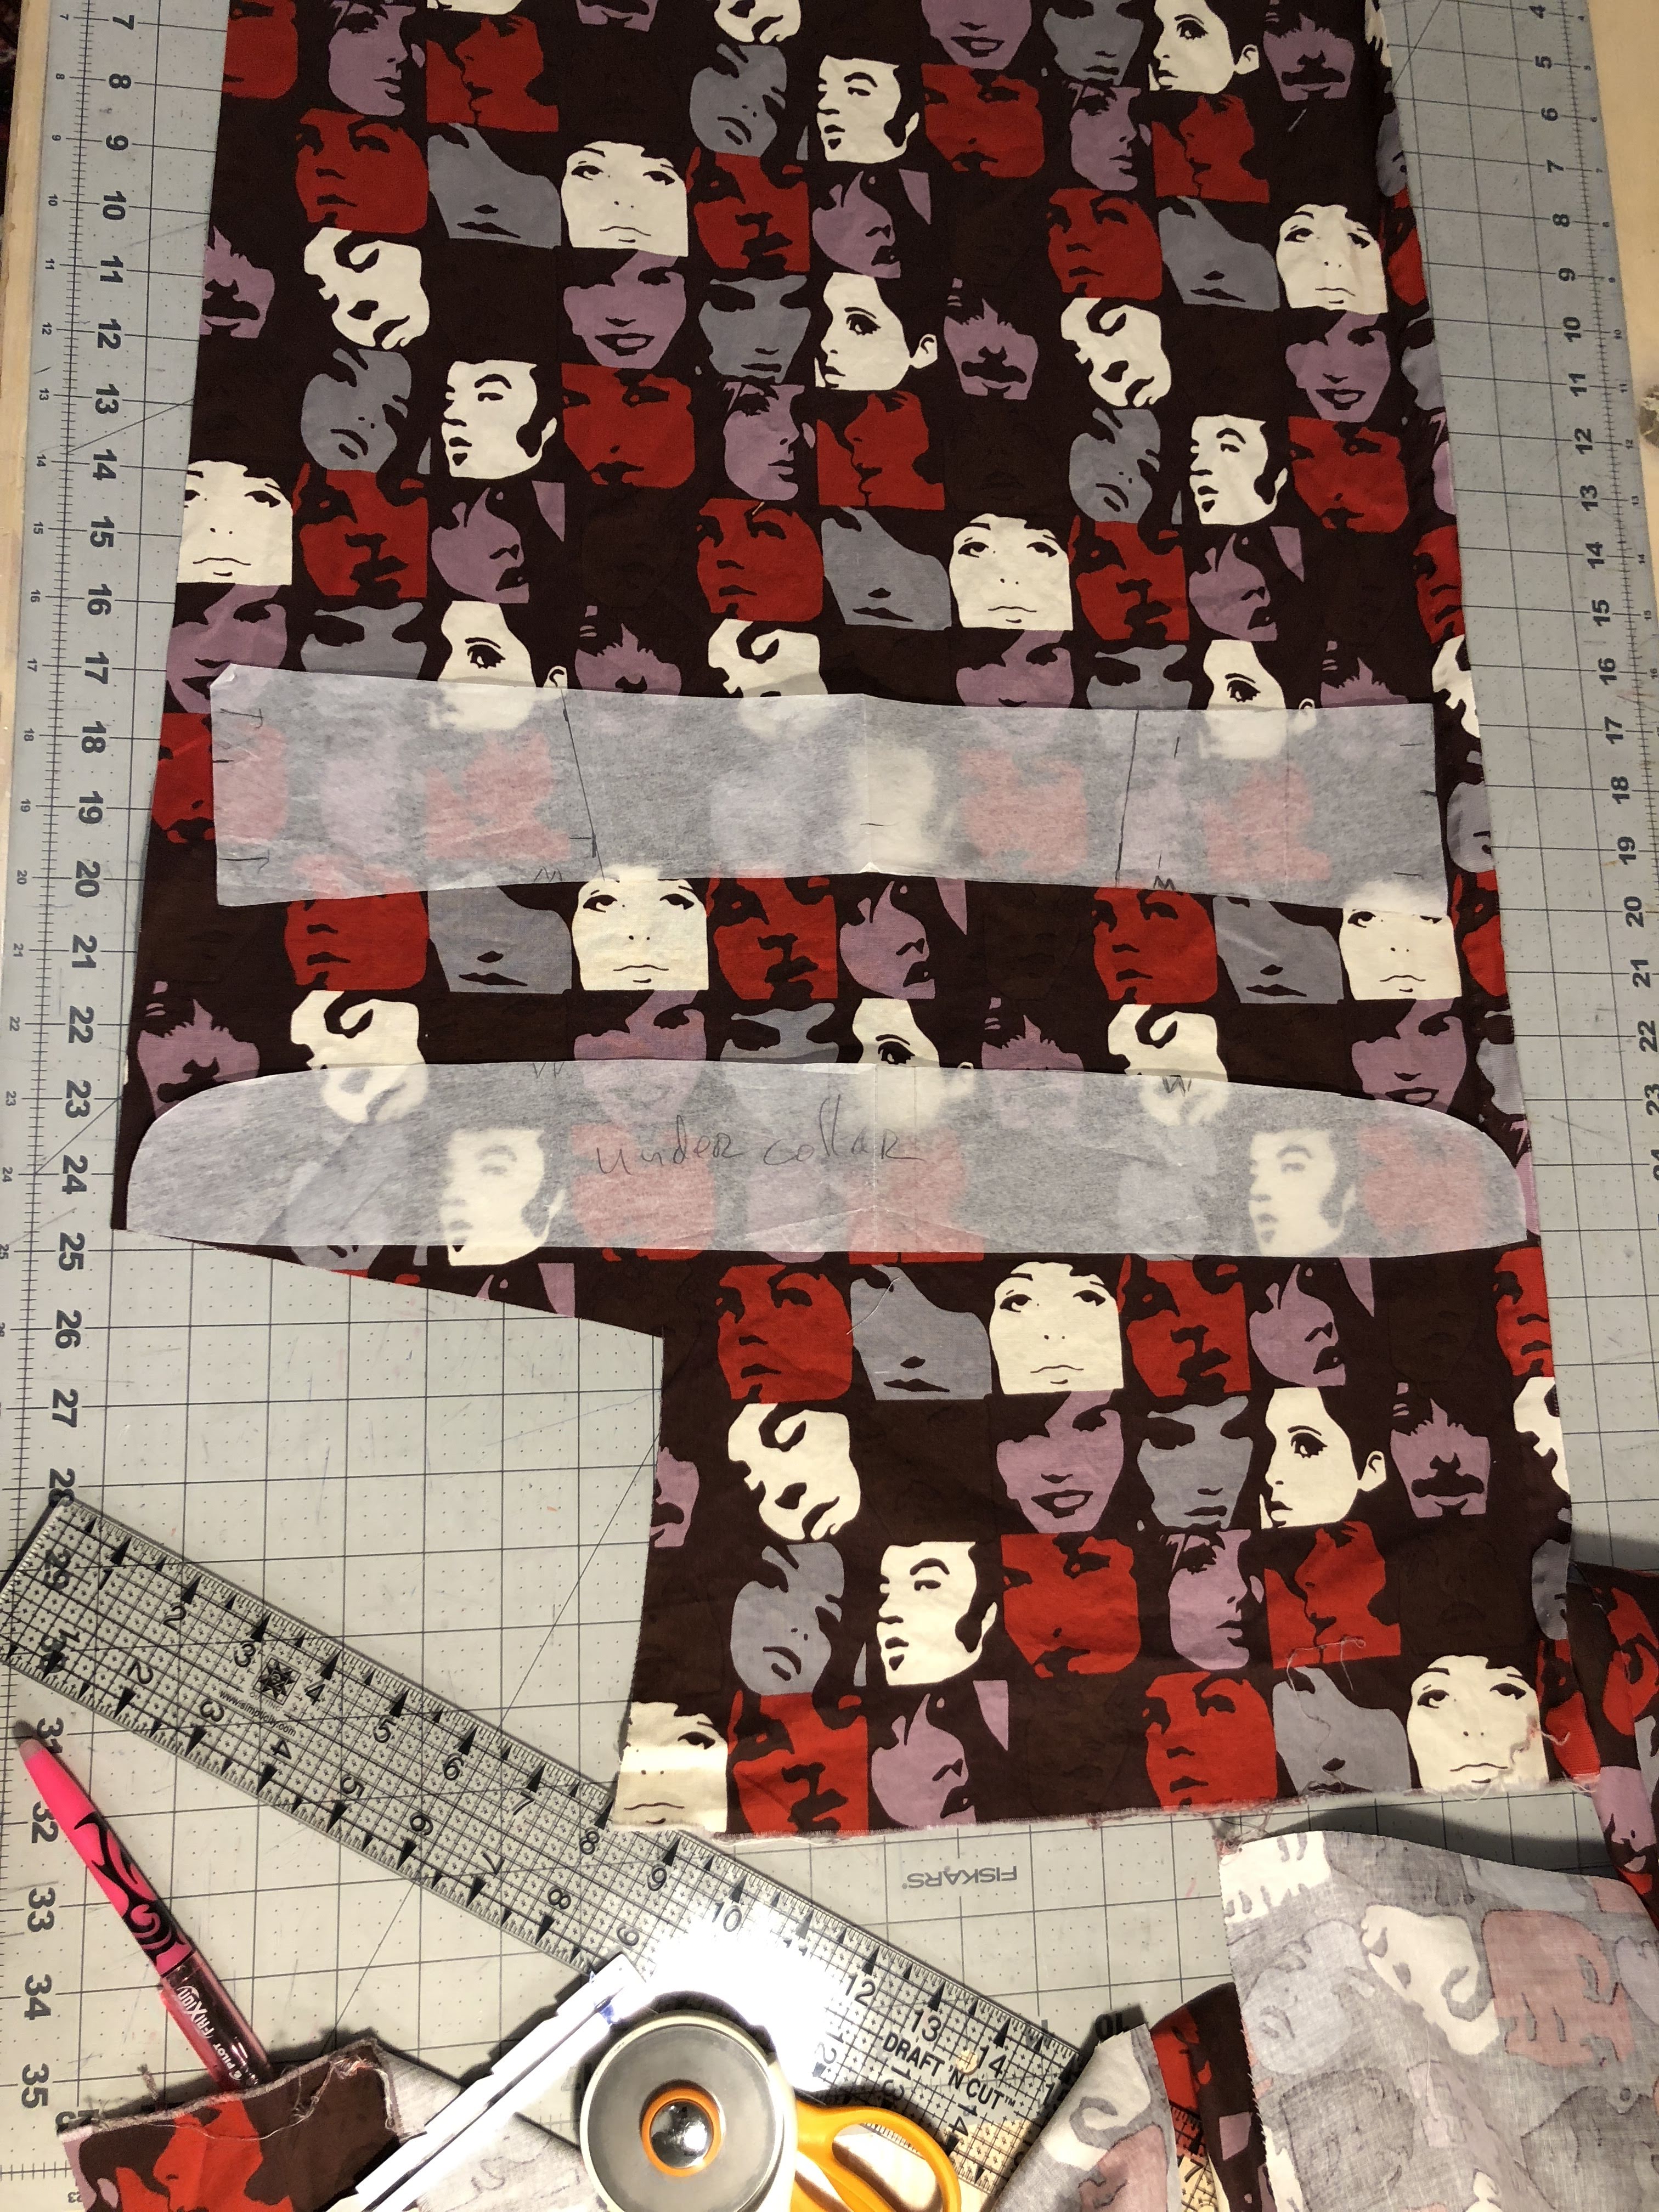
img_1443I cut out the fronts, making sure I would match the pattern in the front. Then cut out the contrasting placket, and matching that to the underlying front pieces too. To make sure I had everything lined up correctly, I laid it out on my cutting table. And then it happened; my brain started going off the deep end again.

“This looks really nice and symmetrical. Why shouldn’t I do that to the back too?”

“Surely the back of a shirt can have a placket!”

“That would create even more symmetry in the shirt!”

That didn’t seem too bad. I got the rest of the pattern pieces out of my envelope and started unfolding them. And then looked at the sleeve and sleeve placket pieces…

“Another placket! That should be contrasting too!”

“If we’re splitting the shirt into two halves along the front and back, shouldn’t we do that along the sides too?”

“Can I make a placket all the way along the sleeve?”

And thus another challenge was born. My mind seems to have this quality to make life difficult for itself. I had to figure out how I would make a placket in the sleeve that would run all the way up. Since the normal place for the placket is not in the middle of the sleeve piece, and I wanted the placket to run all the way up to, and beyond, the shoulder, it would have to be at a slight angle. And only the first 8 or so inches would have to be open, the rest would just lay on top of the sleeve fabric. I figured this would be best with a two-piece sleeve placket.

img_1448Of course, all of this would have to match the fabric pattern. So the challenge began of getting each piece out of the limited amount of contrasting fabric. With the placket on the sleeves being at a slight angle, that was not as easy as it initially sounded. I had to change how to cut the sleeves from the main fabric to accommodate what contrasting fabric I had left. And even then, trying to get the collar and collar band to fit in the remaining fabric almost didn’t work.

The construction of the shirt was relatively easy. The ‘placket’ in the back and yoke is just a strip of fabric that is top-stitched onto each piece. The part of the side plackets that’s on the shoulder is sewn into the shoulder seam on one side, and top-stitched on the other side. Getting the pattern-matching correct here took a little effort, but not too bad.

The sleeves were more involved. I first cut out a strip of fabric that would match where it would end up. The bottom part of this had an extension on one side to accommodate the opening part.

A sleeve placket is sewn on the wrong side of the fabric, and then folded into place. This placket had to then exactly match the underlying pattern of the sleeve. To accomplish that, I basted it first. This gave me the opportunity to check the vertical alignment. The horizontal alignment doesn’t have to be too precise, because you can adjust that with where you make the fold by the initial seam. Sew a little inside the intended line and you have some playing room. Top stitching needs to be done in two phases, one above and one below the opening of the placket.

I really like the contrasting ‘stripe’ on the back and the sides. It is not something I would do on all my shirts, but I think it works well on this one. A little splash of colour in the monochrome theme brightens it up some.

One pocket from the contrasting fabric was all that I could do, there just wasn’t a matching piece left for the other pocket. And I think that looks fine.

img_1461 (2)

Thanks for reading!
Winter coat

About a year ago I decided that I should make a new winter coat. Figuring that if I would decide that now, I may be in time for the next winter. Unlike my peacoat, which I finished in early March.

I’ve had the Men’s Coats pattern book by Ryuichiro Shimazaki for a while now, and I’ve created the MA-1 Jacket from his Military Wear pattern book. Since I first read it I’ve been attracted to the simple and elegant lines of No. 12. And the fact that it’s a raglan pattern added a nice additional challenge to it.

Luck may have it that I went on a trip to New York this spring. What better place to try to find some nice wool than the garment district? Mood Fabrics seems to always have what I look for; last time Peter Lappin found the perfect material for me for my peacoat, and this time I found exactly what I needed for this coat.

Some procrastination followed, because it’s not even summer yet. And then some more because there’s still a lot of time before winter, and I need more information from books I don’t own yet and haven’t ordered yet, and I need the fabric prepared, and I haven’t researched that either, and that can wait for this other project I should do first, and more of those things we’ve all been through. Until I couldn’t fool myself anymore and I just had to get on with things.

With my previous project from Ryuichiro’s books, and as I’ve read from other people’s experiences, his patterns run rather small. The measurement table had me solidly in the XL size. Since that is the largest size offered, I went with it. The patterns don’t include seam allowances, and those have to be added by yourself. I used an old sheet to make the first muslin, just to see if the fit is anywhere in the ballpark. It was actually not bad at all. Just a little bit constricting between the shoulders in the back if I move my arms forward. I adjusted this by adding some space in the centre back seam, which seemed to work without changing the way the coat drapes. If you can tell something like that by using an old sheet.

IMG_1442.jpg

On to the next muslin to see if this would work. I had purchased some curtains that seemed to be the same thickness as the wool I had. But while cutting out the individual pattern pieces it was obvious that the integrity of the fabric was completely different from wool coating. I made it anyway, just because I had already cut it out and it was a fun fabric. But it didn’t really tell me much about the fit of the adjustments.

I made a final muslin in nice muslin fabric, both to make sure that I had the fit right, and to see how the collar construction worked out. This told me that with the poor drape of this fabric, the coat was still going to be okay. That was enough to convince me to stop procrastinating and start making it.

Getting the wool ready to work with presented me with the usual dilemma; how to pre-treat it? With my peacoat I used damp towels and threw those and the wool into the dryer. This seemed to work fine. For a while I played with the idea of using the London Shrink method. That seemed like a lot of work, and I had no experience with it. Then I remembered that my new dryer has a steam setting. And that is basically what using damp towels does too. So I tried a cut off piece to see what happened. And other than shrinking a bit, it came out great. While still being a little scared I threw in the whole cloth and set it for 20 minutes. It worked great. It shrank a bit, but otherwise looked great.

Next was figuring out what to do with the interfacing. Since this is a coat with raglan sleeves, there isn’t all that much information to build on. I found some scans of a German book on cutter and tailor, and tried that. Compared to just flat hair canvas the size of the pattern piece, I didn’t like the way it draped. So I abandoned that and went with a full hair canvas, with an added bias piece on the chest.

The top of the back got a piece of hair canvas added, just to keep it nicely in shape throughout its lifetime. And the tops of the sleeves got pieces of bias cut hair canvas added, for the same reason. I basted all this canvas to the main fabric just inside the seam allowance. It would then later be caught in the real seam, and I’d cut back the excess.

With all the instructions in Japanese, and Google Translate’s troubles of turning it into understandable text, I just resorted to looking at the pictures and making it up as I went along. I changed the placement of the front pockets a bit by moving them a little forward. And did the construction completely different. The book had some top stitching diagrams that made no sense to me. I think it may have been to give the pocket more strength. But since I had a fully interfaced front, I would not have to worry about the integrity of the fabric. After making a normal pocket with flap, I just secured the whole pocket bag to the hair canvas by hand. No matter what I would decide to keep in my pockets, the wool would not be stressed.

The inside pocket was changed slightly too. The pattern puts the pocket partly on the facing and partly on the lining. This is what I did with the peacoat too. With this coat I wanted to try to extend the facing into the lining where the pocket is. Adjusting the pattern was easy enough. Sewing the lining to this little extension turned out to be harder than I expected. My first attempt had small curved corners from the horizontal extension to the rest of the facing. This was too hard for me to sew neatly. The second attempt had straight angles here, and that was somewhat easier. With a lot of marking, basting, and careful sewing I got a reasonable inner pocket. It just took me way longer than I anticipated.

At the top of the back lining I cut out a half circle and replaced it with the main fabric. This way I had somewhere to put my logo.

The rest of the coat came together without many problems. It is really nice to have two sewing machines set up; one for all the seams, and one for just the top stitching. It made for simple switching from one to the other, without having to remember to change the stitch length, tension, thread, etc.

I do like the raglan sleeve type. It is a lot easier to set in the sleeve than with a regular sleeve. But it also has it’s drawbacks. No good way of incorporating shoulder pads, requires interfacing to keep the shape well.

The coat turned out just like I expected. It will be a nice alternative to the peacoat.

Thanks for reading!

NY shirt

Earlier this year I went with the family to New York for some relaxation. Talking about relaxing and New York in the same sentence seems rather contradictory, but I’ve never been a guy who can lay on the beach and do nothing for more than a minute. Anyway, it got me away from my normal busy work and I got to see some Broadway musicals.

Of course, I arranged to have a whole morning by myself to visit the garment district and do some serious fabric shopping. No shopping trip should miss out on B&J Fabrics, and I made it my last stop. The two times I’ve been there I’ve always felt overwhelmed by the amount of nice fabrics I want to bring home. 2018-11-21_08h28_42While looking at the wall of rolls with samples, trying to find an interesting pattern, I saw this little piece of cloth that looked like a cityscape. It was a really small print, but I thought it could make an interesting pattern. Much to my surprise it was a complete border print. And when I saw it I knew I wanted it. Vibrant colours, interesting pattern.

Now I had a different problem. I know I need about 3 yards of 46″ wide fabric for a shirt. But that is if I cut it out with the pattern pieces oriented to the warp of the fabric. With this print, I would have to orient them to the weft, 90 degrees rotated. I had never done this and had no clue what this would mean for the amount of fabric I would need. I did know that I would never forgive myself if I left the fabric here, or if I didn’t get enough. Chest circumference is 40 inches, a little over a yard. That would be the front and back pieces. Two sleeves can be cut from a 45 inch wide fabric, so another yard or so. Then I need space to manoeuvre the pattern pieces around to align them the way I want. So let’s double that to four yards. I’m probably making a mistake here, so let’s add another yard. Before I could talk some sense into myself or look at the price, I told them I wanted 5 and a half yards of it. I think I suppressed the memory of what they said the total cost was, I honestly cannot recollect.

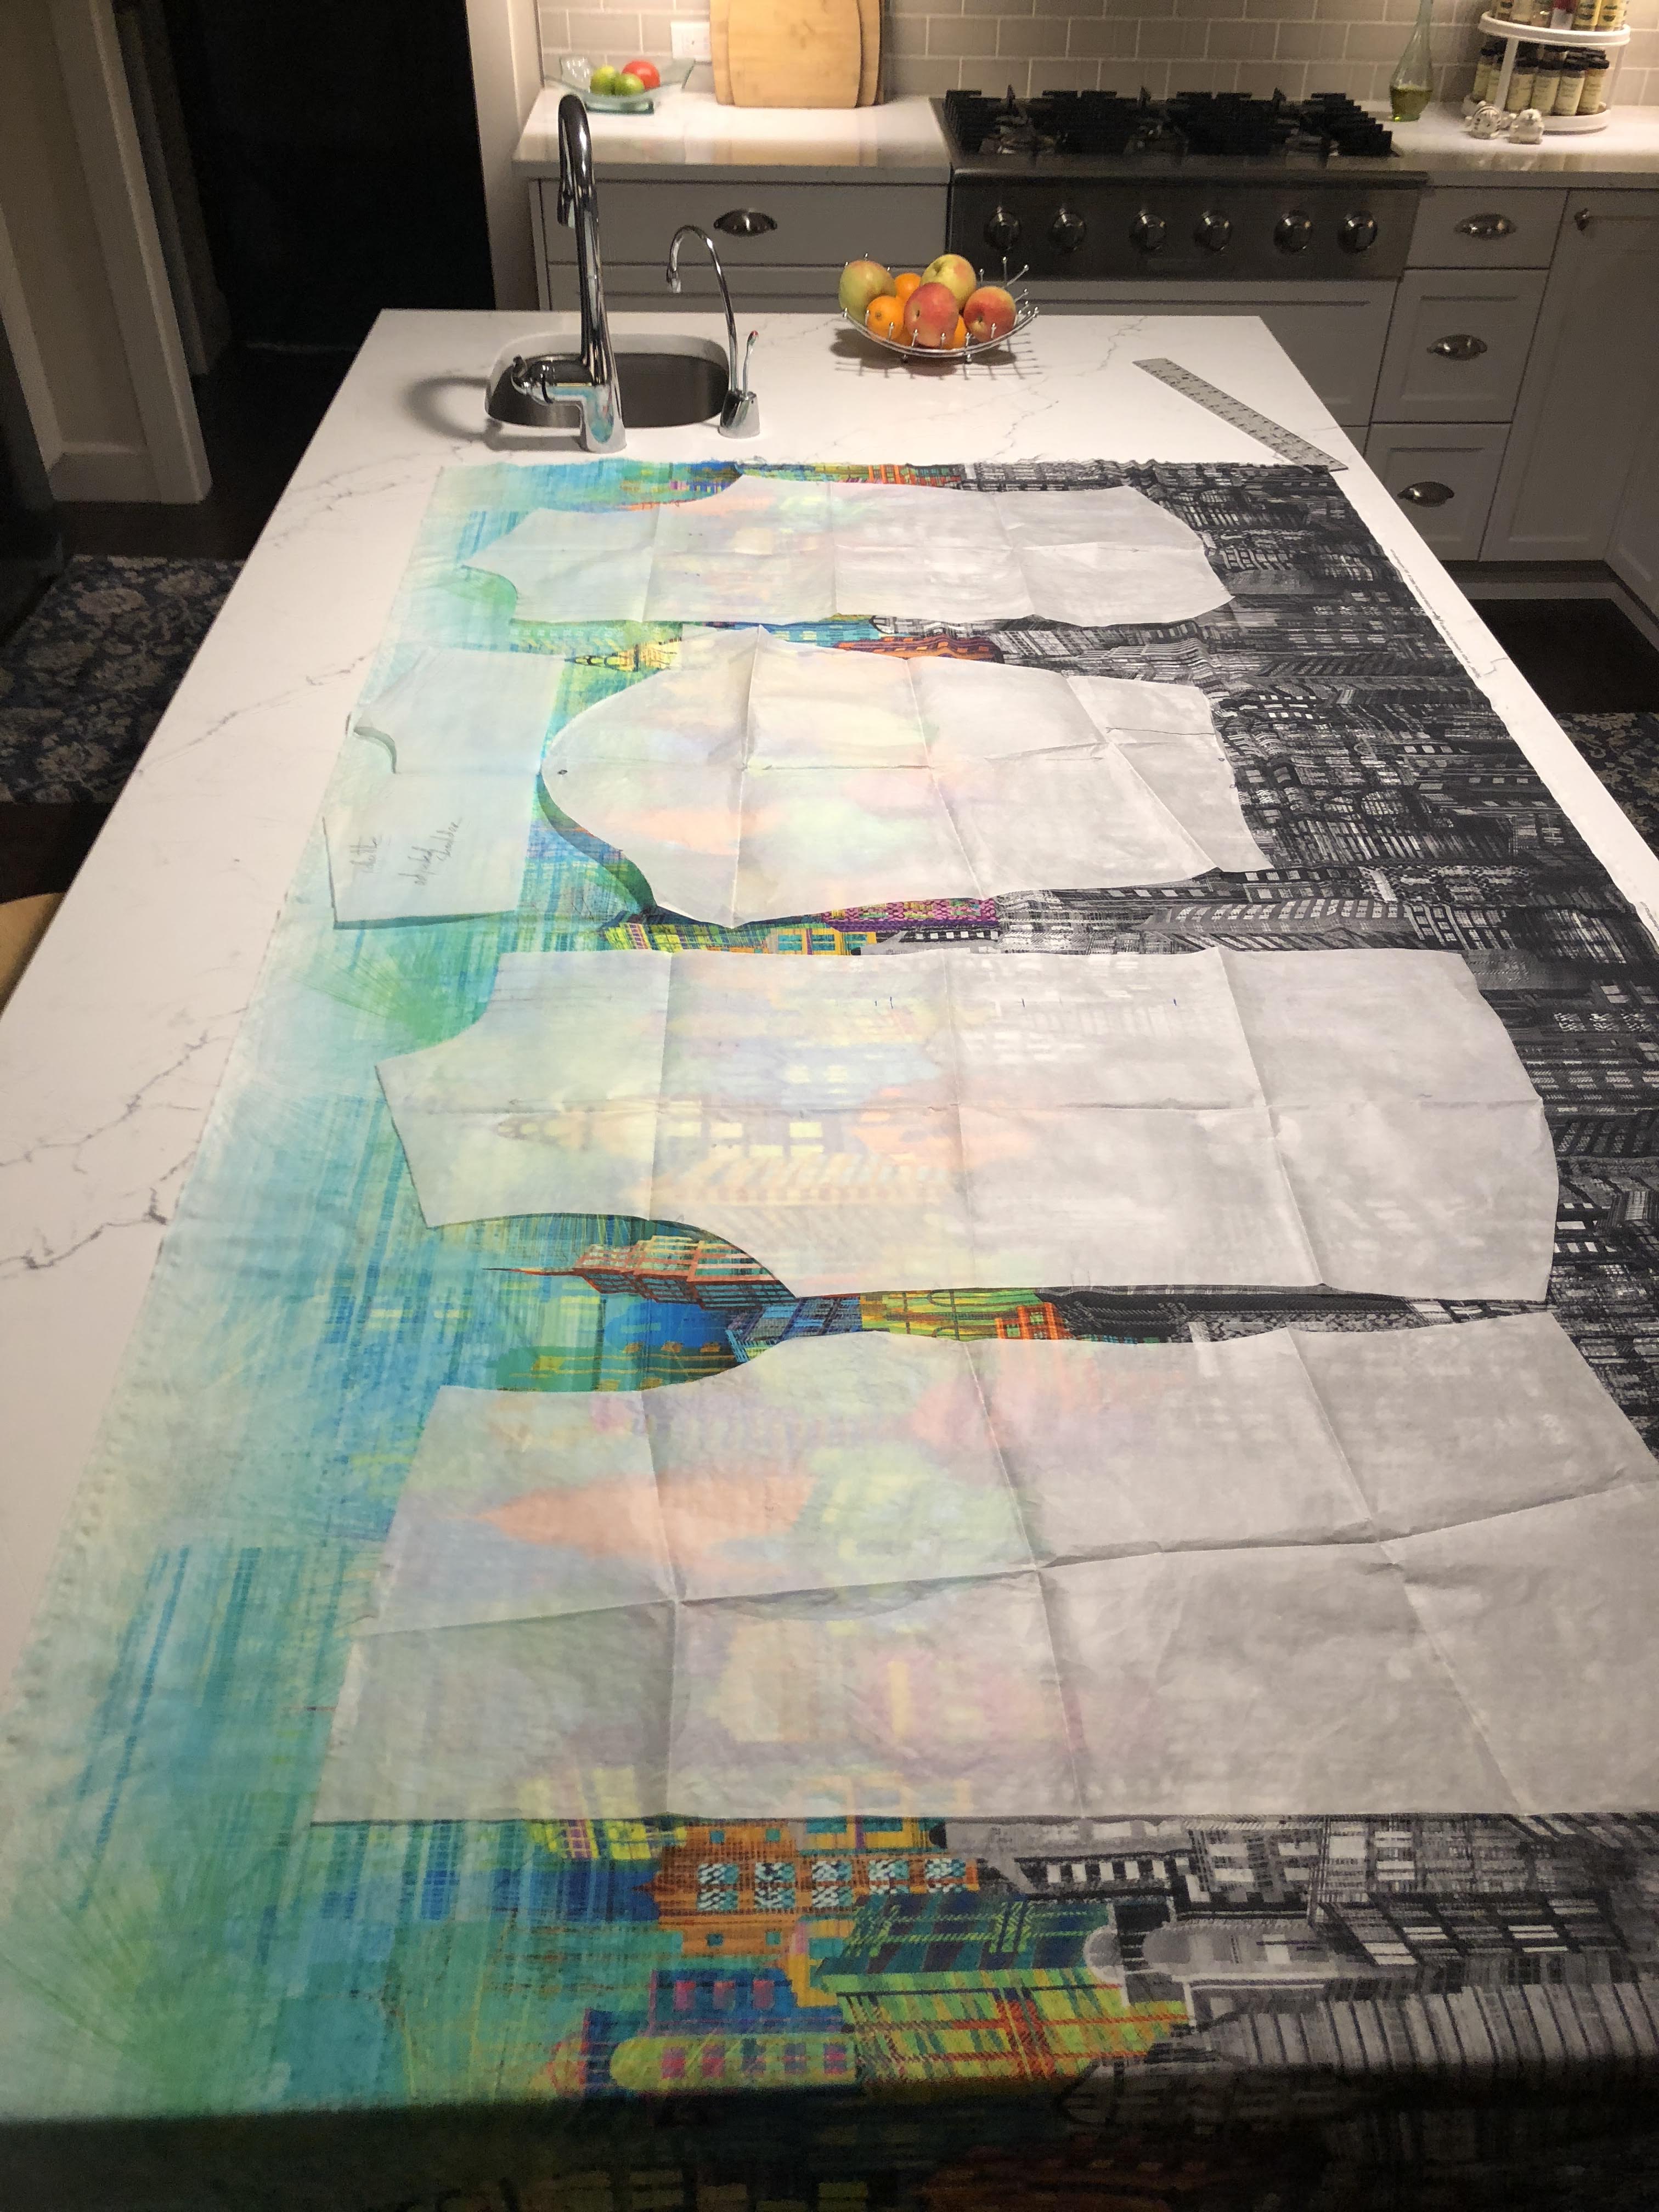
After months of gathering enough courage, I washed it and cleared the kitchen island to get a good look at how I could position the pattern pieces on the fabric.

IMG_1304

To make absolutely sure, I traced another front pattern piece. The cityscape pattern would have to flow from one side to the other, and figuring that out would be easier if I could just lay the pieces on the fabric. Now I had to decide which parts I wanted to make sure I would include on the front, what should be the middle of the shirt, and how high the black parts would have to be. I normally wear my shirts tucked into my pants, and I would want some of the monochrome parts to be visible. The sleeves would have to be adjusted to that decision, so that they would match horizontally.

img_1326.jpg

Although you can see the back yoke piece situated on the fabric in the photo above, in the end the layout I chose didn’t allow me to use that part for it. The yoke had to match the back piece, and the colour difference between that part and the top of the back was enough to have me look for a different solution. None was readily available, and I opted to go for a different solution; make the yoke out of separate pieces. It is made out of three pieces, allowing the colours to blend as well as I could arrange them. The inside yoke is just a piece of white cotton.

Then came the collar. I wanted the vertical orientation of the pattern to be reflected in the collar too, both in the front and in the back. That meant that the collar needed to be a three piece solution too. The dress form was a great tool to construct this. The seams were positioned as extensions of the shoulder seam, so they would be less noticeable.

I also changed the shape of the points a bit to make them more dramatic. Just before I started on the collar I read a blog post from Duane. In it, he referenced this video that has changed how I’m doing collars now. I’m still working on getting this technique as perfect as the guy in the video, but every one I made since has been a lot better than any I made before seeing that. It was a bit scary to try a new technique on something I was so invested in. Seeing how well the collar points came out took away all hesitation.

The rest of the shirt construction went smoothly. Just the standard adding sleeves, making flat-felled seams, add cuffs, and hem it.

And then; buttons. Oops. No buttons I had looked right. And I have a lot of different coloured shirt buttons. It occurred to me that no matter how long I would look, I would never be happy with a button on the front. I should have anticipated this. I should have created a hidden button placket. Too late now. I felt really down, having made such a stupid mistake. I felt like I couldn’t finish the shirt to my satisfaction.

Then I realised that there are other options. Ones I hadn’t tried yet; snaps! Some Google research led me to Snapsource, who had so many colours, there should be something I could use. The Color Sampler helped with finding the right ones. I was a bit worried about placing them and aligning the pattern. With buttons I just put the buttonhole in the right place, align the fabric and stick a needle and thread through the hole. Now the button will be exactly in the right spot. You can’t do that with a snap. Or so I thought. Turns out that since I used ring snaps, I can just push a pin through and then mark where the bottom part needs to go.

This worked really well on the test piece, and all the snaps on the shirt came together easily. Definitely something I need to remember next time I’m using snaps. I did use buttons for the collar and cuffs. Those being on a monochrome background made it easy to find appropriate ones.

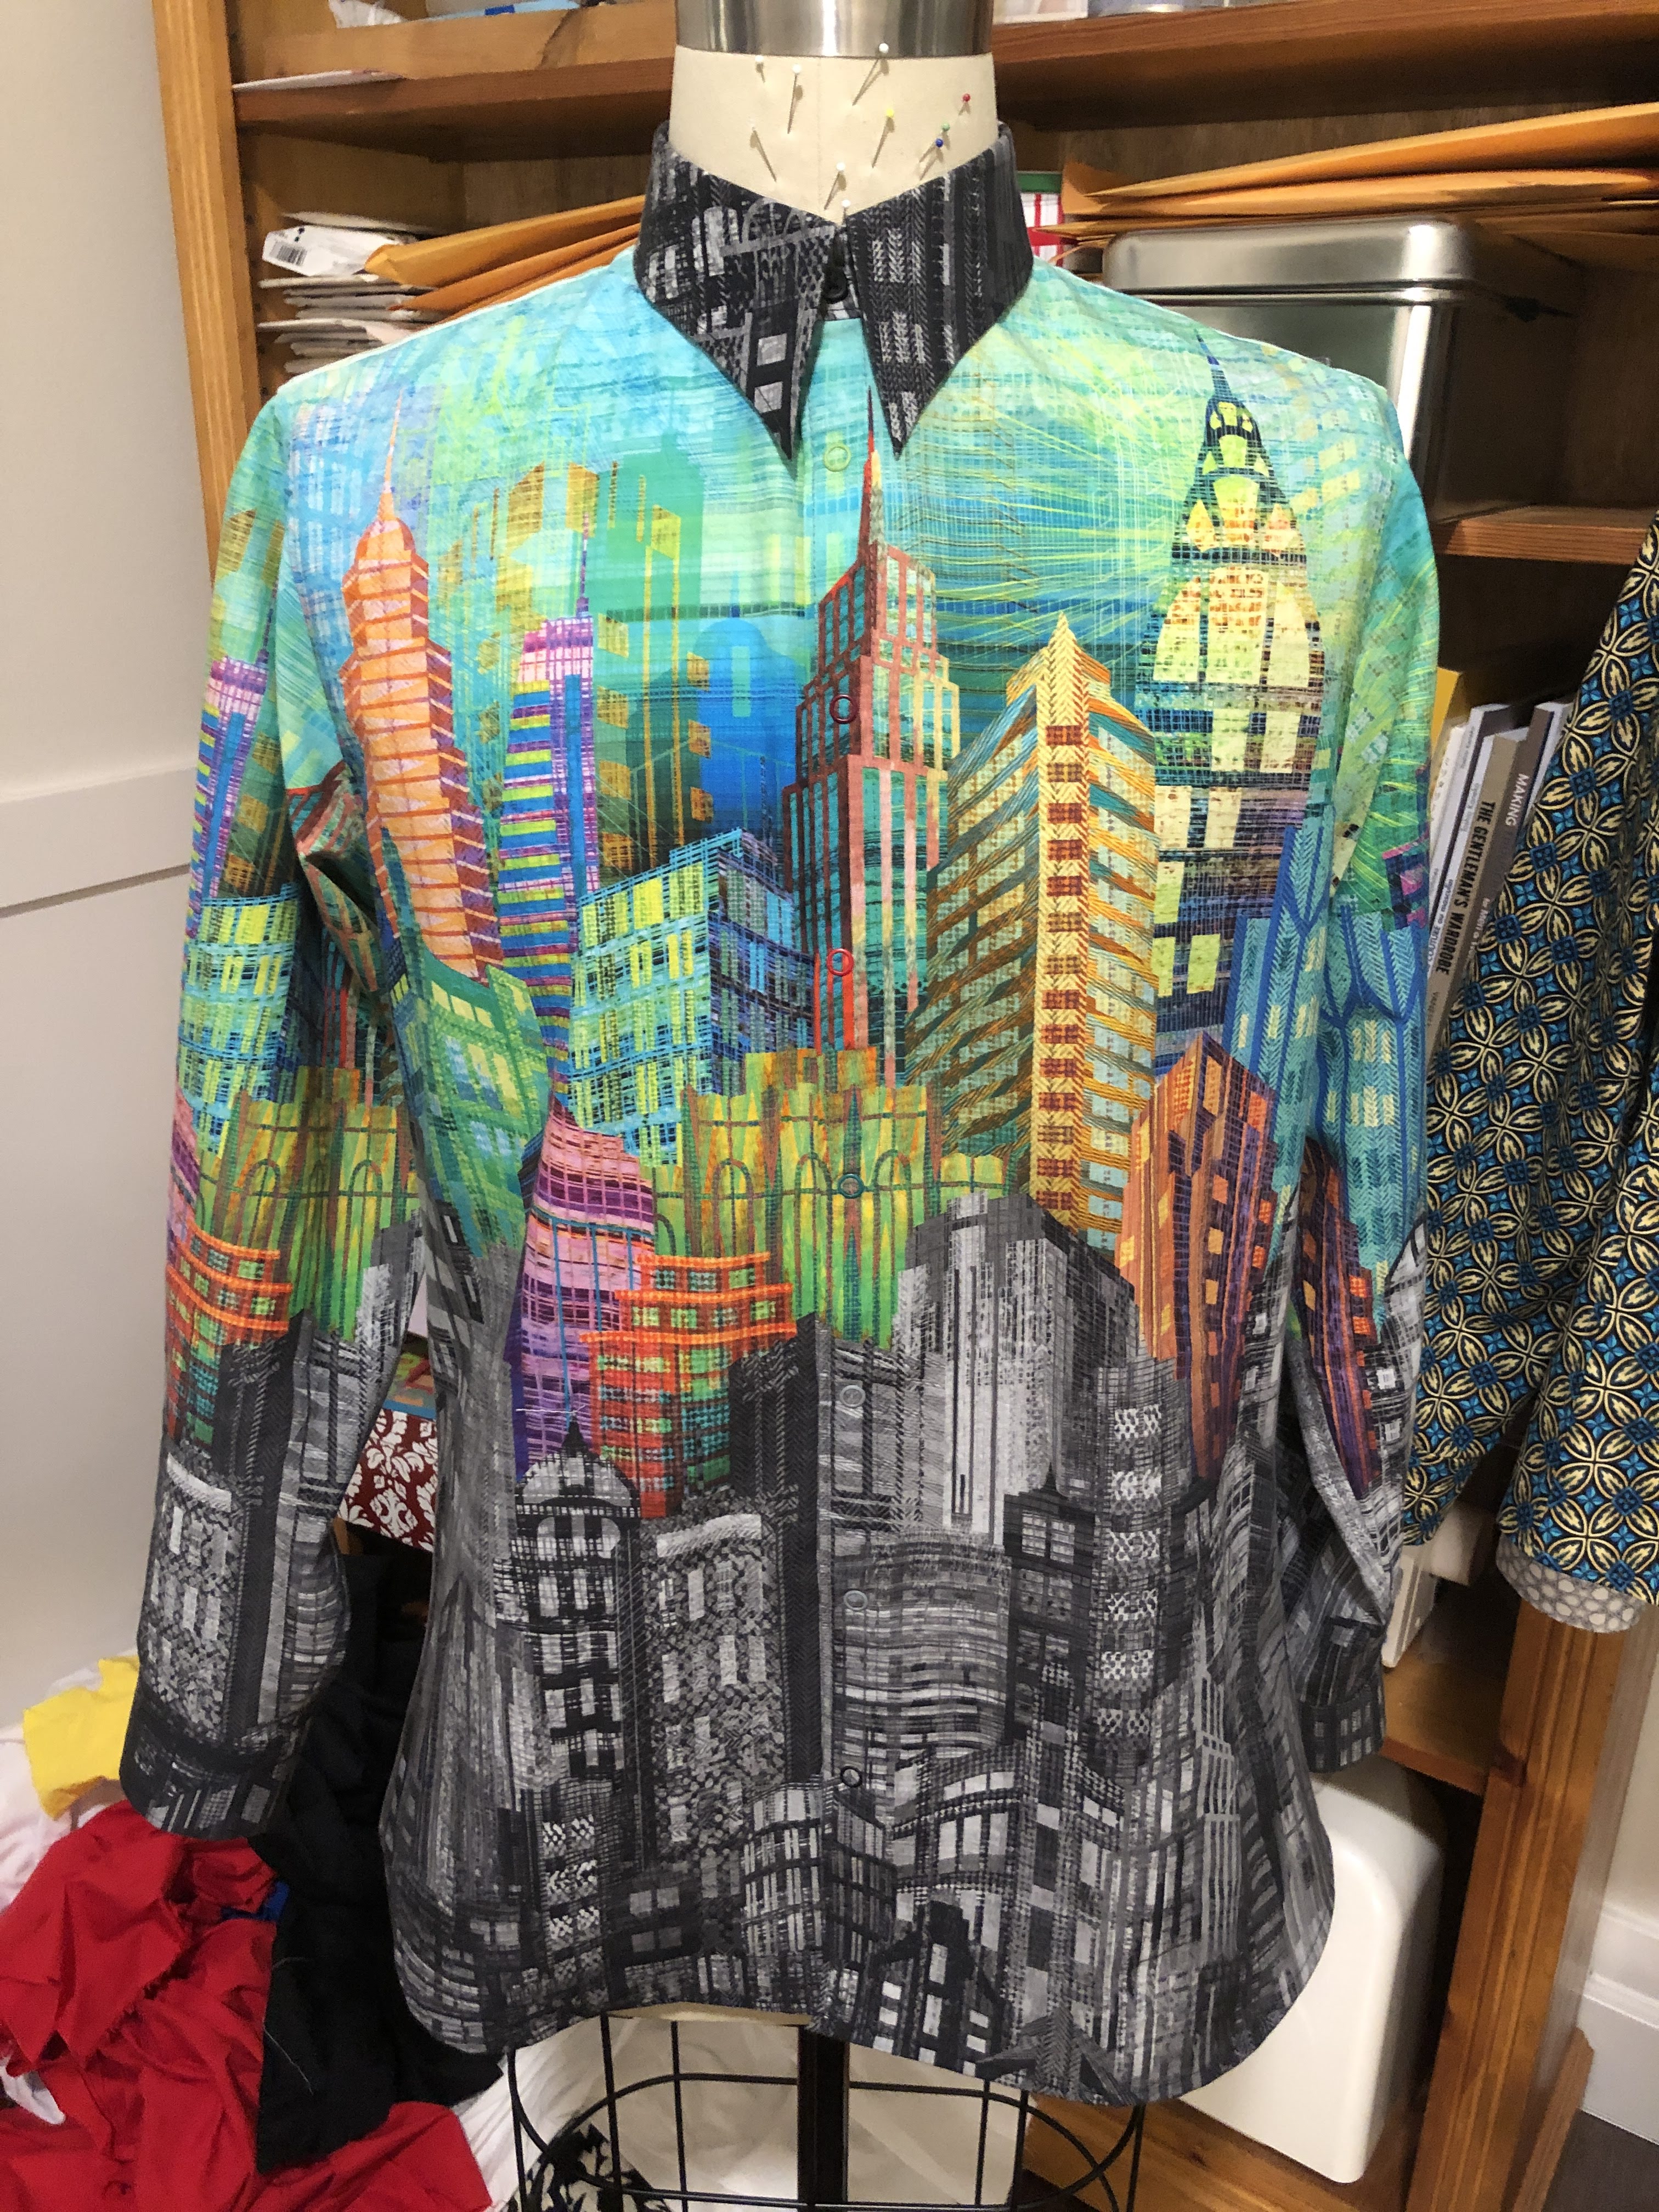
And with that, the shirt had been completed. I’m tickled how well the project turned out. I’m not going to call it an art shirt, since I didn’t design the fabric, or did anything really special with the construction. Yet it will go to the special area of my closet, only to be taken out on special occasions.

IMG_1628

Thanks for reading!
 

?

Another art shirt. This time without a special print. Just nice white shirting fabric.

It is one of those ideas that had been sitting and brewing in my mind for a long time. Thinking about it, throwing the concept around, and never daring to give it a go. For at least three years I didn’t think I had the skills to make it. Until one day I got enough courage to try.

When I just started making shirts I looked at all the parts that make up a shirt. And pondered why they all were the way they were. And how you could change them. Different collars, different closures, different sleeves. I started looking at where the collar meets the placket. And then it struck me that a collar looks very much like a placket. Could I make a collar that turns into a placket? Or a placket that turns into a collar?

Making this possible would require a lot of experimentation on the dress form. Start with a shirt and a lot of paper, and keep tweaking until you have something that looks like what is in your mind. That was the plan.

There were multiple things I could do with the placket; have it extend from the collar in a diagonal and let it disappear somewhere in the side seam, go straight down the front, or some thing else? Down the front would not work, for you would not be able to make the collar turn into a placket smoothly. Making it go into the side seam seemed to distract from the concept I was trying to create. So I decided on making it go in a slow curve that would go down the right side of the shirt, just 4 or 5 inches right of centre.

I started with the collar pattern piece of my standard shirt, took off the seam allowance, and pinned it in place. Then added some paper to make the right side point straight down along the centre front. Traced that onto a new piece of paper and added a large piece to the left side. Pinned that in place and started sketching where the natural sweep of the collar would end up. With that established, I could start sketching where the curve down the front would end up on a larger piece of paper.

The transition from collar to the front of the shirt presented some issues. It was rather difficult to get it to follow the contours of the form. To solve this I started from both ends, the collar on one side, and bringing the placket up from the other. Then join them where they would meet, at the junction of the shirt front and the collar band. This turned into an interesting pattern piece.

With the collar drawn, I could start transferring the parts onto my regular pattern pieces. Using the centre front of the shirt and the collar band as a reference, I just positioned them on top of each other and traced onto a new piece of paper. It is a tracing paper I buy from art supply stores that I use almost exclusively for my pattern drawing and tracing. It is not flimsy, easy to see through, and available in long rolls of different widths.

What I could not figure out well was the shape the collar band should get. The collar is supposed to flow from collar to placket, but the collar band cannot flow into the front piece. The collar band would have to remain separate. I decided to just leave extra fabric on it on the left side and sculpt it while it was on the form. Even using the muslin to figure this out didn’t give me consistent results.

I had some beautiful dobby shirting in my stash that seemed perfect for this project. Making these weird pieces was an interesting experience. Only the back, the yoke, and the sleeves were normal. All the rest made me feel like I was learning how to make garments all over again. Because of the weird shapes, it also took a lot more fabric than a shirt normally would. Specially the collar and the back of the right-side placket.

The construction of the collar band went a lot easier than I expected. I just kept tweaking the end of the fabric until it sat right. Then I marked the crease and sewed along the marked line. After that I could attach the collar / placket and I could continue with the shirt construction as normal.

This design of the placket created a hidden button feature that went well with the overall look I was going for. Figuring our where the buttons should be took a little experimenting. I didn’t want to have a button every half an inch, and their position alters how well the front sections follow the contours of the body. There is still a slight ripple from my right shoulder to the collar / placket that shows sometimes. I couldn’t get rid of that without adding more buttons, or introducing other imperfections elsewhere.

This was a very fun project to do. Having thought about it for so long before I actually began its construction made a lot of the details easily fall into place. It turned out pretty much exactly as I had envisioned.

Why the question mark? Throughout the project I kept thinking that the main feature of the shirt looked like one.

Thanks for reading.

IMG_1427