MA-1 jacket

For years I’ve heard great things about the Japanese pattern books of Ryuchiro Shimazaki. Specially on The Japanese Pattern Challenge by Duane (mainelydad). I had asked, and received, all three books for birthdays or Christmasses. Now it was finally time for me to try to make one of these.


I selected the MA-1 bomber jacket. And since I’m not a big fan of olive drab, I opted for a nice navy fabric, figuring it would look nice with the orange lining. The main fabric was found locally at Pacific Fabrics, although I had swatches come from multiple sources. The lining came from Mood Fabrics. The original MA-1 jackets had wool for insulation, but I wanted to make it lighter and got some Primaloft from Seattle Fabrics.

I’m glad I waited a while before diving into these Japanese books. There are some good resources out there to assist with the translation (Japanese Sewing Books, Google Translate), and they’re a great help. Yet I’m glad I didn’t try this without a good amount of experience with different types of patterns and construction. It made it a lot less confusing. I don’t think I would have been able to make the welt pockets with the translated instructions as my only guide.


You have to add your own seam allowance to the pattern pieces, something I’m not so used to. Although the pattern pieces are scattered all over the included sheets, they’re very well separated and easy to trace. It just takes a little while to find them all, with only the Japanese characters to guide you. A smartphone with Google Translate helps a lot here. It’s also somewhat fun, for Google will give the pieces interesting names. One of them is now called ‘Pocket Mouth’.

The largest included size is a ‘L’, and that was a bit too narrow for me across the chest. by creating two muslins and changing small bits to address that, I ended up with a good fit.


Making 2 test versions also allowed me to figure out how to construct the rib knit collar. I had never worked with this type of fabric before, and it was quite an adventure. Lots of pins, a walking foot, and patience gave me an acceptable result. Good thing I bought a lot of extra rib knit.

I first sewed the Primaloft to the lining pieces, then sewed the lining together, and at the end cut back all the Primaloft from the seam allowances. This worked pretty well. The stuff comes with a backing that I peeled off at the last moment. Since it was rather thick insulation, I removed some layers of the Primaloft itself too. Otherwise the jacket would have looked like the Michelin man.


What I really liked about this jacket is that it looks casual, yet you can spend some time getting all the little details in order. There is a fun pocket on the left sleeve, welt pockets with flaps, a flap across the front, and the collar. It keeps it from being a pattern you just put together, and makes it something where every step is interesting.

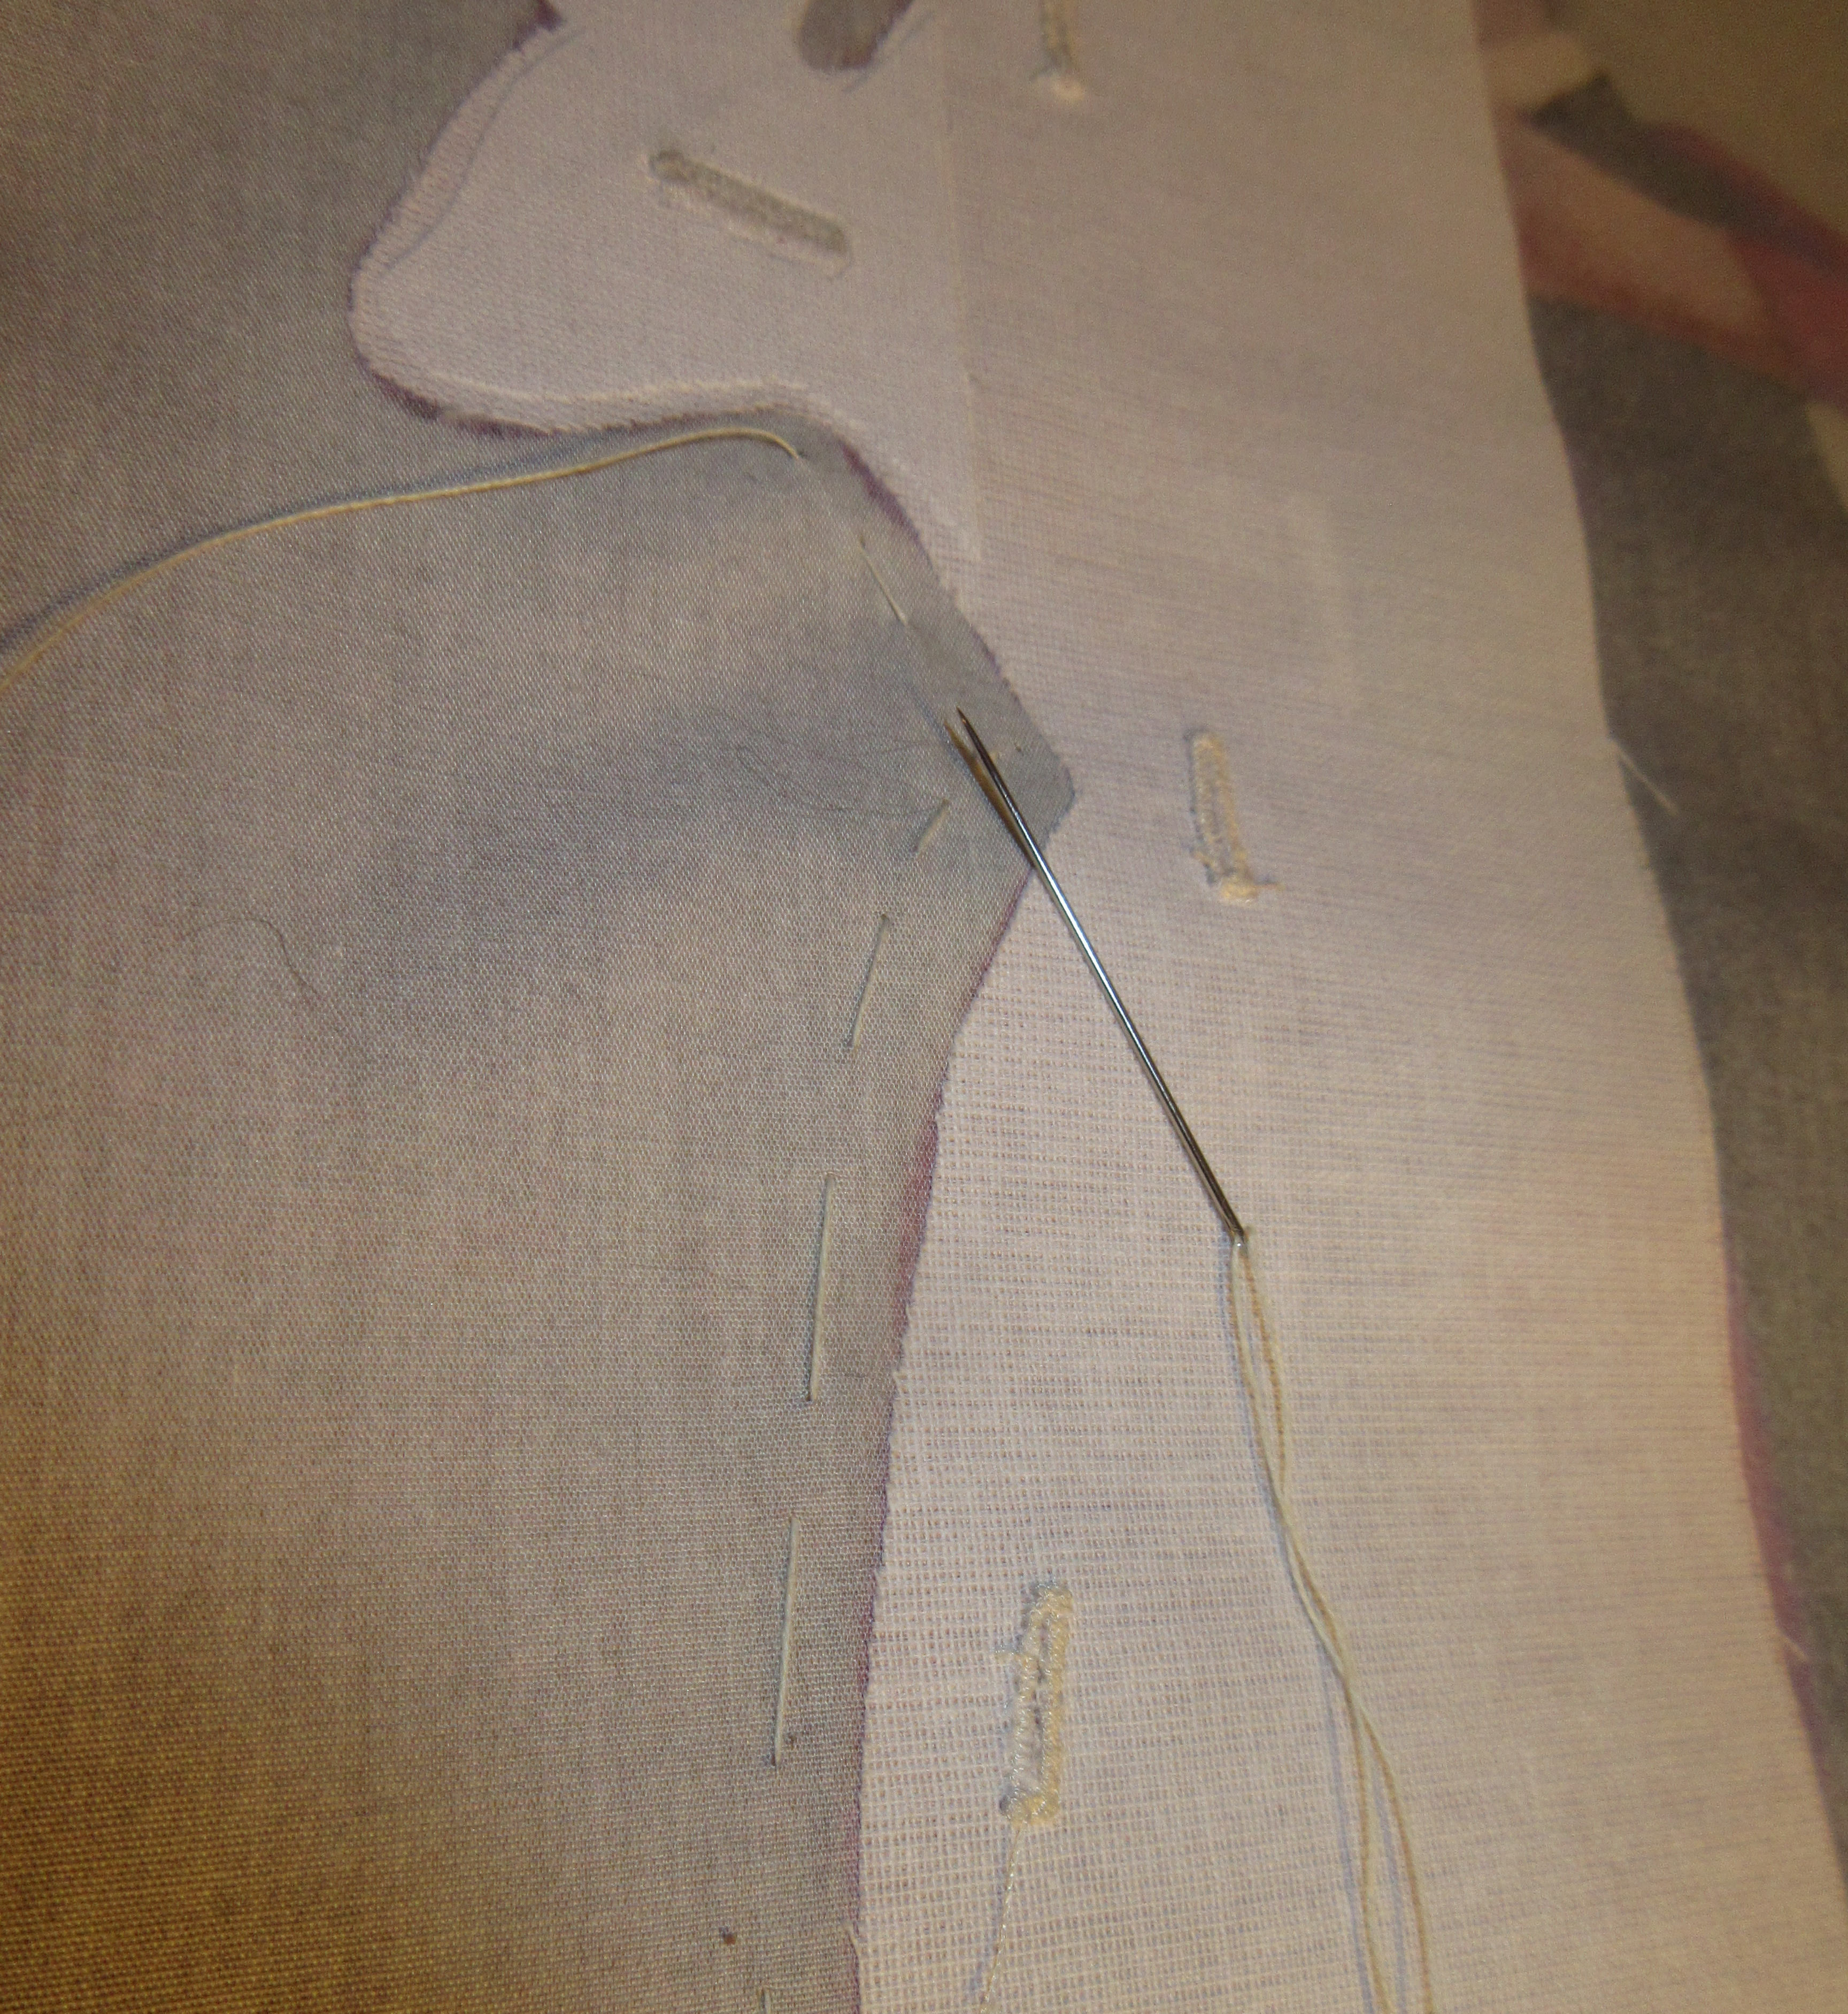
The sleeves were different from any I had already made. The under sleeve needs to be gathered in along both seams before attaching it to the upper sleeve. I added two lines of basting stitches on the sides of the seam, and then pulled the thread on one side of the fabric. This gave me great control over where, and how much to gather.


My usual approach with lined jackets and coats is to bag the whole thing. And since I couldn’t really understand the Japanese instructions anyway, that was what I did with this jacket too. The zipper I shortened and inserted without an issue. The rib knit waistband and collar did create a challenge. It looked like you should double them up and then sew them to the outer fabric. I did that with the collar, and then sewed the lining to the same seam allowance at the same spot where I had already joined the outer fabric to the rib knit. With the waistband I only sewed one side of the rib knit to the outer fabric and then sewed the other side to the lining. Then after turning the bag, I joined both sides with the top stitching. I’m not sure which technique worked better, and I might do both the way I did the collar next time.

Joining the sleeve lining and outer fabric is always a puzzle to me. I did it the same way as with the waistband, attach the rib to each side and use the top stitching to join them. Of course, only after turning it inside out multiple times to make sure I didn’t make any mistakes. Flashes of knotted sleeves were going through my head the whole time. My modern sewing machine is the only one that has a free arm, and it was barely small enough to do the top stitching on for the sleeves.


After this was done, all that was left was do a round of top stitching along the outer seams, and close the hole in the lining side seam I used to turn it inside out.

It was a lot more work than I initially envisioned. Mainly because there were a bunch of new techniques involved, more details that I thought, and the instructions were only somewhat helpful. Yet the whole process was fun and I really enjoyed the project.


Of course, I only completed it when the weather started to become warm and dry. I’ll be wearing it next year.


The Rainbow Shirt

Or the Skittles Shirt, as my daughters like to call it

Some four years ago, Peter Lappin of Male Pattern Boldness revealed Micheal’s Crossword Puzzle Shirt. And I just knew that I have to have one too. Peter documented the name and manufacturer of the fabric well, so obtaining that was not an issue. I wanted this to be a fitted shirt, and my only fitted shirt pattern was McCall’s 8889. This has a hidden button placket, instead of a sewn-on placket in Peter’s version. Wanting to copy the master’s vision, I figured I’d set out to adapt my pattern to include a different placket.

This meant I would have to make a muslin to test the changes I made. Specially since this was in the infancy of my sewing days and I didn’t quite know what I was doing with pattern changes. The changes turned out fine and the crossword shirt was made.

I ended up with a great shirt, and a very fine muslin. A really well done muslin. Seemed like it would be silly to let it go to waste. Some short sleeves were added and it almost looked like a real shirt. But it was white. Very white. Boringly white. And I was not in the business of making boring garments. Something had to be done.

Since the whole shirt was already constructed, there wasn’t much I could do with pleats, bibs, etc. The only thing that I hadn’t finished were the buttons. And with that a plan was beginning to take shape; what if I use different coloured buttons?

This created a quest to find identical, but differently coloured buttons. That shouldn’t be too much of a hassle. Wrong. None of the fabric and quilting stores around here had more than 4 colours of the same shirt buttons. I even had my daughters go through pots of old buttons in one of the stores, trying to find matching ones. Nothing.

il_570xN.611246581_nvvo

All the way from Thailand!

I decided to continue the quest online and came across these at an Etsy store. Only being $6 for 100 buttons, I felt that I could not go wrong. Patience was required, as they had to come all the way from Thailand!

When they finally came, there were many more colours than I had expected. I was hoping for some 7 or so that would complement each other well. Here I was with over 20 different colours and all were fun. How to decide which colours I should use?

Many different combinations were created by each member of the family. One thing we figured out quickly was that we all had our own favourite ones. Then it came to me. Why limit myself to the usual 7 buttons down the front? If I have so many colours, why not use them all? And with that, The Rainbow Shirt was born!

Measuring the placket on the front and looking at how many buttons I could use, I came to the conclusion that 1 inch spacing would be good. This in contrast to the normal 3 to 3½ inch spacing you see on shirts. That would be a lot of buttons and button holes. And after 23 button holes and 23 buttons, the shirt was done.

rainbowI wore it to that year’s Christmas dinner of my partner’s company with some boring slacks and a sports jacket. Lots of remarks, and all very positive. Great evening, good company, nice food, and a lot of dancing.

The next day I threw it in the laundry, so it would be ready for the next time. And when that next time arrived I noticed something alarming. This was a fitted shirt. And the pattern fits me nicely. And I made the shirt precisely to the pattern. Using nice muslin fabric. That I hadn’t washed before using it! The shirt had shrunk quite a bit during the laundry. So much so that I couldn’t close the collar anymore, and there was absolutely no ease across the chest. I really could not wear the shirt anymore. After all this time spend on it (do you know how long it takes to sew on 23 buttons?) the shirt was relegated to the back of the closet.

That was three and a half years ago. Ever since the day I put it away it bothered me. It was a good shirt. It deserved a version 2.0! So a couple of months ago I finally bought some nice white shirting fabric and I set out to make the exact same shirt. This was a new experience for me. I had remade a RTW shirt, and remade design failures. But I hadn’t made a shirt I had already made exactly like the original. And I had to, I didn’t feel like there was anything about the shirt I should change.

The construction was a breeze. The only things I did differently from my normal shirt construction is that I added the button holes and buttons before attaching the front panels to the other parts of the shirt. With 23 button holes to make, it’s a lot easier to have a small piece of fabric to manoeuvre than the whole shirt. It just takes some precision to know where to start the first button and hole.

The only issue was that when I marked the top of the sleeve to align it with the shoulder seam, I grabbed a ballpoint that was not a frixion. How that pen ended up in my sewing accoutrements, I will never know. But my heart almost stopped when I saw that while ironing, the mark didn’t disappear. After some testing I found that Shout! and generous amounts of bleach will take care of it. The pen has been relegated to the waste bin.

I’m really happy with how this turned out the second time around.

And here are they both together:IMG_0908

Thanks for visiting!

Dogs

Time for another art shirt

It started at a dinner party last year. I was wearing my Singing Butler shirt and people were asking questions about it. My partner’s boss made a remark along the lines of “if I’d ever get a shirt like that, I’m sure it would be of the Dogs Playing Poker.” And so a challenge was started.

You see, this boss is a very conservative guy when it comes to clothes. Slack and sports jacket, maybe jeans and a sports jacket on Friday. My partner and I decided that this would be a great practical joke.

I didn’t really think this would be a art shirt, that painting is not something you think of when discussing art. Then I started to research it a bit and found out that it is actually a series of paintings, and some of them have recently been sold for well over half a million dollars. So I’m going to keep referring to this as an art shirt, even though it really was started as a prank.

I wasn’t going to spend too much time on making this a perfectly executed shirt, since it probably wouldn’t be worn very much. And it had to be a surprise. So with the help of his wife we took one of his shirts while he was on a business trip and took some measurements. With those I adapted a pattern a bit and started the design of the fabric.

A Friend in need small

We decided that there wasn’t really anything smart and funny we could do with the arms. So those would be made of a different, solid coloured fabric.

That just left the back and the front to be made out of panels cut of the painting. To get a better distribution, I compressed it horizontally somewhat.

I did want to do something fun with the collar. So I found some photos of cards, tweaked, mirrored and shaped them somewhat. It could work, or I could use the fabric for the sleeves if it didn’t.

And after some weeks of waiting, the fabric came.

IMG_0715
The construction of the shirt itself was rather easy. No strange construction needed, just a basic shirt.

I was going to take more photos of the shirt by the person actually wearing it. But when my partner gave it to him for his birthday, he actually took the packet home and didn’t open it until there. Apparently, he has worn it for his wife and she liked it. I haven’t seen it other than on a bad mobile phone picture. So here is the only photo I have of the completed shirt (sans burttons):

IMG_20171117_214600411 (1)

Robots

It started with a visit to a small fabric shop to kill some time. Not finding anything I was looking for, I just browsed through everything they had. Two bolts of cotton caught my attention. They were a little heavier than your normal shirting or quilting, and looked like they could work well for shorts. And they had two, which were complete opposites of each other.

I like fabrics where I have different colour version of the same pattern. You can always make fun garments where a pocket, placket or collar is different from the rest.

And then I realised that since a pair of short is really just made up of pairs of identical parts, I could use two fabrics to make one pair of shorts. Feeling all giddy about the prospect, I quickly bought a yard of each. Once home, they went through the ritual three washing and drying cycles to stop any bleeding and get rid of the shrinking.

And then I saw that they weren’t exactly opposites. The dark one was actually a very dark navy colour, and the light one had black letters. The difference was enough for me to halt the project right there.

Or was it?

I tried going online and find a version of the Japanese Kokka fabric. A black version did exist, but no yardage was available as far as I could find. But with all this searching I did find a different print by Kokka, on the same type of fabric. And this I could find in both a white and black version. Hello robots!

IMG_20170725_211439_611

I liked this even better for the project, and bought a yard and a half of each. Since it was getting further along in the year, normal pants seemed to be more practical than shorts. (Although I now realise that ‘practical’ is a very relative term when it comes to these pants.)

The pattern would be Jutland Pants, by Thread Theory. I’ve used this pattern before, but always for shorts. This would be the first time I’d use it to make full pants.

When I make this pattern, I start out with the dart in the back panel and go on with the welt pockets. While looking at the panels, I knew I had to swap the welts too. And those robots, could they be matched across the welt? Since the pocket crosses the dart, this is not a standard pattern matching problem. I would have to make the dart in the welt too. A pattern was designed and I did some experimenting. But in the end it turned out that there would just be too much bulk with this fabric and I abandoned the challenge. I did manage to match one robot across the welt.

The front pockets were much easier.

Front pocketAnd the rest of the construction presented no problems. I don’t really follow the instructions and construct the pattern in my own way. First finish the back panels and sew them together. Then finish the front panels and construct the fly. After that sew the outside seams, followed by sewing the whole inside seam in one go. Then the belt loops and waistband. And finally the hem.

I chartered my step daughter to take some photos of me wearing it.

I’m not quite sure how much use they will get. Yet, I’m tickled pink with having made them, and just having them. It was a great project to work on.

The Singing Butler

After my first Art Shirt worked out so well, I needed to make another one. I knew this even before I finished making the first. This is in stark contrast with the first shirt. I don’t really recall when I decided to try to make that one. It started probably with seeing the Great Wave painting and then slowly figuring out that I could make a shirt with that.

Since I already knew I wanted to make another Art Shirt, I had to find a subject. This turned out a lot harder than the the process of starting with a painting and moving towards a shirt. Obvious classics like Starry Night and The Scream didn’t appeal to me. Those have been used for too many things by too many people.

Then one night while browsing through classic paintings I came across The Singing Butler by Jack Vettriano, and I knew I had a good one. Nice composition with the subjects in the middle, and enough flexibility for me to do things with.

the-singing-butler

Just like with The Wave, there were items I could use for the collar; the umbrellas in this case. But where I could use a mirror image of The Wave for the back of the shirt, I didn’t think that would work well here. I didn’t want to have two couples on a beach. That meant that I would have to create an empty beach. This would add significantly to the required Photoshop work.

back
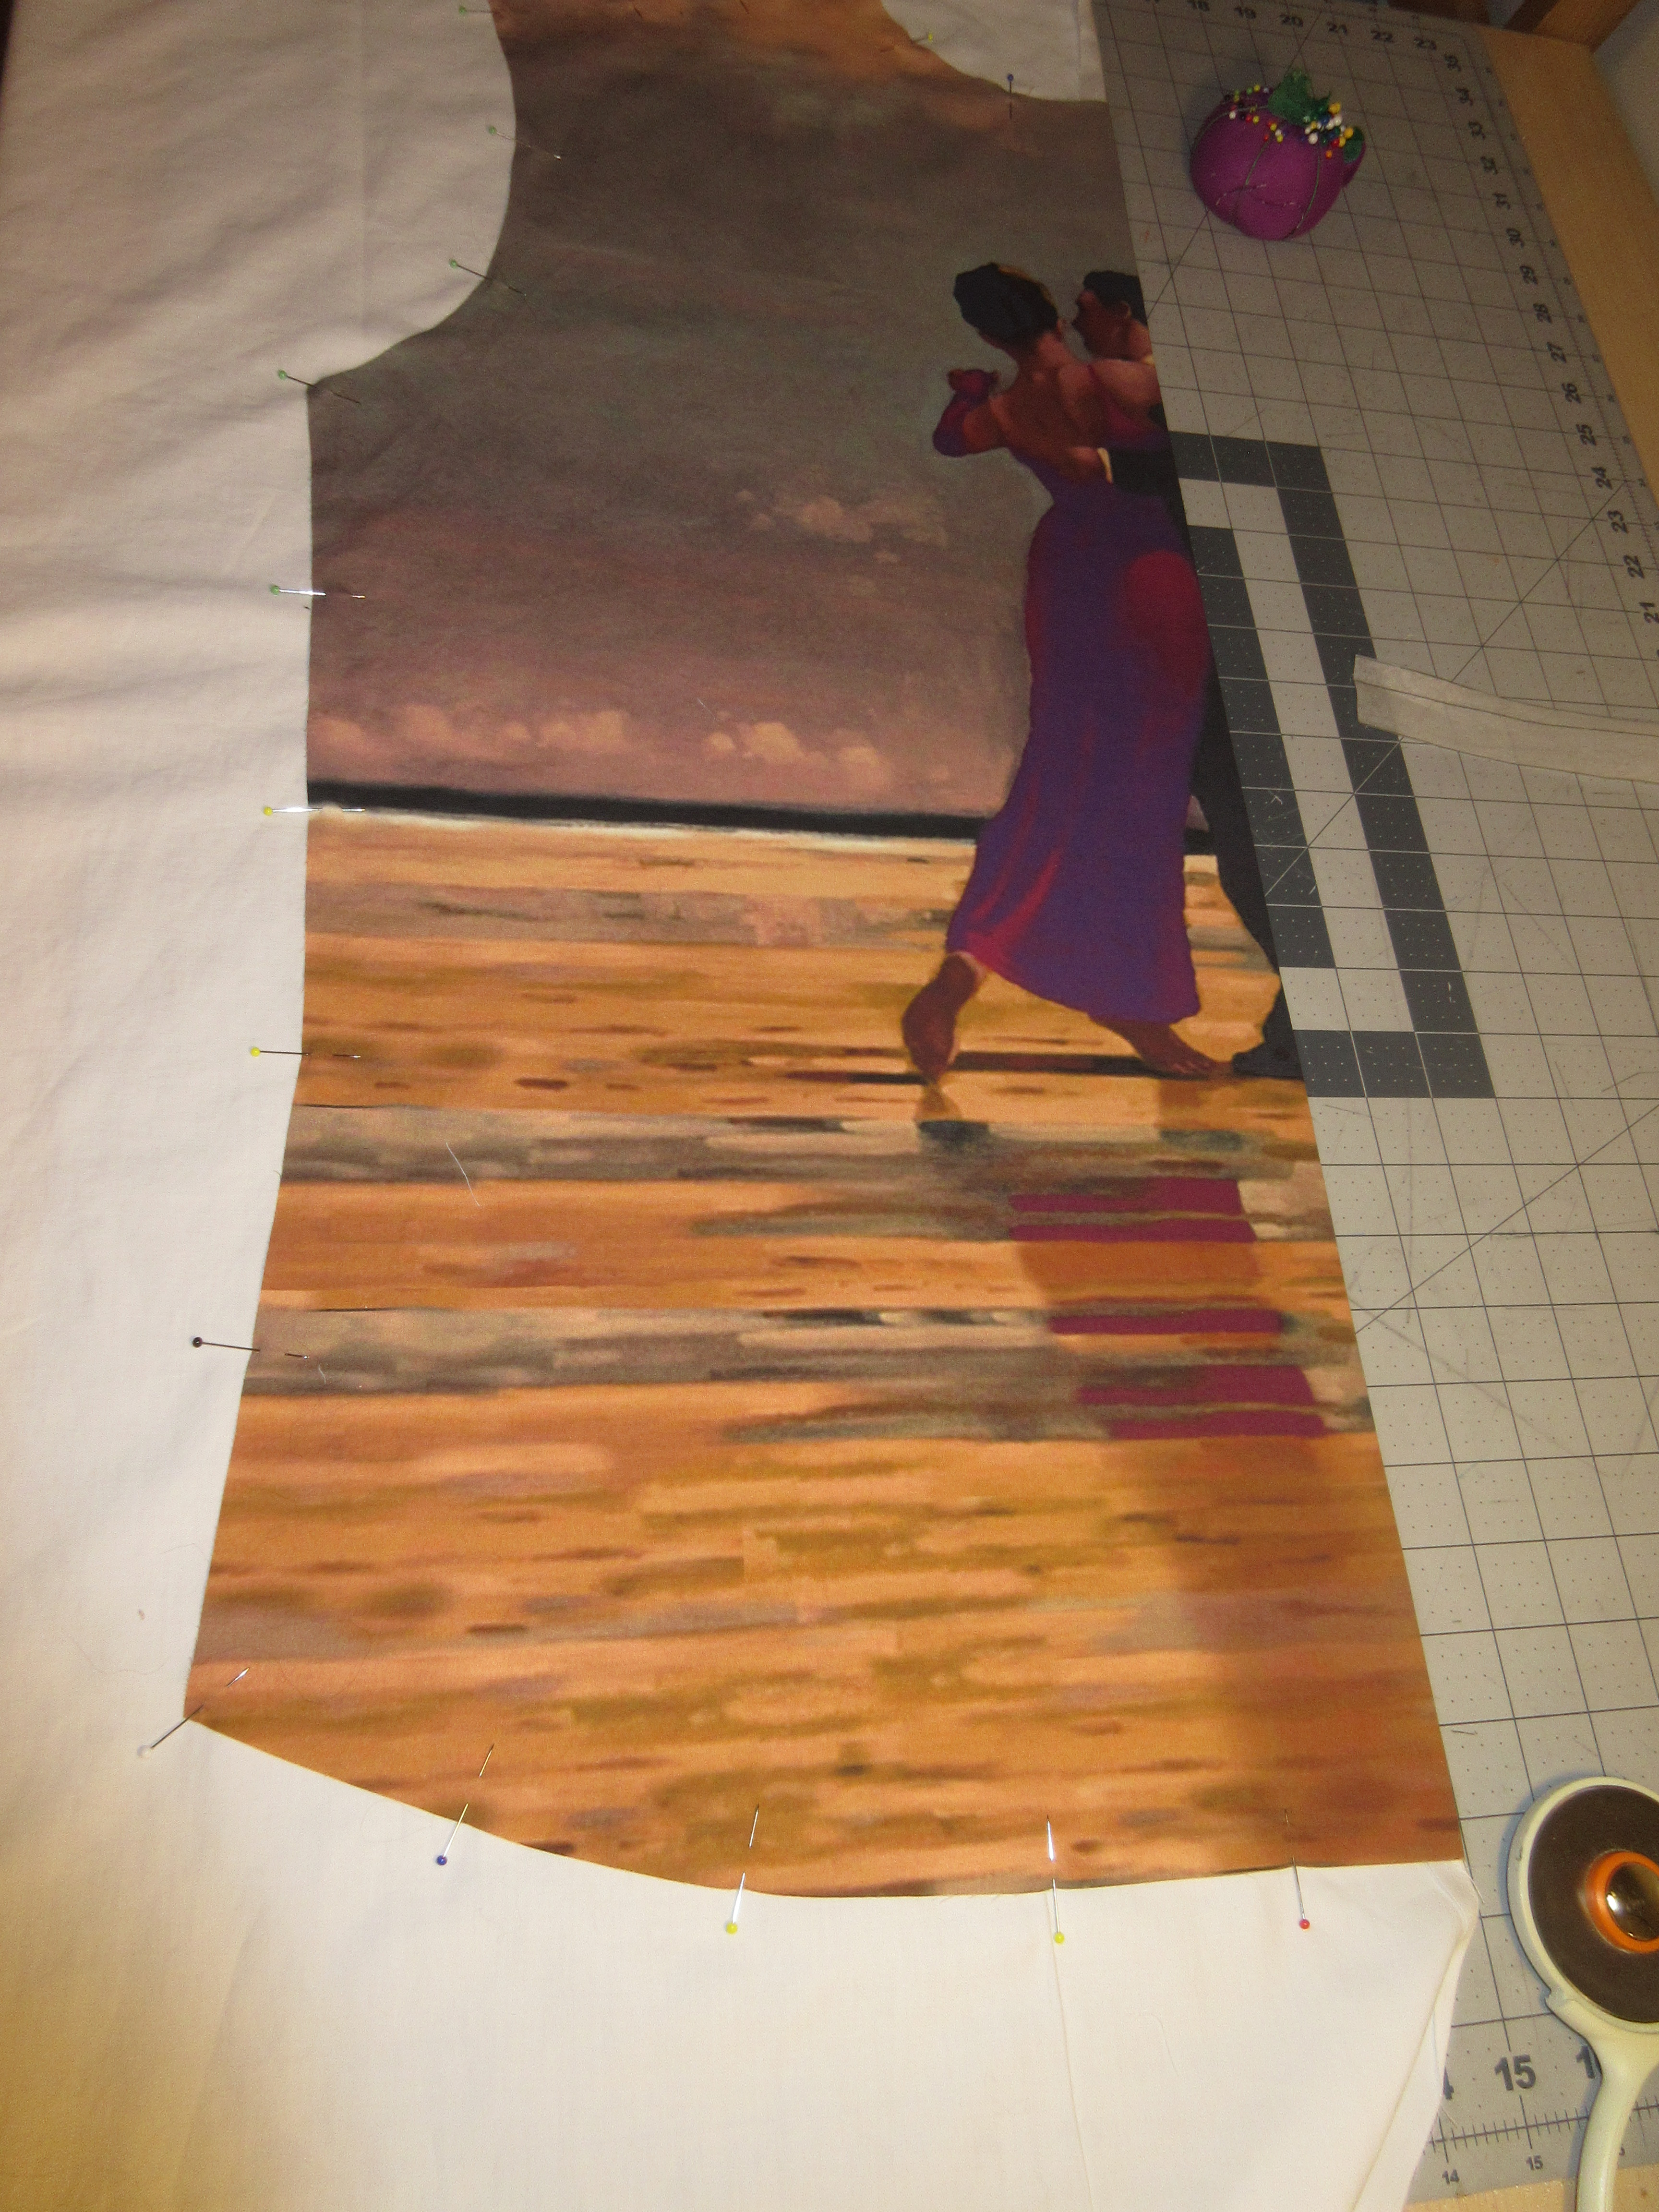
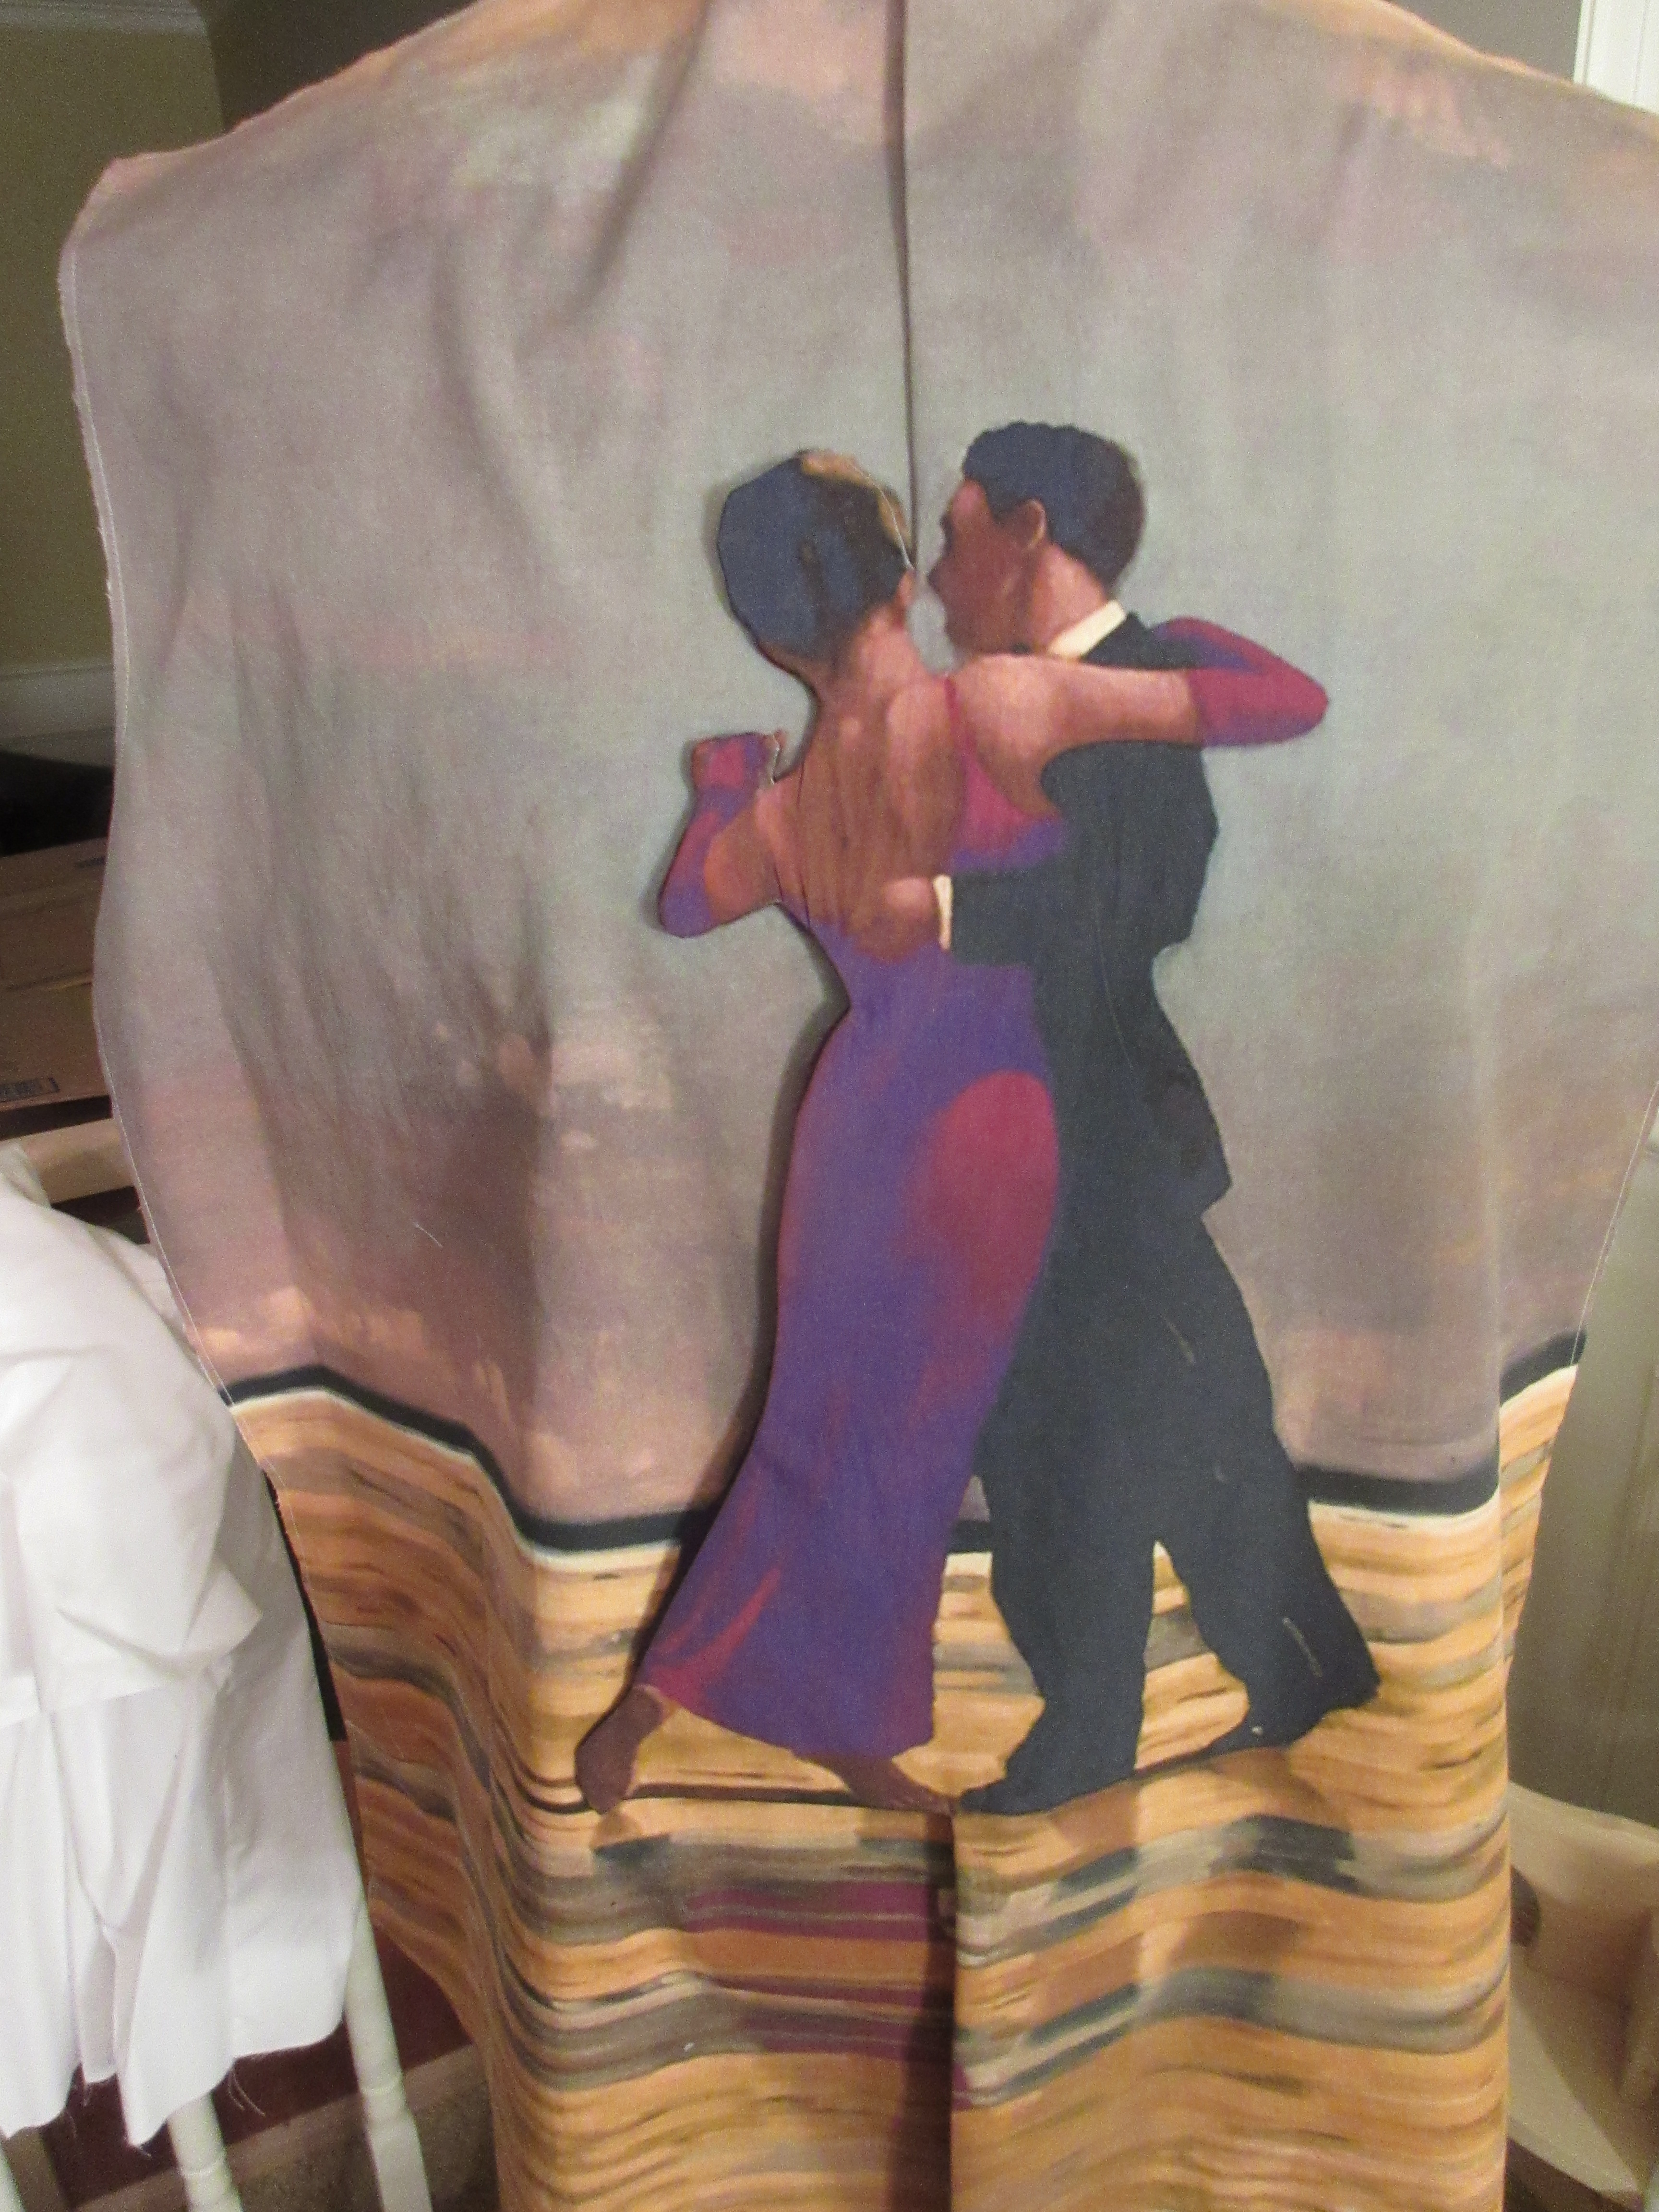
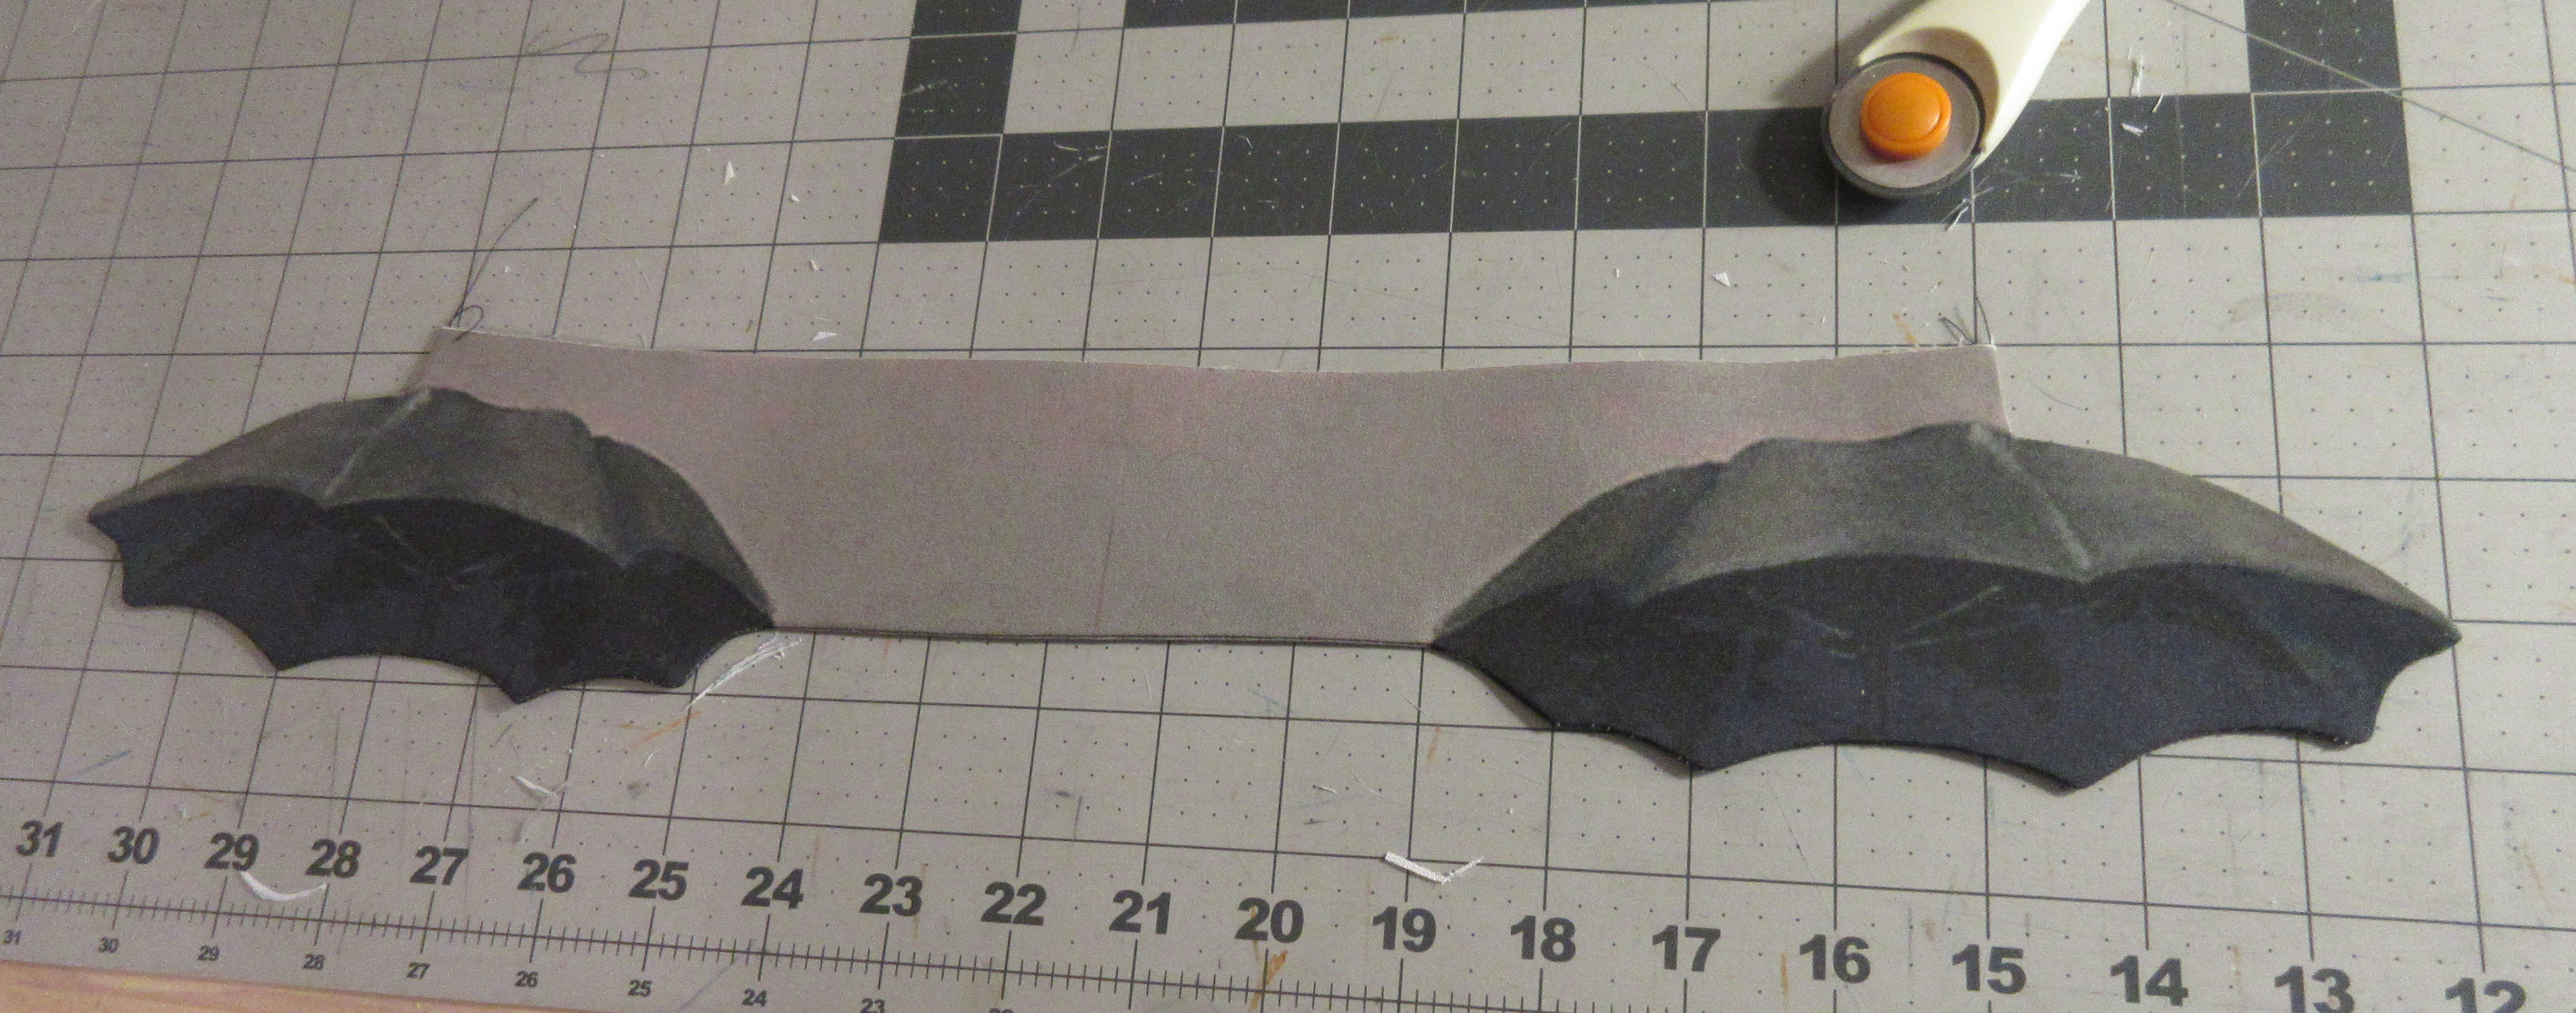
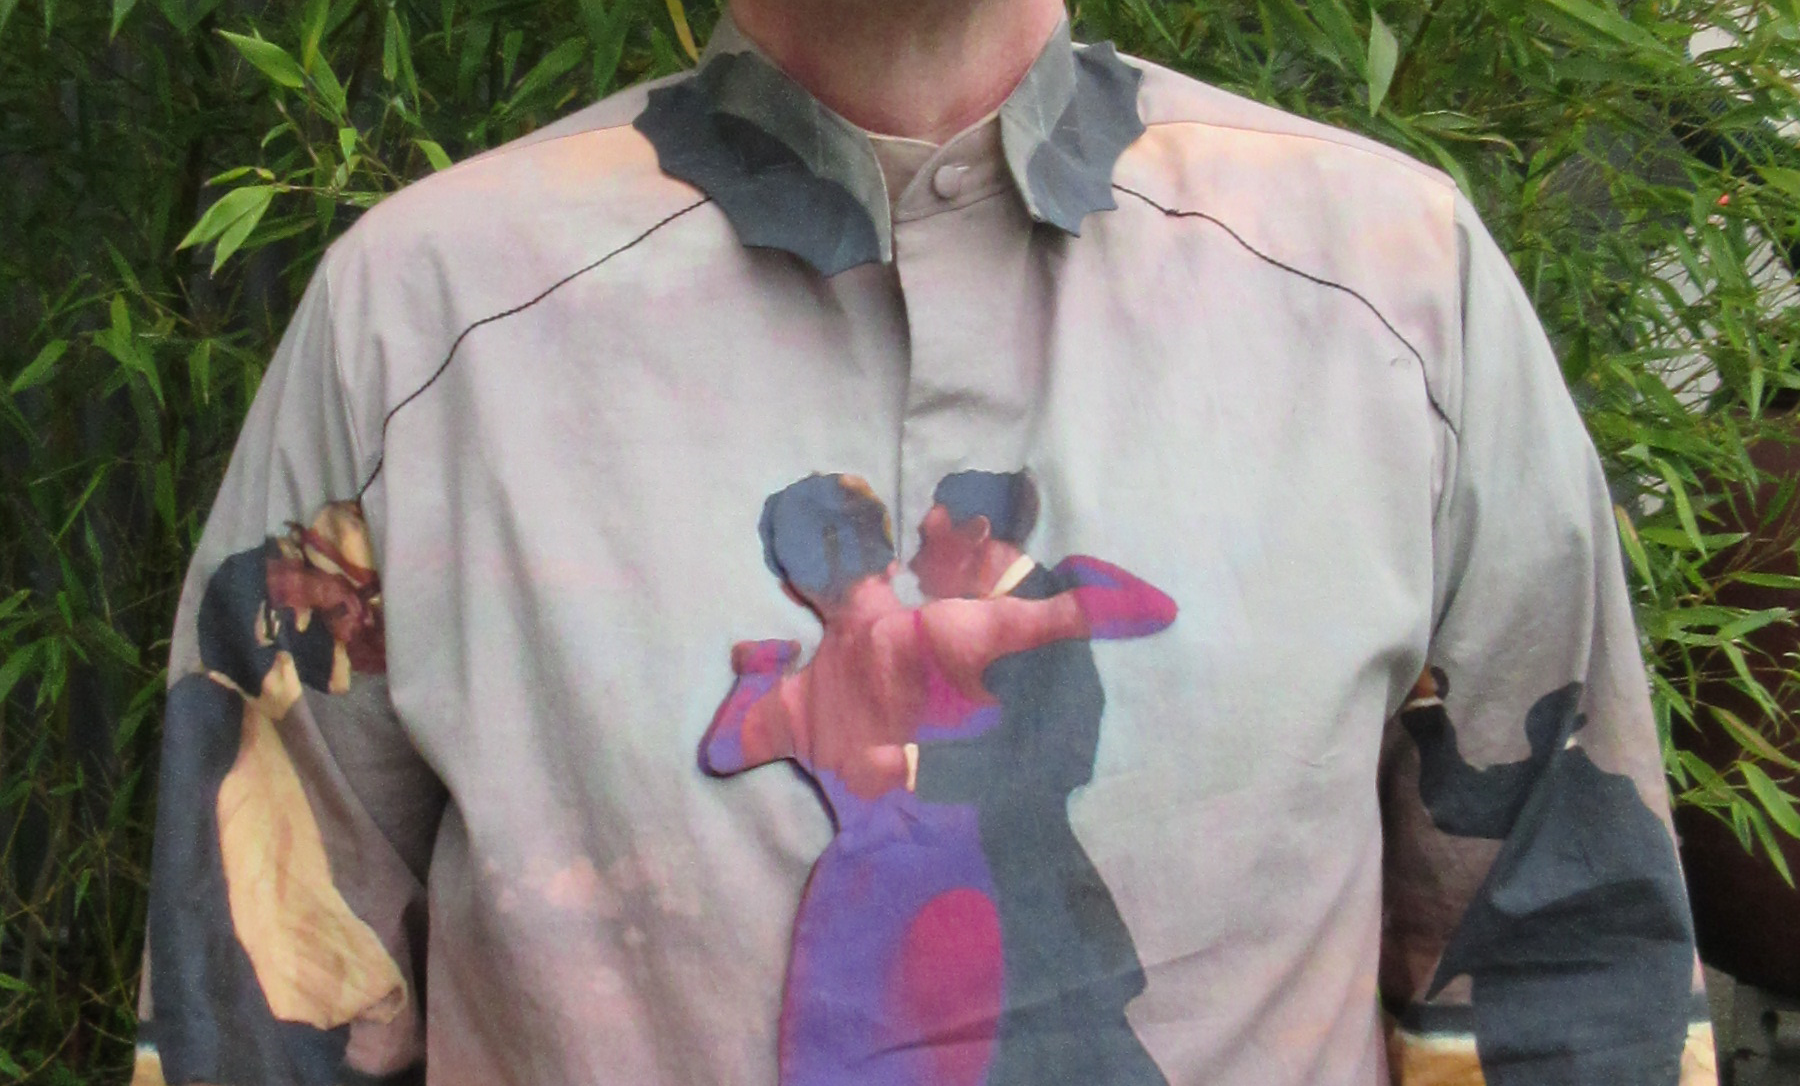
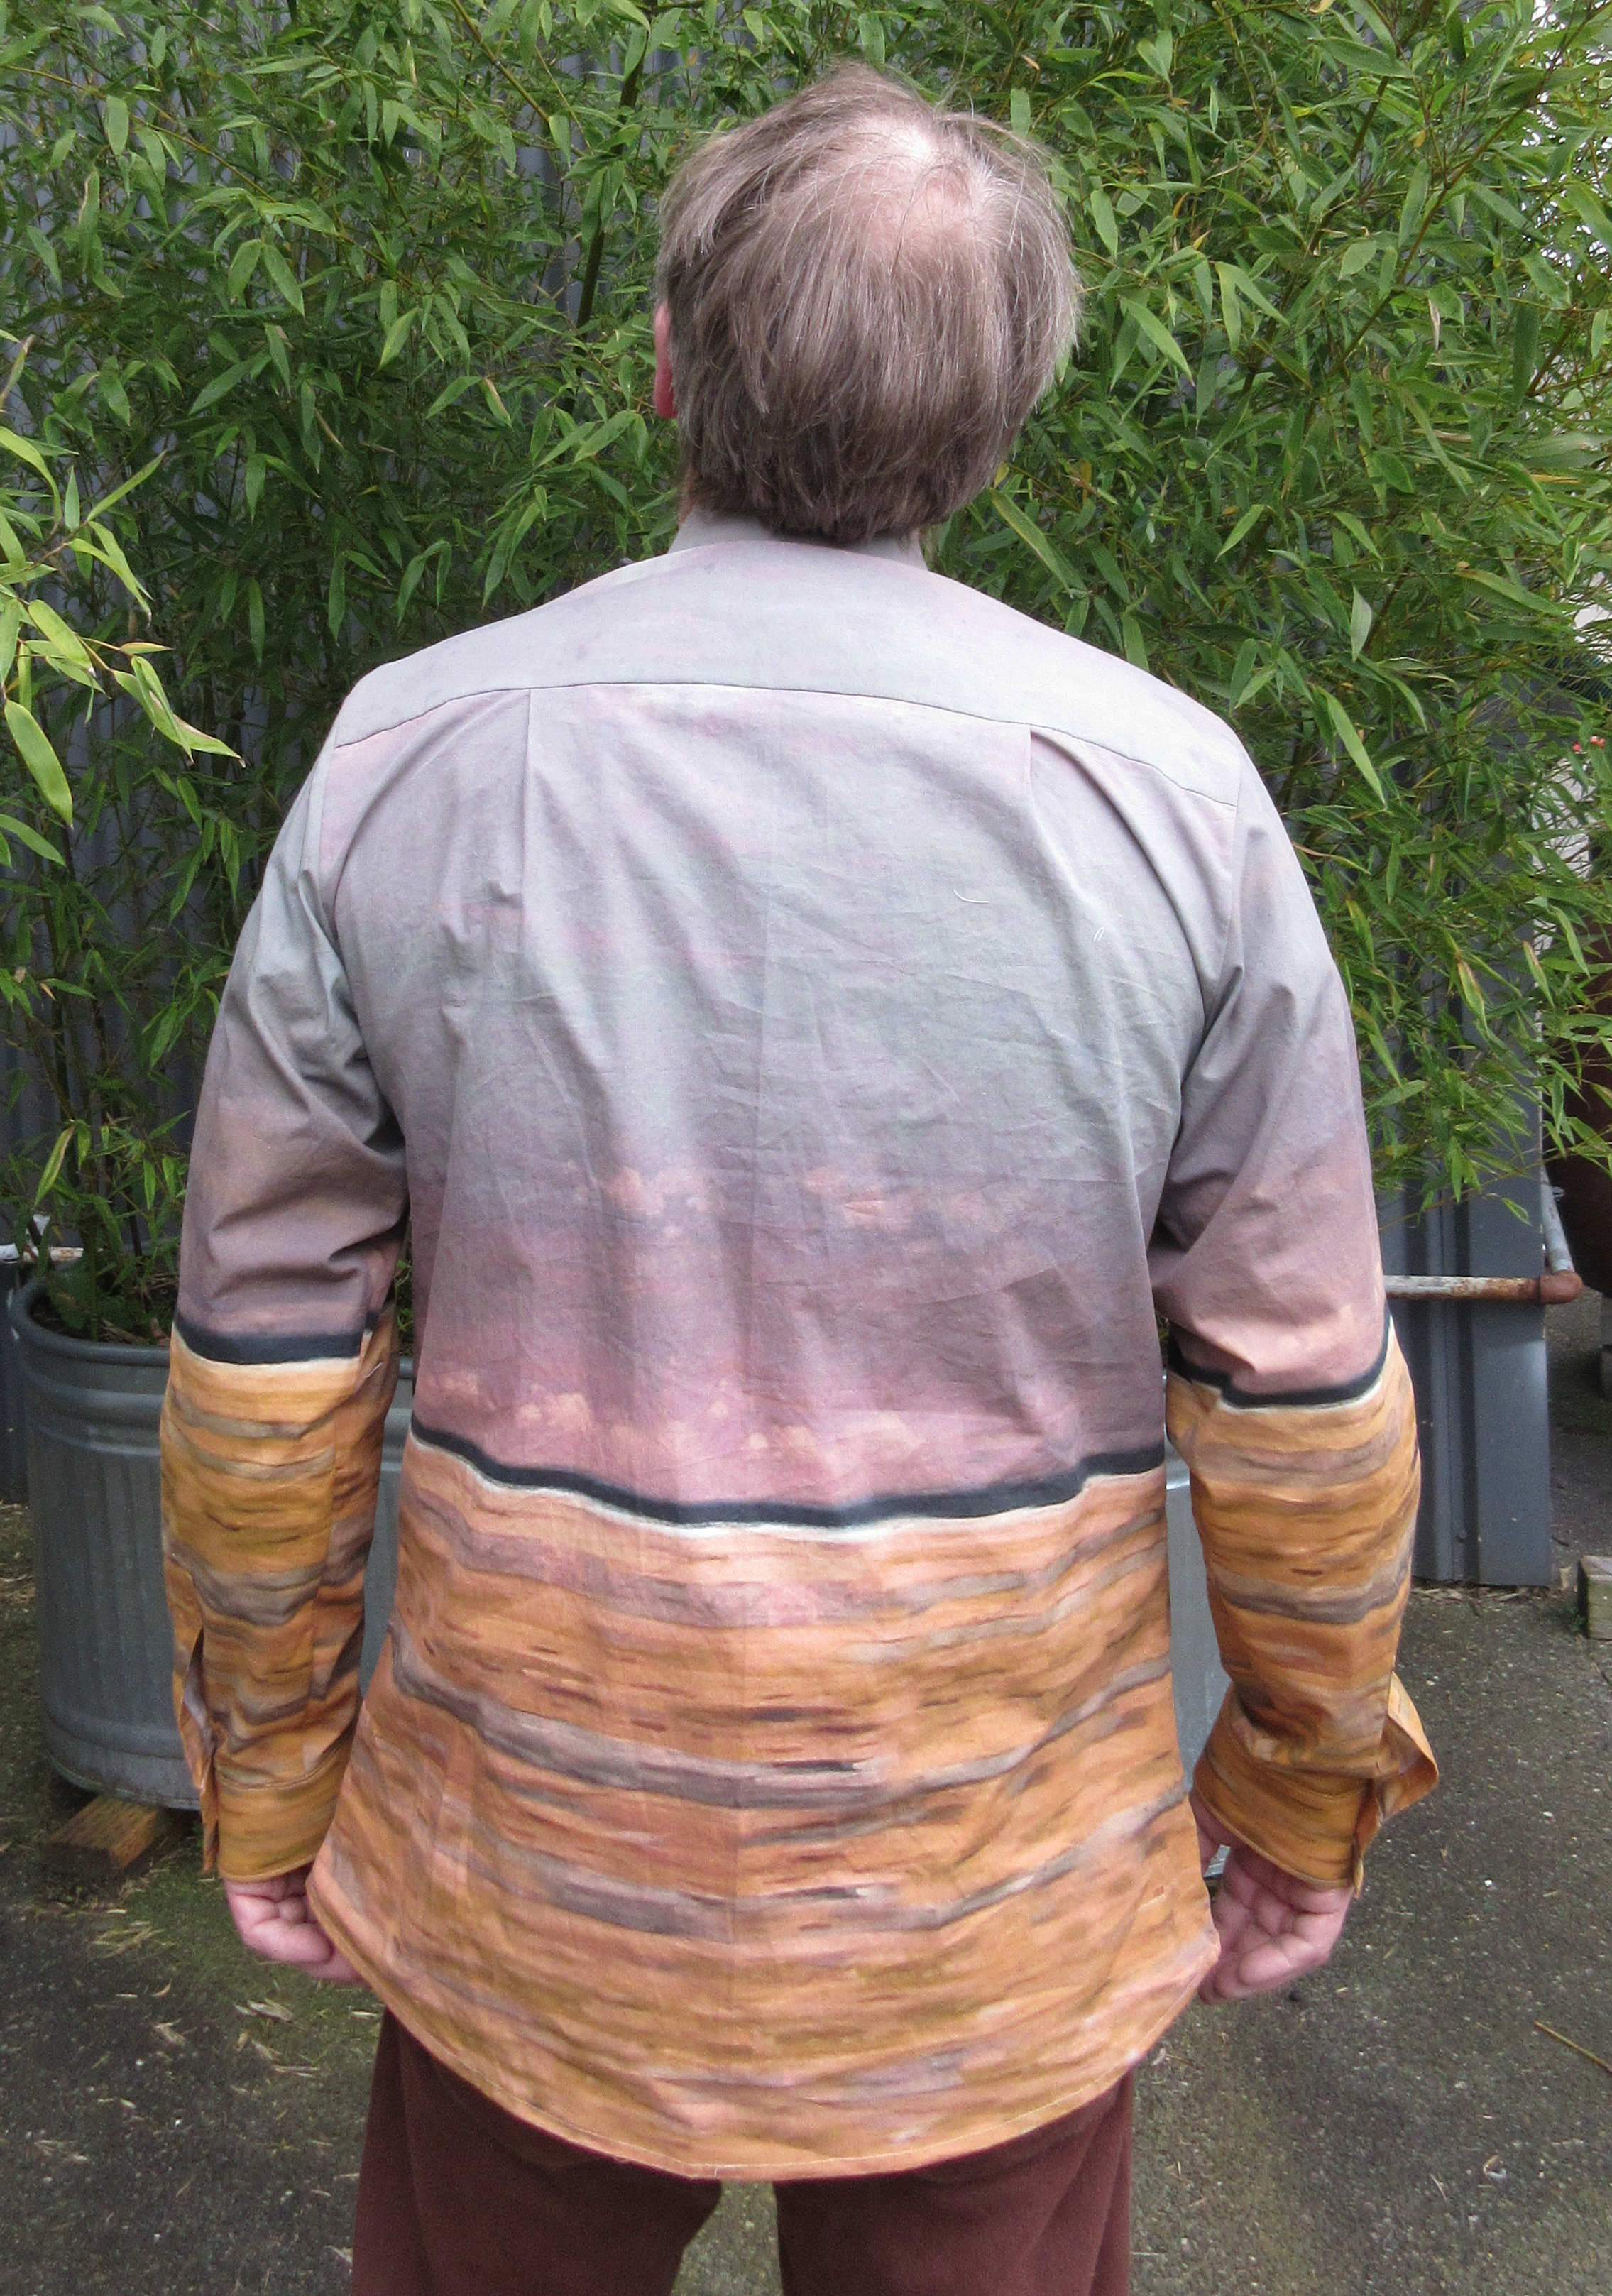
After measuring I realized that if I would tuck the shirt in my pants, I would cut off the couples’ legs. More Photoshop work to add more beach at the bottom of the painting, including new shadows and reflections for everyone. The maid and the butler would be moved to the sleeves, and the umbrellas to the collar.

the-singing-butler-Total (2)

Full 3 yards of fabric design

With those general decisions made, I could start with the design of the fabric. This phase went pretty well, and the way it is painted made tweaking it not all that hard.

Then I had to make a decision on what to do with the front closure. I considered having the two sides split between the dancers, with the lady on the right and the gentleman on the left. The way their arms were held made that too difficult. I figured I would put both the dancers on the left front of the shirt and have the closure follow the outline of the lady. Then how to close then shirt? Showing buttons on the front would ruin the image. Using something like velcro would never sit right. Hidden buttons it would have to be. But I also didn’t want to have any top stitching show.

After researching this and even asking for ideas on The Cutter and Tailor forum, I decided on making a double-layered front with buttonholes in the hidden layer. I tested this first with a muslin and it worked pretty well. Making the whole front a double layer keeps the buttons from pulling the fabric into strange twists.

Now I would have to wait a good three weeks for the fabric to be printed and arrive at my doorstep.

Since the button placket is basically the whole dancing figures, I interfaced that, and the band above and below it.

IMG_0343

Applying the interfacing to the right front. The additional inner layer is on the left.

IMG_0344

Joining both layers of the right front so I can treat them as one.

IMG_0345

Stitches within the seam allowance. This will be cut off once the shirt has been constructed.

For the left front I first had to make the inner layer, complete with the button holes in strategic places. This inner layer is partly made of a mirror image of the front. Once this was done, I could join both along the couple’s left side. Basting the layers together by hand first while checking the position of the layers, and going ever so slow on the machine made for a good result.

basting

Basting the layers together. Button holes are already made

IMG_0350

Small stitches and lots of patience.

IMG_0351

Draped the fronts on the dressform

Next task was the collar. Although this one was more elaborate than your average collar, it was still a lot easier than making the one for The Big Wave. One umbrella on each side and hopefully I had designed the distance between them correctly. This brings up an interesting tidbit; when you design the fabric for something like this, you have to keep in mind that the fabric will shrink before you get to sew with it. Knowing that your collar needs to be 19″ long, tip-to-tip means that you have to create the design to be 19″ times shrink-factor. Turning the collar was relatively easy.

Collarinterfacing

Cutting the interfacing

collar

Collar ready. Just over 19″, good enough.

And this is where the smooth sailing hit the cliffs. After attaching the collar to the stand and then to the shirt, I didn’t like the small, minimalistic collar stand I had envisioned. And the angle of the umbrellas didn’t look quite the way I wanted them. I was so upset with the result, the seamripper came out immediately and I took it off before taking a photo. Here is the offending item:

collarandband

Wrong, wrong, wrong.

the-singing-butler-Extra

Two more yards of fabric

After putting that aside, I focused my attention to the sleeves. And found another set of cliffs. I had swapped the width and height measurements for the sleeve parts and designed the fabric wrong! The parts were wider than high, while the opposite is required. Now I knew I had to redesign the fabric and order some more. Things like this is why these projects always turn out to be rather expensive. I did make sure to include two new versions of the collar, some extra cuffs and collar stands.

Of course, this gave me some weeks to focus on other things before I could continue with the project.

When the new fabric arrived, was washed three times and ready for use, I had to decide how to mount the sleeves. Since I had to order two yards of fabric, I had designed the patterns for the sleeves with a lot of extra space around them. This way I could change where the maid and the butler would end up on the sleeve. To figure out the final placement, I basted the sleeves to the body without cutting the fabric out first. It seemed an easy idea at first, and turned into more work than I anticipated. Sewing without seam allowances to line up is harder than I thought.

IMG_20170407_131618921

Following a hardly visible chalk line.

It took a couple of tries to get them lined up the way I wanted them. The rest of the sleeve construction went without a flaw. As you may have noticed, I forgot to include plackets in the fabric design. Luckily I could use the incorrectly designed sleeves to cut the plackets from.

Now that I had the sleeves in place, I had to decide on how to make the umbrella shafts. While going through the creation of the fabric, I had deliberately photoshopped them out of it. This so I could later add them when the placement of the sleeves and collar were finalized. While researching this, I came across a technique called ‘couching‘. One site I found said you could replace the bottom thread with the decorative thread, adjust some tensions, and sew it upside down. Never too shy to experiment, I tried this. First tries were not so great, but after playing with the settings some, I really liked the effect.

Since the decorative thread is on the bobbin, you cannot see the right side of the fabric while you’re sewing. I had to draw the line I wanted to follow on the inside of the shirt by poking pins in at regular intervals and connecting these. Then put it under the machine and hope for the best.

With the shirt construction completed, all that was left was adding the buttons in the right place. This is where my pattern matching obsession really helped out. I just had to look where in the pattern the button hole was and then just add the button in the corresponding spot on the other front.

IMG_0464IMG_20170413_215728_222

Closing the buttons is something to get used to. The buttonhole only goes through the first layer of the front, not through the second one. So you cannot manipulate the button once it is partly through the hole. Not extremely practical, but it looks the way I wanted it.

Here are some photos of the completed shirt.

frontsiderightBackshirt

me

Happy shirt maker

Thanks for reading. Reactions are appreciated.

Waistband

A couple of weeks ago I  posted a photo on Instagram of a pair of shorts I had made with Thread Theory Design’s Jutland pants pattern. One of my followers asked how I constructed my waistbands. Since I like the pants so much, I made another pair and I decided to document this aspect of the construction and share it here.

This particular pattern uses a self piece and a liner to create the waistband. I have yet to make a lined pair of pants, so I just use a doubled piece of self fabric for the waistband. These are summer shorts and made from light fabric. To give it more structure and strength, I use a fusible hair canvas inside. The hair canvas is cut without the seam allowance, so as not to add any additional bulk.

After this prep work I pin the waistband to the pants. I start at the left side of the pants, since the hair canvas can add some bulk to the end seams. I want this bulk to be behind the fly, on the right side of the pants. While pining, I make sure to stretch the waistband some, because I want it to be what determines the fit, not the part of the pants below it. I have some earlier examples of pants I made where the band is looser than the pants themselves. Not a good thing.

Since I have the hair canvas cut without the 5/8″ seam allowance, I can use it as a guide to my stitching. I stop and start right at the edge of the pants, not the edge of the waistband, which sticks out by a seam allowance. Below you can see the inside of the pants with the waistband folded open behind it.

After this I trim the ends of the zipper off and the work on the waistband ends begins. Working from the inside of the pants, I fold the fly of the pants under a 45° angle back onto itself, right next to the seam we just stitched. I then hold it there in place with a pin. Make sure you don’t fold it over the seam stitching because we’ll be sewing over that line again in a moment and we don’t want to catch this fabric. We just hold it here so it is out of the way. We then fold the waistband over this and pin it in place. The waistband is now folded against the crease we pressed into it earlier.

I now turn the whole thing over and add two more pins to keep the waistband nicely folded onto itself. I’ll be stitching through all the layers and I don’t want it to shift. Then I put it under the machine, aligning the needle exactly with our previous stitching. The stitching will be from a couple of inches in to the end of the waistband.

I will lock the beginning with a couple of backward stitches and stitch along the previous stitch line towards the end. It is key to go just to the end, but not beyond it. To make sure, I stitch to almost the end, and then go one stitch at a time. I’ll lift the foot, and look between the layers of the waistband to see if I can see the needle. At first you’ll see the fabric of the fly between the layers of the waistband. But the needle will show when you have just gone beyond that fabric.

It is then time to turn the fabric a quarter turn and sew straight across the waistband. Finish off by locking the stitches with a couple of backwards ones.

Now I remove the pins and trim the corners and all the excess fabric to reduce bulk.

Next, turn it right side out and use the point turner to get the corners crisp. You should have the side of the waistband nicely line up with the side of the fly. And the inside of the waistband is now stitched to the pants for a couple of inches.

Now it is time to press the inside of the waistband under, just along the stitch line that attached the outside of the waistband. Press this well, for it will make for an easier job top stitching and it will make the end result look so much better. I like to pin the inside to pants at strategic intervals, just to make sure the waistband fabric we’re catching with the top stitching isn’t moved ahead of the rest by the feed dogs.

Now all that is left is running the top stitching along the whole waistband, making sure we catch the inside of the waistband.

And with that, the waistband is done.

Bartack the belt loops in place, make the buttonhole and it’s done.

Please let me know if you found this useful.


A Blog

I have been keeping my sewing adventure posts mostly in Instagram. But since recently someone asked how I did something, I figured I needed a different medium to share some things. So a blog has been started. I’m not sure how often I’ll be updating this, as I’m not really the worlds most prolific talker.

The title is an immodest hint of where I want to get to.