When I’m busy with a difficult project, I sometimes take a little break to make something easy and familiar. This was the case with my winter coat project too. I felt that I had done enough pad stitching and basting, and needed to finish something. With plenty of fabric in my stash, it’s easy to just start a quick shirt.
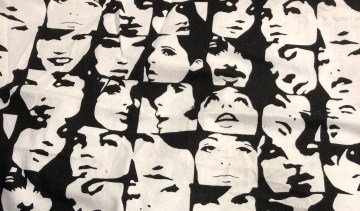
I’ve had this fabric for a while now, and even found some contrasting versions of it too. So I figured I’d make a quick shirt, with a contrasting collar. Maybe a contrasting front placket too.
 I cut out the fronts, making sure I would match the pattern in the front. Then cut out the contrasting placket, and matching that to the underlying front pieces too. To make sure I had everything lined up correctly, I laid it out on my cutting table. And then it happened; my brain started going off the deep end again.
“This looks really nice and symmetrical. Why shouldn’t I do that to the back too?”
“Surely the back of a shirt can have a placket!”
“That would create even more symmetry in the shirt!”
That didn’t seem too bad. I got the rest of the pattern pieces out of my envelope and started unfolding them. And then looked at the sleeve and sleeve placket pieces…
“Another placket! That should be contrasting too!”
“If we’re splitting the shirt into two halves along the front and back, shouldn’t we do that along the sides too?”
“Can I make a placket all the way along the sleeve?”
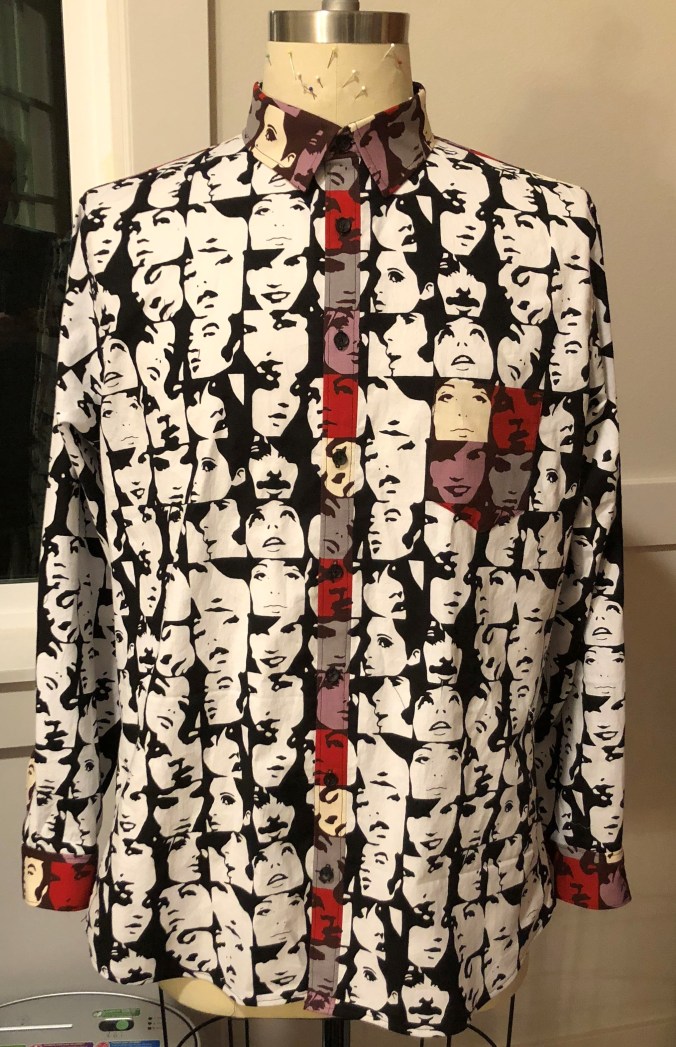
And thus another challenge was born. My mind seems to have this quality to make life difficult for itself. I had to figure out how I would make a placket in the sleeve that would run all the way up. Since the normal place for the placket is not in the middle of the sleeve piece, and I wanted the placket to run all the way up to, and beyond, the shoulder, it would have to be at a slight angle. And only the first 8 or so inches would have to be open, the rest would just lay on top of the sleeve fabric. I figured this would be best with a two-piece sleeve placket.
 Of course, all of this would have to match the fabric pattern. So the challenge began of getting each piece out of the limited amount of contrasting fabric. With the placket on the sleeves being at a slight angle, that was not as easy as it initially sounded. I had to change how to cut the sleeves from the main fabric to accommodate what contrasting fabric I had left. And even then, trying to get the collar and collar band to fit in the remaining fabric almost didn’t work.
The construction of the shirt was relatively easy. The ‘placket’ in the back and yoke is just a strip of fabric that is top-stitched onto each piece. The part of the side plackets that’s on the shoulder is sewn into the shoulder seam on one side, and top-stitched on the other side. Getting the pattern-matching correct here took a little effort, but not too bad.


The sleeves were more involved. I first cut out a strip of fabric that would match where it would end up. The bottom part of this had an extension on one side to accommodate the opening part.
A sleeve placket is sewn on the wrong side of the fabric, and then folded into place. This placket had to then exactly match the underlying pattern of the sleeve. To accomplish that, I basted it first. This gave me the opportunity to check the vertical alignment. The horizontal alignment doesn’t have to be too precise, because you can adjust that with where you make the fold by the initial seam. Sew a little inside the intended line and you have some playing room. Top stitching needs to be done in two phases, one above and one below the opening of the placket.


I really like the contrasting ‘stripe’ on the back and the sides. It is not something I would do on all my shirts, but I think it works well on this one. A little splash of colour in the monochrome theme brightens it up some.


One pocket from the contrasting fabric was all that I could do, there just wasn’t a matching piece left for the other pocket. And I think that looks fine.
Thanks for reading!

What an amazing idea! I love your vision. That sleeve is mind boggling! 👏🙏👍👏
LikeLike
Love your planning and thinking to make an ordinary shirt/pattern into something so special. I love color blocking and contrasting strips of fabric!!!
LikeLiked by 1 person
Thank you!
LikeLike